Brilliant Ideas and Suggestions Requested: Scuppers

This is the place to post your ideas, thoughts, questions and comments as relates to general boatbuilding and reconstruction techniques and procedures (i.e. recoring, epoxy, fiberglass, wood, etc.)
Post Reply
User avatar
Tim
Shipwright Extraordinaire
Posts: 5708
Joined: Tue Apr 01, 2003 6:39 pm
Boat Name: Glissando
Boat Type: Pearson Triton
Location: Whitefield, ME
Contact:

Brilliant Ideas and Suggestions Requested: Scuppers

Post by Tim »

One of the projects I will be beginning soon on Glissando will be a complete redo of the original cockpit scupper arrangement. The old stuff has got to go.

I have purchased some nice bronze scuppers from Spartan Marine that I plan to install in the same location as the existing molded fiberglass monstrosities at the forward end of the cockpit.
Image

As you can see, the bronze casting has an angled, tapered head. The idea is that I need to create a countersink-type hole, or a larger opening into which the scupper can sit flush and be secured with epoxy mush. Creating this countersink, or hole, is complicated by the tightness of the location in which I will need to work--the cockpit walls on two sides will prevent the use of many typical tools I might ordinarily choose to use.
Image

I have some thoughts--nothing concrete yet--but am interested to see if anyone had any great ideas or suggestions to make the job easier. Many heads are better than my ole' noggin!

Thanks!
---------------------------------------------------
Forum Founder--No Longer Participating
dasein668
Boateg
Posts: 1637
Joined: Thu Apr 03, 2003 9:09 am
Boat Name: Dasein
Boat Type: Pearson Triton 668
Location: Portland, Maine
Contact:

Post by dasein668 »

Could you try cutting a larger opening with a hole saw on a flexible extension? Or, frankly, what about that honkin' right angle drill you got recently?
Figment
Damned Because It's All Connected
Posts: 2847
Joined: Tue Apr 08, 2003 9:32 am
Boat Name: Triton
Boat Type: Grand Banks 42
Location: L.I. Sound

Post by Figment »

Wow. The minimal flange sure makes this interesting. It'll be durn near impossible to set those things without causing some damage to adjacent finishes. Having that big honkin access hatch so close doesn't make things any easier, either.

So since we're talking about some nasty destructive work, I'm thinking.....
you'll want the top edge to be flush or even slightly recessed into the cockpit sole.
Tim, as I recall from my readings of the Glissando restoration, you laminated some plywood onto the existing cockpit sole.... or something like that. What's the overall thickness of that assembly now? 3/4"?
Say you set the scuppers with the top face 1/8" below the sole.... that leaves 5/8" of meat to hook into. Not enough in my mind. So you'll want to goop some additional blocking in underneath and then start making your hole....

ah, heck. Unless you have a buddy in a machine shop who can make you a Supersize McCountersink bit to match the taper of those scuppers, you're going to be spending some elbowgrease with some patternmaker's rasps until you get the holes close enough that epoxy can hide the sins.

Are you thinking toward direct-epoxying for installation, or were you going to just use the casting to form the epoxy seat, and then remove and rebed with 3M 101 or something?

so much for brilliant solutions!
User avatar
Tim
Shipwright Extraordinaire
Posts: 5708
Joined: Tue Apr 01, 2003 6:39 pm
Boat Name: Glissando
Boat Type: Pearson Triton
Location: Whitefield, ME
Contact:

Post by Tim »

The hatch is no problem--it's currently loose and in the process of being replaced with a new aluminum. I'll just take it right out; this also gives me stellar access to the underside.

The actual holes for the existing scuppers are a bit further out from the corners than those cover plates would lead you to believe; the cover plates are not quite centered on the holes, and are also substantially larger in diameter than the puny scupper openings. This is what the holes look like with the covers removed (photo taken during cockpit reconstruction several years ago):
Image

It's kind of a matter of enlarging the existing opening, which already is sort of tapered and smooth. Maybe a little drum sander attachment at the end of a flex shaft...hmm. The big right angle drill will definitely be the the ticket when and if drilling a new hole is required. I will take great care to avoid damaging the surrounding cockpit sides.

I agree that additional reinforcement/thickness beneath for support will be required. That will be no trouble at all once I cut off the old fiberglass tubes. I expect to remove the old junk today. Details to follow.

Memory Refreshing Aid: Website Information on the Original Scuppers and Subsequent Repairs Thereunto
---------------------------------------------------
Forum Founder--No Longer Participating
Dave, 397

Post by Dave, 397 »

I'd use a die grinder, myself...you could alternate working from above and below if need be, and if there were concern of controllability while bevelling thinnish glass you might try a 40-grit flap wheel in a fairly small diameter. Other goofy things involving an anitquated piece of valve-seat cutting gear and a Milwaukee HoleHawg come to mind, but I'll save that cracked pot incase anyone needs to take a...

Dave
User avatar
Tim
Shipwright Extraordinaire
Posts: 5708
Joined: Tue Apr 01, 2003 6:39 pm
Boat Name: Glissando
Boat Type: Pearson Triton
Location: Whitefield, ME
Contact:

Post by Tim »

The Remains of the Day...(and the scuppers)

Image

I spent the day cutting out the old scuppers and figuring out how to ultimately proceed. Junk, junk, junk. I am thrilled to be rid of this ridiculous garbage.

As is usually the case, the solution to the new scupper installation issue became rapidly apparent as I worked.

As it turns out, the new scuppers are exactly 2-1/2" across at the top. After cutting out the old scupper trees, I decided it would be pretty easy to cut a 2-1/2" hole in each corner, and go from there. The new scuppers are designed to be secured in epoxy--and will be--so once the large hole is cut, I will add backing as necessary to create sufficient strength and thickness, and then set the scuppers in a thickened epoxy mess, ensuring that the entire circumference is filled completly with epoxy, flush with or just slightly below the level of the cockpit sole. If done correctly, this process will have a minimum effect on the surrounding cosmetics, and the new scuppers will effectively end up in the same place as the old.

In order to cut the new hole, I had to fill the old openings with epoxy so that the pilot bit will have something to drill into. Fortunately, I got that far this afternoon, so the epoxy should be cured and ready for further action tomorrow morning.

I'll post details and photos on the website. Scupper Replacement

Thanks all for the input.
---------------------------------------------------
Forum Founder--No Longer Participating
Figment
Damned Because It's All Connected
Posts: 2847
Joined: Tue Apr 08, 2003 9:32 am
Boat Name: Triton
Boat Type: Grand Banks 42
Location: L.I. Sound

Post by Figment »

So, Tim the Trailblazer, with the hindsight of a season's use on these scuppers, are you pleased?

How about the seat and side deck drains? Are you happy with them discharging into the cockpit?
bcooke
Master of the Arcane
Posts: 2272
Joined: Sat Oct 04, 2003 10:55 pm
Boat Name: Jenny
Boat Type: 1966 Pearson Triton
Location: Rowley, MA
Contact:

Post by bcooke »

You know Mike, I have a plan for these myself.

I was able to fit seacocks directly below the cockpit sole scuppers. Your older boat might be different.

The seat scupper doesn't really handle much water so discharging into the cockpit seems okay to me.

The side deck scupper is the only place on deck for the water to drain off unless you make some cutouts in the toerail... wait, do you have a toerail? In any case, you are going to get streaks from the water running out the toerail slots. You are also likely to get a pretty high volume of water coming off those decks in a rainstorm or some aggresive sailing.

My thoughts on the deck drains is to run the hose aft to the counter and put the drains above the waterline and underneath on the counter. That way you should be able to shed a lot of water without leaving streaks on the topsides and you won't have all that water running through the cockpit.

Just my thoughts on the matter.

-Britton
-Britton
Work is overrated.

Most everything you read on the Internet is wrong.

The Website
The Blog
User avatar
Tim
Shipwright Extraordinaire
Posts: 5708
Joined: Tue Apr 01, 2003 6:39 pm
Boat Name: Glissando
Boat Type: Pearson Triton
Location: Whitefield, ME
Contact:

Post by Tim »

Figment wrote:So, Tim the Trailblazer, with the hindsight of a season's use on these scuppers, are you pleased?

How about the seat and side deck drains? Are you happy with them discharging into the cockpit?
Yes, I am pleased on both counts. It's been two sailing seasons and one season on the hard since I installed this system.

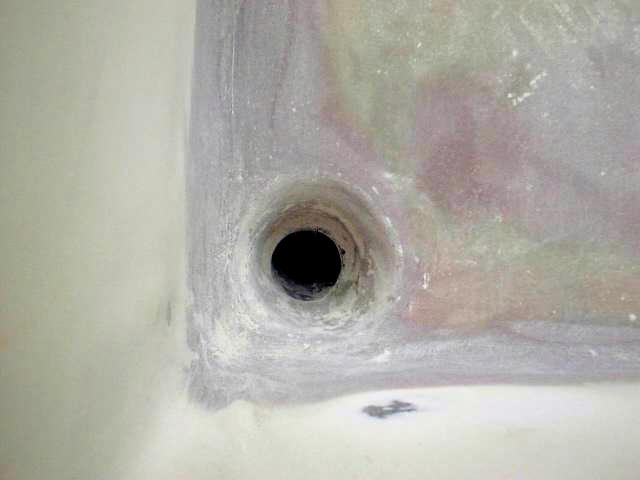
At its best, the fiberglass porcupine-like drain arrangement beneath the cockpit is tenuous. At worst, it's downright weak and dangerous (like mine was). Removing the old setup and putting in some real scuppers was an excellent decision that I only wish I had done during the initial project push, rather than a couple years later.

The deck drains that lead to the cockpit have been successful. Since the outlets are located directly above the main suppers, the discharge is of minimal irritation value. Frankly, when water comes through those drains, the cockpit is already wet, whether from rain or seas, so the extra water is not a bother in the slightest. When sailing with the rail under, water will enter the cockpit from the submerged deck drain--but water already does that through the lee cockpit scupper anyway. It's not like Tritons are every dry boats once the wind pipes up. The discharge from the deck scupper remains confined to the very forward end of the cockpit. I really haven't found that I even notice it happening.

It's a simple, straightforward installation, and the hose runs are short and easily downhill all the way.

You might find that you can fit a seacock beneath the existing outlets and make it work, especially if you use the pre-formed radiator hose like I finally did. (It took 3 years for me to reach that point of eye-openness and acceptance.) But be sure your fiberglass scupper tree is truly in good shape. I thought mine was better initially, but I discovered it was actually a horror show once I started cutting it away. That said, I really like the installation I ended up with, and would recommend it without reservation to those who are so inclined.
---------------------------------------------------
Forum Founder--No Longer Participating
bcooke
Master of the Arcane
Posts: 2272
Joined: Sat Oct 04, 2003 10:55 pm
Boat Name: Jenny
Boat Type: 1966 Pearson Triton
Location: Rowley, MA
Contact:

Post by bcooke »

Tim wrote: But be sure your fiberglass scupper tree is truly in good shape.
Yuck! They are too ugly to live, IMHO. They also make the hose replacement in my own installation rather challenging. (hose was installed and seacock slid into position, I know I know, bad idea but I knew the scupper was on death row.)

Darn, and I drilled a hole in the counter last month that is temporarily used by a bilge pump but was destined for the deck drain.

-Britton
-Britton
Work is overrated.

Most everything you read on the Internet is wrong.

The Website
The Blog
Figment
Damned Because It's All Connected
Posts: 2847
Joined: Tue Apr 08, 2003 9:32 am
Boat Name: Triton
Boat Type: Grand Banks 42
Location: L.I. Sound

Post by Figment »

Cool. I figured that we'd have heard about it if you were really disappointed. I was just fishing for nuance on the level of "they're so great that the 1-1/2" is overkill, the 1" would've been sufficient".

Those new forespar compact 90degree seacocks seem like just the ticket. I think a good compromise between speedy drainage and ease of hose installation might be to install the seacock about 5" outboard of the current tube location, but I think I'll probably put everything else in place and let the hose tell me where the seacock wants to be before I drill the Big Hole.
User avatar
Tim
Shipwright Extraordinaire
Posts: 5708
Joined: Tue Apr 01, 2003 6:39 pm
Boat Name: Glissando
Boat Type: Pearson Triton
Location: Whitefield, ME
Contact:

Post by Tim »

Figment wrote:I'll probably put everything else in place and let the hose tell me where the seacock wants to be before I drill the Big Hole.
That's probably a good plan. Keep us posted.

1" would be sufficient; it has to be, since that's about the size of hte original molded scuppers (if they're even that big). But bigger is better for scuppers, where possible. (and within reason, of course.)
---------------------------------------------------
Forum Founder--No Longer Participating
jollyboat
Candidate for Boat-Obsession Medal
Posts: 338
Joined: Wed Mar 29, 2006 11:51 am
Boat Name: Jollyboat
Boat Type: Pearson Triton
Location: Fairfield County, CT
Contact:

Post by jollyboat »

Tim, I liked you set up so much that I installed a simlar installation on JOLLYBOAT. The cockpit drains I can't find fault with and so left in tact. The combing and seat drains I have plumbed with T fitting and then into the the cast bronze thru-hull fittings that dump into the cockpit above the cockpit drains. The cockpit drain plumbing I kept very simple by just installing a standing water pipes from the actual thu-hole in the hull to the nipple on the under side of the cockpit drain. I having installed a simlar set up on SEPIBAJEZUS as well I know this set up works very well. I did not install seacocks in the thru-hulls as I did not see the need for my type work being done with the boat. With that said - though seacocks are nice because they can be closed the chances of failure of the standing water pipes small.
Brian
Jollyboat, Triton #466
Sepi,Triton #346 (1st, Triton)

No Quarter
sailman
Bottom Sanding Grunt
Posts: 8
Joined: Tue Dec 19, 2006 4:22 pm
Location: Portsmouth, RI
Contact:

Post by sailman »

Tim,

You could you make a fiberglass mold of the bronze fittings that would serve as the deck fitting. Take a circular piece of G10 or something similar that is about an inch larger in diameter than the bronze fitting. Cut the inner diameter out mathcing the bronze fitting. Next set the bronze fitting into the G10 and make the fiberglass mold. Then to install into the boat you have to cut and opening for the drain to pass through and bevel the deck so that the lip can be made flush.

Will Museler
User avatar
Tim
Shipwright Extraordinaire
Posts: 5708
Joined: Tue Apr 01, 2003 6:39 pm
Boat Name: Glissando
Boat Type: Pearson Triton
Location: Whitefield, ME
Contact:

Post by Tim »

This is a really old thread.

I finished those scuppers over 2 years ago!
---------------------------------------------------
Forum Founder--No Longer Participating
Figment
Damned Because It's All Connected
Posts: 2847
Joined: Tue Apr 08, 2003 9:32 am
Boat Name: Triton
Boat Type: Grand Banks 42
Location: L.I. Sound

Post by Figment »

...but mine just arrived yesterday.

I'm not sure that I catch your drift, Will. Are you suggesting that I use the bronze unit as a mold to lay up fiberglass replicas?
Figment
Damned Because It's All Connected
Posts: 2847
Joined: Tue Apr 08, 2003 9:32 am
Boat Name: Triton
Boat Type: Grand Banks 42
Location: L.I. Sound

Post by Figment »

Oh, Tim, did you have a problem getting hose to fit over the tailpiece of those scuppers? (the tailpiece is 1-5/8", seacocks are 1-1/2")

I assume I'll just boil the hose to get it onto the 1-5/8" end, no big deal, but figured I'd pick your brain while I had the opportunity.
sailman
Bottom Sanding Grunt
Posts: 8
Joined: Tue Dec 19, 2006 4:22 pm
Location: Portsmouth, RI
Contact:

Post by sailman »

Figment,

I was suggesting using the bronze fittings to make a fiberglass mold so that you would have a deck support for the bronze fitting. The bronze fitting would then be bedded into the fiberglass and then that would be bedded into the cockpit sole.

Will
User avatar
Tim
Shipwright Extraordinaire
Posts: 5708
Joined: Tue Apr 01, 2003 6:39 pm
Boat Name: Glissando
Boat Type: Pearson Triton
Location: Whitefield, ME
Contact:

Post by Tim »

I think it was a bear getting the wire-reinforced hose to stretch enough, but that eventually I got it on.

The new radiator hoses that I put on shortly thereafter were a lot easier to make fit, as I recall (thanks to my memory aid).
sailman wrote:You could you make a fiberglass mold of the bronze fittings that would serve as the deck fitting. Take a circular piece of G10 or something similar that is about an inch larger in diameter than the bronze fitting. Cut the inner diameter out mathcing the bronze fitting. Next set the bronze fitting into the G10 and make the fiberglass mold. Then to install into the boat you have to cut and opening for the drain to pass through and bevel the deck so that the lip can be made flush.
As it turns out, this is roughly what I did, though I made the bronze fitting fit into the original cockpit sole, and installed a block beneath the sole to help support the scupper fitting.

The G10 fiberglass would have been a better material than the Meranti plywood that I used, but the plywood works fine and will last as long as I don't let anything leak. That said, I am pretty much committed to using G10 or other prefabricated fiberglass sheets for most of my backing purposes going forward. It's great stuff.

Here's the writeup.
---------------------------------------------------
Forum Founder--No Longer Participating
Post Reply