Spraying Awlgrip With Showtime HVLP

This is the place to post your ideas, thoughts, questions and comments as relates to general boatbuilding and reconstruction techniques and procedures (i.e. recoring, epoxy, fiberglass, wood, etc.)
Post Reply
Columbia34
Almost a Finish Carpenter
Posts: 92
Joined: Wed Aug 23, 2006 11:11 am
Location: Battle Creek, Mi
Contact:

Spraying Awlgrip With Showtime HVLP

Post by Columbia34 »

I have been talking with Tim back and forth over e-mail but figured I would bring our conversation to the board so that it may help others, and others may be able to help me.

Our topic is the painting of our 34' Columbia. I just purchased a used Showtime 90 HVLP sprayer with the gravity feed gun. Tim has mentioned using a slower reducer and maybe even more reducer to avoid orange peel on the surface. and even running the hose through cold water.

We will be painting in a nice shop like yours, that is a pretty controled enviroment. probaly paint around 60-65 degres, unless its better to heat the barn up more. what do you suggest for our situation. we are going to use awlgrip. do you suggest doing both the chilled water (do you mean like a cooler with ice and water in it?) and the slower reducer? my other question is the gun comes with 38' of hose, is there any pro's or con's to adding more hose say another 38' so you don't have to move the turbin around. the gun we bought comes with the 1.0mm needle and the 1.4mm needle which one would you suggest using. and i have seen the video of Tim spraying primer and Green on a boat thats around this site somewhere, it shows him starting and stoping while still on the surface, In the very little spraying i have done i was always told that you start off the surface and end off the surface, in this case working from top to bottom not side to side. But looks like side to side worked just fine for tim. Thanks for all your help your all a great source for info.

Here is the project
Image

Scott
dasein668
Boateg
Posts: 1637
Joined: Thu Apr 03, 2003 9:09 am
Boat Name: Dasein
Boat Type: Pearson Triton 668
Location: Portland, Maine
Contact:

Re: Spraying Awlgrip With Showtime HVLP

Post by dasein668 »

Columbia34 wrote: the video of Tim spraying primer and Green on a boat thats around this site somewhere
For reference, that's from dasein668.com. Direct Link Here. (DIVX avi format, 8.5meg)
User avatar
Tim
Shipwright Extraordinaire
Posts: 5708
Joined: Tue Apr 01, 2003 6:39 pm
Boat Name: Glissando
Boat Type: Pearson Triton
Location: Whitefield, ME
Contact:

Post by Tim »

Columbia34 wrote:Tim has mentioned using a slower reducer and maybe even more reducer to avoid orange peel on the surface. and even running the hose through cold water....(do you mean like a cooler with ice and water in it?) ...
Yes, exactly.
Columbia34 wrote:probaly paint around 60-65 degres...
This is an excellent temperature. Typically, you'd probably use a medium reducer at this temperature, but with the turbine gun you might still want slow...unless you chill the air as mentioned above.

It's very important to test your setup beforehand. I learned this the hard way with this particular tool. The orange peel problem from the heated air, causing the reducer to flash prematurely, was something I did not anticipate when I started using this.

In addition, I found that you need more reducer than the product calls for for the best results.

It will provide excellent spraying results if you hone your technique and paint mixture properly, though.

I had better results spraying Awlgrip with the turbine gun than I did with Alexseal. The Awlgrip was a bit more versatile and responded better to the changes in reducer. Alexseal brings its own learning curve with it.
Columbia34 wrote:...is there any pro's or con's to adding more hose say another 38' so you don't have to move the turbin around...
Yes. The additional hose is a godsend when trying to move around a boat. In my opinion, it's virtually required.

The additional hose will also help cool the air being fed to the gun, helping to alleviate the orange peel problem.
Columbia34 wrote:i have seen the video of Tim spraying primer and Green on a boat thats around this site somewhere, it shows him starting and stoping while still on the surface, In the very little spraying i have done i was always told that you start off the surface and end off the surface, in this case working from top to bottom not side to side.
It may look that way, and yes, I did spray side to side. But I started and stopped the gun off the surface, as part of the sweeping motion.

Still, a vertical spraying approach would work well too. It's a lot more awkward and tiring, that's all.
---------------------------------------------------
Forum Founder--No Longer Participating
Columbia34
Almost a Finish Carpenter
Posts: 92
Joined: Wed Aug 23, 2006 11:11 am
Location: Battle Creek, Mi
Contact:

Post by Columbia34 »

So if we do the additional hose and run the hose through ice water and paint at about 60-65 degress you think we should still us the slower reducer? or think the normal medium would work just fine.

Also i was reading about boot stripes some where on the site and Tim you mention using a transit to strike your a boot line. I work for a Landscape architecture firm and have access to a transit. I know where the orginal boot stripe was and measured it out before I sanded it off. Can you explain how to do this and do you have to make sure the boat is level front to back and side to side on the cradle?

Scott
Columbia34
Almost a Finish Carpenter
Posts: 92
Joined: Wed Aug 23, 2006 11:11 am
Location: Battle Creek, Mi
Contact:

What Reducer?

Post by Columbia34 »

OK we are going to order our paint, and wondering what reducer to order the T0001, T0003, or T0005. I am leaning towards the T0003 Standard, since we are painting at about 60 F. If I were to follow Awlgrips recomendation I should be using the T0001. Thanks for the input in advance.
User avatar
Tim
Shipwright Extraordinaire
Posts: 5708
Joined: Tue Apr 01, 2003 6:39 pm
Boat Name: Glissando
Boat Type: Pearson Triton
Location: Whitefield, ME
Contact:

Post by Tim »

I'd try the T0003 standard spray reducer first. I have found this to be a very versatile reducer the couple times I have used it for spray.

Remember, you can always create a "custom" reducer by blending portions of, for example, standard and slow. But only some test spraying will truly show you what you need for a reducer with your individual setup and shop conditions.
---------------------------------------------------
Forum Founder--No Longer Participating
Columbia34
Almost a Finish Carpenter
Posts: 92
Joined: Wed Aug 23, 2006 11:11 am
Location: Battle Creek, Mi
Contact:

Steps

Post by Columbia34 »

Tim I am hoping to get your input on this. With reguards to the stripes on the topsides, would you do them first then tape them off and do the rest or paint the topsides and paint the stripes over that? And we want to do and boot stripe and a top stripe as well. how do you determine what size to do and how many like 1 or 2 at the waterline? Thanks.

Scott
User avatar
Tim
Shipwright Extraordinaire
Posts: 5708
Joined: Tue Apr 01, 2003 6:39 pm
Boat Name: Glissando
Boat Type: Pearson Triton
Location: Whitefield, ME
Contact:

Re: Steps

Post by Tim »

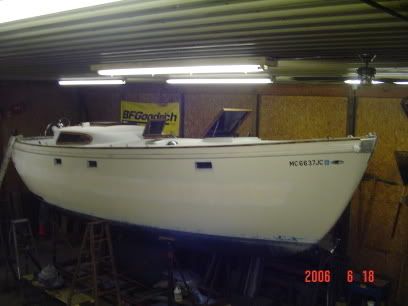
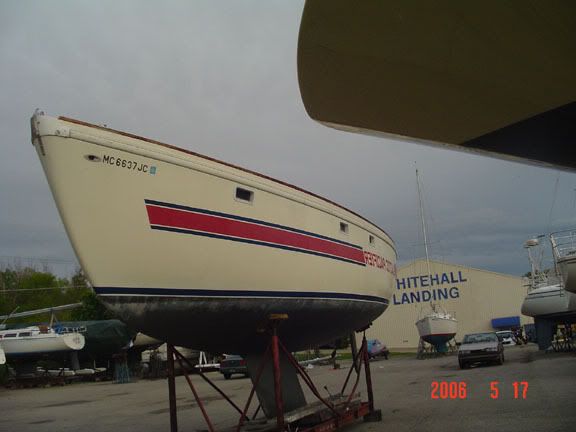
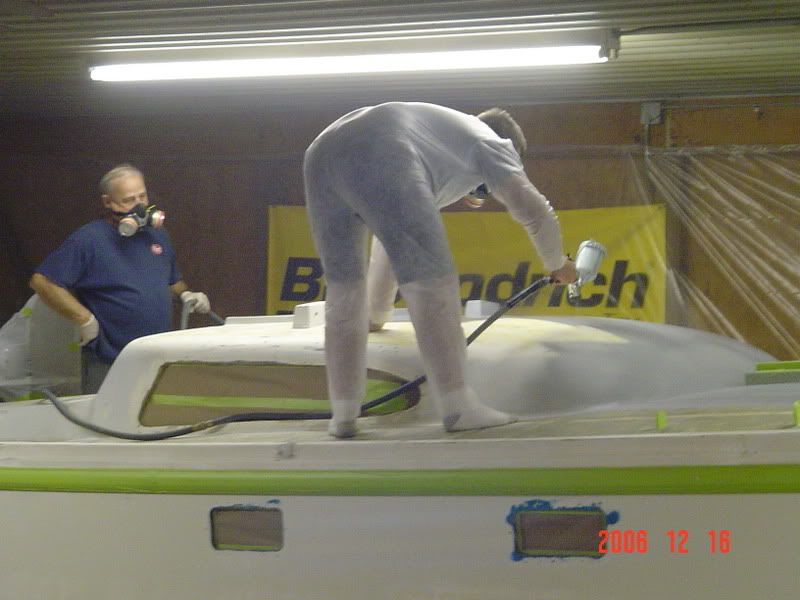
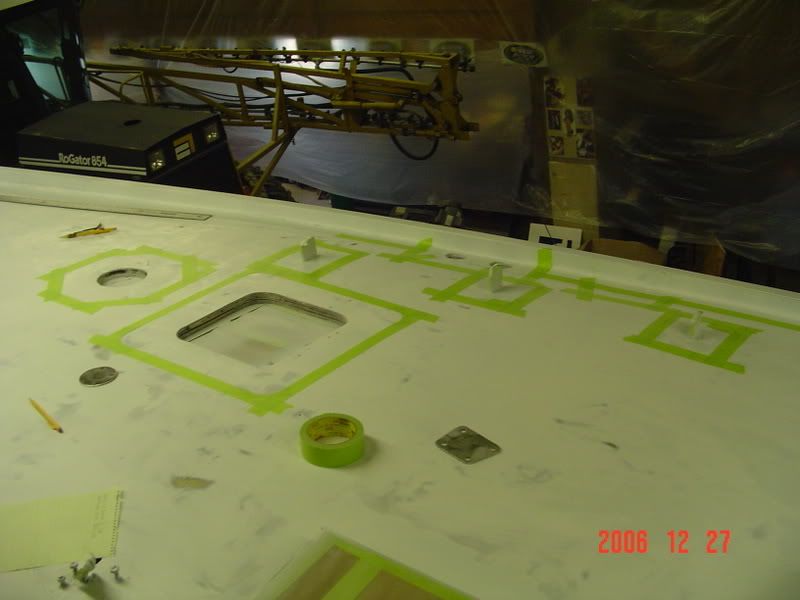
Columbia34 wrote:Tim I am hoping to get your input on this. With reguards to the stripes on the topsides, would you do them first then tape them off and do the rest or paint the topsides and paint the stripes over that? And we want to do and boot stripe and a top stripe as well. how do you determine what size to do and how many like 1 or 2 at the waterline? Thanks.
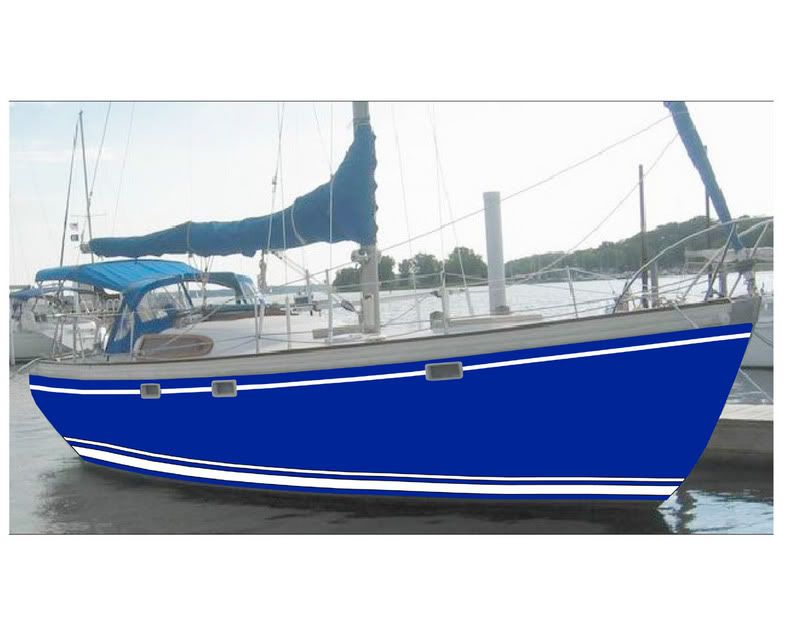
Typically, one paints the field first, and the striping afterwards. I think you get a better sense of the overall scheme of the boat this way, and can better judge the stripes you want/need after the field is painted.

As far as the width of your boot strip and sheer strake...well, there are several factors to consider on any given boat, including personal taste, tradition, height of topsides, and other factors.

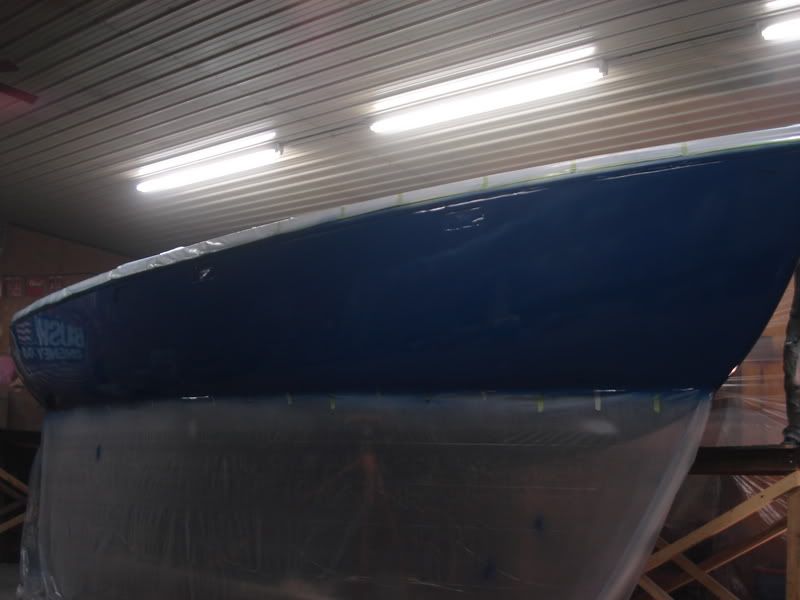
Your boat has very high topsides for her length, a small cabin trunk, and short-ish overhangs. The overall appearance of the boat is, to me, sort of a "throwback modern"--reverse transom, but a spoon-y bow; short overhangs, but still a curvy sheerline. I think the boat would look best if the striping were conceived in such a way as to minimize the visual appearance of the topsides.

Here's what I'd do on your boat, if it were me.

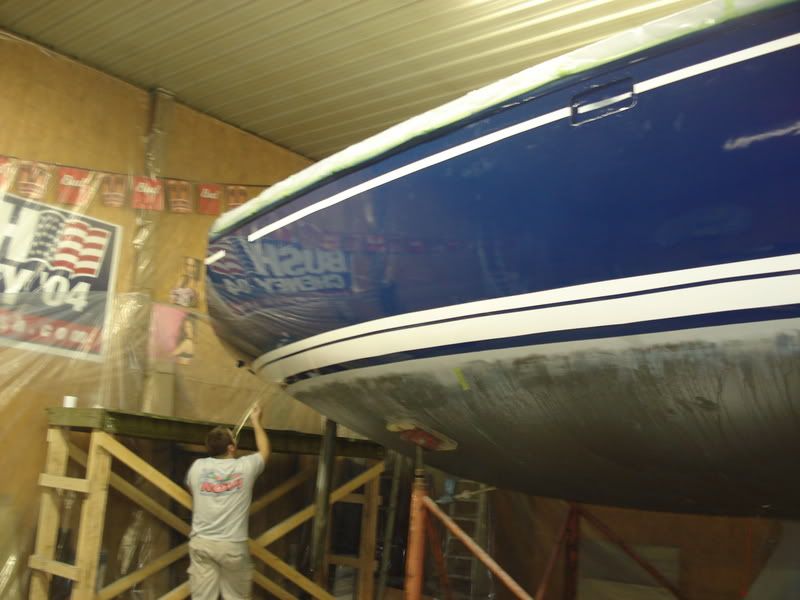
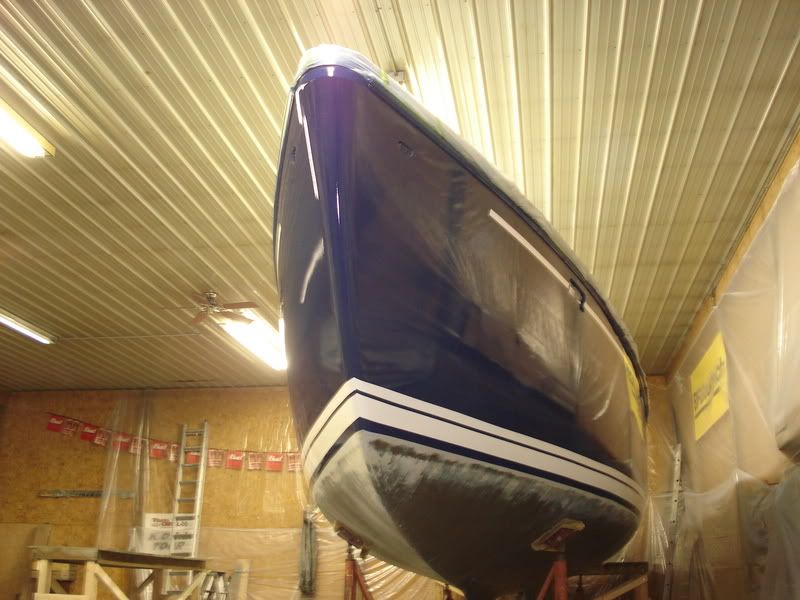
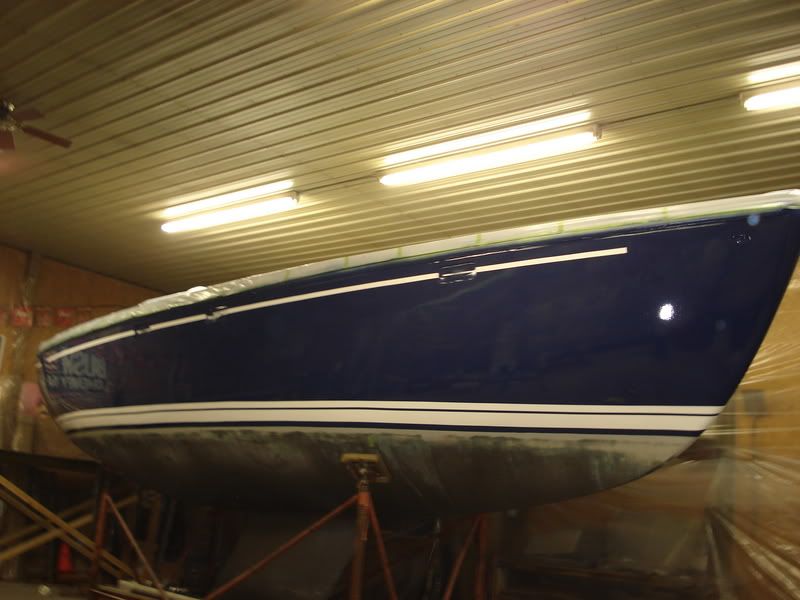
First, I'd ensure that the antifouling paint was brought well above the actual waterline. 4" sounds like a lot, but I think that may not be far off what I would do. The exact number will depend on how it looks one way or the other in person. I hesitate to even throw a number out there, but even if 4" is wrong, it lets you know that I don't mean 1", which wouldn't be nearly enough.

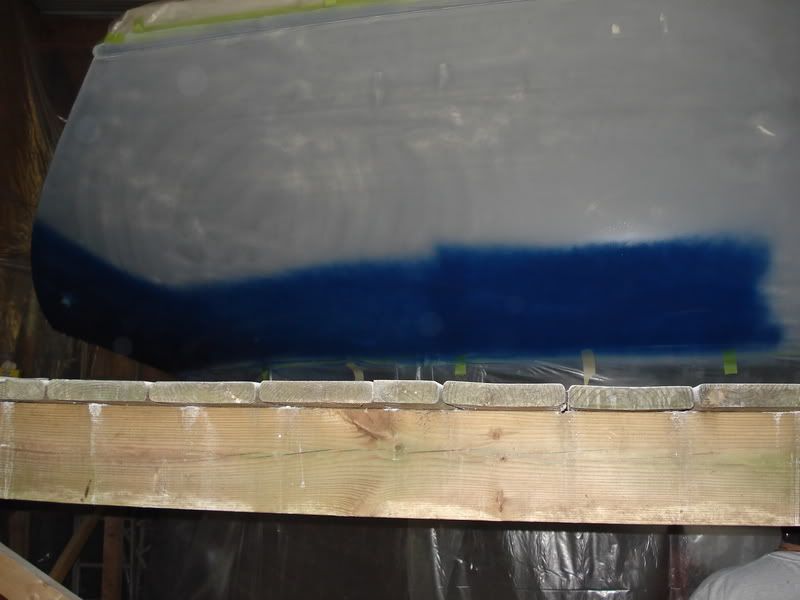
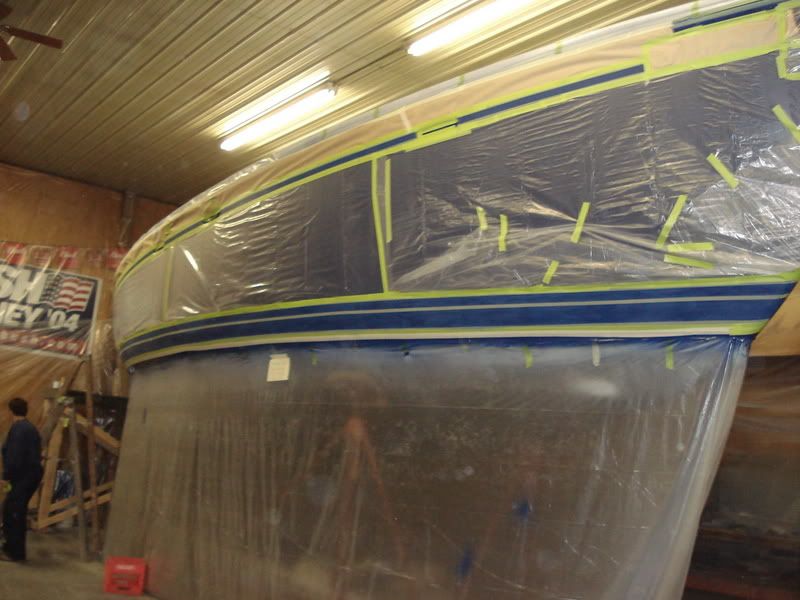
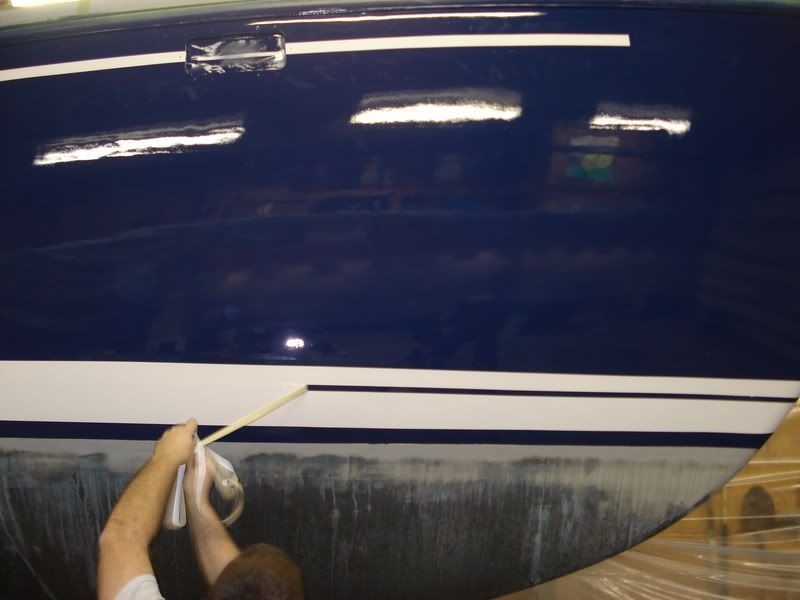
Next, I'd strike a pair of evenly-sized boot stripes, leaving hull color between the stripes and between the bottom paint and the lower stripe. For your boat, the stripes should probably be about 2" wide each or possibly even larger, and with perhaps 1-1/2" between the stripes. I'd begin the first stripe 1" to 1-1/2" above the antifouling, max. Choose a stripe color that clearly contrasts with the hull color. Some color combinations lack enough contrast to be seen from a distance, and this changes the appearance of the boat. (I think you said you were going flag blue for the hull, so I'd suggest pure white for the striping. I have always liked Awlgrip Snow White for its pure whiteness, with no blue or cream tones, but for also managing to remain warm without seeming cold or pale.)

The combination of two boot stripes, plus the relatively high antifouling paint, will work very well to reduce the visual height of the topsides. Plus, the dual stripes fit the style of boat very well--much better than a single wide stripe. In addition, the dual stripes will be much more interesting to see on the boat, and will make her stand out.

At the sheer strake, I'd paint a wide-ish stripe along the sheerline, beginning at the toerail and extending down 3" (???) or so. Use the same color as the boottop. I think it'd look good if you added a thin (1/2") band of another color (goldleaf comes to mind) at the bottom edge of this sheer strake. I wouldn't carry the full width of the sheer strake all the way to the stem and transom; instead, I'd sweep it at the ends, perhaps with a curve reminiscent of your bow and stern profiles, respectively, and end it a couple inches short of the stem/transom.

I think this would look excellent...I can picture the boat easily in this configuration. But bear in mind that my width estimations are just that: guesses. The actual width required to look correct may be different. You don't want the dual boot stripes to look puny, but at the same time they don't want to be too wide, which would seem bulky and heavy. The proper width is truly a visual thing only, with no hard and fast rules.

Hope this helps.
---------------------------------------------------
Forum Founder--No Longer Participating
User avatar
Tim
Shipwright Extraordinaire
Posts: 5708
Joined: Tue Apr 01, 2003 6:39 pm
Boat Name: Glissando
Boat Type: Pearson Triton
Location: Whitefield, ME
Contact:

Re: Spraying Awlgrip With Showtime HVLP

Post by Tim »

After I posted my response, I happened to notice the photo of the boat at the beginning of this thread; I had answered based on my memory of the Columbia 34 and hadn't seen this photo from the beginning.

I see that you have some sort of raised or recessed demarcation near the top of the hull, above those ports. I would use this as the lower edge of my sheer strake. At the bow, since this area runs right into your stem casting, I would bring the paint right to the stem casting. This is slightly different from what I wrote earlier. I can't tell enough detail about the specifics of this area to know exactly how it is set up, but in any event a stripe of that width would be perfect at the sheer.

The new boottops need to extend quite a bit farther onto the hull than the old one did (the ghost of it is still visible there). I think I might bring the antifouling up to the top of that old boot, anyway, and then begin striking the stripes from there. My other comments still apply.

I'm hopelessly incompetent at Photoshop, so I won't even try to draw in some representation of what I'm talking about. I wish I could.

Image
---------------------------------------------------
Forum Founder--No Longer Participating
Columbia34
Almost a Finish Carpenter
Posts: 92
Joined: Wed Aug 23, 2006 11:11 am
Location: Battle Creek, Mi
Contact:

Post by Columbia34 »

Well I am not good with Photoshop either but here is a concept made in autocad.

Image

The top stripe is a 2" stripe throught the middle of the ports. then at the bottom its a 2" gap between bottom paint and 1st boot stripe, 1st boot stripe is 6", then 2" gap, then 2nd boot stripe being 3". the free board in the front of the boat is a little over 6' and middle of the boat is a little less then 5'.

here is a picture of the run rail above the ports you were looking at. We plan to paint it white above the rub rail.

Image

we are using Aristo blue topsides and snow white stripes.

Thanks for all your help.

Scott
Columbia34
Almost a Finish Carpenter
Posts: 92
Joined: Wed Aug 23, 2006 11:11 am
Location: Battle Creek, Mi
Contact:

Post by Columbia34 »

So what do you guys think of my concept plan for painting? I also planned on using Interlux Interdeck for my non-skid areas, anyone used this and how is it? should I use it or somthing else. We were planning to do the gray color but I am worried about it being to dark and being hot on the feet. What do you think about mixing half white and half gray together, to lighten the color.

We ordered paint today went with the T0003 reducer, I also ordered another 30' of hose for the sprayer. We are going to be painting at about 60-65 degres, still think i need to run the hose through cold water?

How about the primer any tricks to spraying that? were priming the deck off white 1st coat and then regular white 2nd coat. then on the topsides 1st coat white and 2nd coat gray.

Thanks for everyone help.

Scott
User avatar
Tim
Shipwright Extraordinaire
Posts: 5708
Joined: Tue Apr 01, 2003 6:39 pm
Boat Name: Glissando
Boat Type: Pearson Triton
Location: Whitefield, ME
Contact:

Post by Tim »

Columbia34 wrote:I also planned on using Interlux Interdeck for my non-skid areas, anyone used this and how is it? should I use it or somthing else. We were planning to do the gray color but I am worried about it being to dark and being hot on the feet. What do you think about mixing half white and half gray together, to lighten the color.
I like Interdeck a lot. It's very easy to apply, and the texture is extremely consistent.

The gray color they offer always struck me as too dark also. I think lightening it is a very good idea--both for appearance and for the comfort of the deck surface.
Columbia34 wrote:We are going to be painting at about 60-65 degres, still think i need to run the hose through cold water?
Maybe not. My experience has been that Awlgrip is much less affected by the warmth of the air than Alexseal. I would give it a try without the water and see what happens. In either case, only experimentation will really tell you what you need to do. Each situation is different.
Columbia34 wrote:How about the primer any tricks to spraying that? were priming the deck off white 1st coat and then regular white 2nd coat. then on the topsides 1st coat white and 2nd coat gray.
The primer is easy to spray, and will go on extremely nicely. Alternating the colors slightly is a good idea because it really helps you know where you are. Too bad you can't do this with the topcoats.

The primer will go on so well that it might give you a false sense of security about the topcoats. While you'll get used to the spray equipment during the priming stage, be very aware that the topcoats will act very differently than the primer: they are thinner, cover less well, and you'll find that the same gun settings that worked for the primer will probably overload the surface with topcoat. So be sure to run tests before you actually spray the hull with the final coats.
---------------------------------------------------
Forum Founder--No Longer Participating
Columbia34
Almost a Finish Carpenter
Posts: 92
Joined: Wed Aug 23, 2006 11:11 am
Location: Battle Creek, Mi
Contact:

Post by Columbia34 »

Thanks Tim, its nice to get help from someone with history of working with the product. Yeah we will run a test on a piece of glass and see what it looks like. what needle do you use in the sprayer, i have a 1.0 and the 1.4. When you read the awlgrip manual it talks about thinning the paint 25% and i know you can only tell through testing, but is that a good place to start or does it need to be thinned more right from the start.

How about the color concept I know its a little diffrent than what you were talking about i think. and with the boot stripes do i run them all the way around or leave them a bit short of the bow?

And above in this post I asked about painting side to side or top to bottom and you painted side to side in your video, do you have to worry about ruins in the overlap area? and i assume you hand is already in motion when you pull the trigger on the gun to layout the paint. also looks like you are painting with a fan of about 3", holding the gun 12" off the surface.

Sorry for all the questions but i am just trying to take in all the info i can to make or project go the best it can.

Scott
Summersdawn
Skilled Systems Installer
Posts: 279
Joined: Fri Nov 04, 2005 6:34 pm

Post by Summersdawn »

Columbia34 wrote:We were planning to do the gray color but I am worried about it being to dark and being hot on the feet. What do you think about mixing half white and half gray together, to lighten the color.
If you are going to custom mix the colour, make sure you mix enough in one batch to put on both coats, with enough left over to do any touchups. Matching paint colours can be quite tricky. I used to mix automotive paint, and it could be a real challenge matching colours like this - of course this was before they started using scanners and colour matching software to make the recipe.

I used Interdeck on my boat, and like Tim, found it to be easy to work with. After rolling and tipping, wetsanding, etc. it was nice having something that just rolled on (it goes on almost like house paint).
Rick
Summer's Dawn
24 San Juan #380
User avatar
Tim
Shipwright Extraordinaire
Posts: 5708
Joined: Tue Apr 01, 2003 6:39 pm
Boat Name: Glissando
Boat Type: Pearson Triton
Location: Whitefield, ME
Contact:

Post by Tim »

I think your color concept looks very nice. I like it, and it has the desired effect to "lower" the height of the topsides. There's no right or wrong answer.

The boottop should be run continuously around the stem and counter. On many new boats where the boot is molded into the gelcoat, you often see it end short, but it's not a look to emulate. I think I'd stop your covestripe (the one running through the ports) short of the stem and transom, though--end it a bit further from the stem than from the transom.

You always need to worry about runs in the overlap area, because it's very easy to overload the surface. Practice makes perfect. My technique is not perfect by any remote stretch.

12" is about the right distance to hold the gun away from the hull. I'm not sure about the fan size; it's just a combination of material output and needle characteristics that seemed right. I use the stock needle that came with the gun--the 1.0. I used this for both primer and topcoat.

You'll probably find that 25% reducer is a good starting point. You may need more, and shouldn't worry about adding more as needed.

I think I answered everything...
---------------------------------------------------
Forum Founder--No Longer Participating
Columbia34
Almost a Finish Carpenter
Posts: 92
Joined: Wed Aug 23, 2006 11:11 am
Location: Battle Creek, Mi
Contact:

Post by Columbia34 »

We we planning to break the top stripe at the back for the Columbia Logo, and then break it at the front as well for the MC Numbers? or should they just go below the stripe? When marking out the stripes can you use a pencil and dividers? or do you just measure along and use the tape? Thanks.

Scott
User avatar
Tim
Shipwright Extraordinaire
Posts: 5708
Joined: Tue Apr 01, 2003 6:39 pm
Boat Name: Glissando
Boat Type: Pearson Triton
Location: Whitefield, ME
Contact:

Post by Tim »

The registration numbers will look much better in a break in the line, or forward of the end, depending how you want to do it.

You can mark out the line any way that works for you. Just be sure to confirm its fairness and look with your eye. But the covestripe should be a consistent distance from (in your case) the rubrail, so consistent measuring and marking should work fine.
---------------------------------------------------
Forum Founder--No Longer Participating
Columbia34
Almost a Finish Carpenter
Posts: 92
Joined: Wed Aug 23, 2006 11:11 am
Location: Battle Creek, Mi
Contact:

Post by Columbia34 »

Tim I finished up most my sanding over the weekend and am almost ready to clean up and prime. When I tape stuff off do I have to remove the tape after each time i paint, thinking of areas like the rub rail which i need to tape off to paint, but do i need to remove it in between prime and paint while the primer is still fresh and then re-tape before color? Thanks.

Scott
User avatar
Tim
Shipwright Extraordinaire
Posts: 5708
Joined: Tue Apr 01, 2003 6:39 pm
Boat Name: Glissando
Boat Type: Pearson Triton
Location: Whitefield, ME
Contact:

Post by Tim »

It depends on your tape. For general taping, I'd use the silver 3M tape (#225), which is heavy duty, will hold up to multiple layers of paint, and is removable up to 30 days. You can tape your rubrail and do the whole job without retaping.

When you remove the tape at the end, you'll probably want to score along the paint edge with a sharp knife to help with the removal, but generally it comes off nicely even with the heavy layers of paint. Scoring at the edge just prevents the potential for pulling any of the paint along with the tape.

When you do your striping, I'd recommend a thinner tape, like Fine Line tape. The Awlgrip can bleed beneath the silver tape, leaving annoying little capilliary rivulets. Fine Line won't hold up over a long application, so don't leave it on for days at a time.
---------------------------------------------------
Forum Founder--No Longer Participating
Columbia34
Almost a Finish Carpenter
Posts: 92
Joined: Wed Aug 23, 2006 11:11 am
Location: Battle Creek, Mi
Contact:

Post by Columbia34 »

Ok new questions...

When painting with the showtime 90 are you spraying with the air control full on or somthing less to control over spray?

We are still undecide about what we are going to do with the anchor system on the boat, right now there is just a anchor hanger and a small hole in the deck for the rope to get into the locker. We are thinking about adding a windlass and a bow roller, but not sure yet. If we do the windlass I would like that you be mounted to the deck paint not the non-skid paint so I am wondering if I can just over paint the area right at the bow and determine where the non-skid will go later in that part of the bow. Once i know i can tape it out sand the awlgrip and roll on the non-skid. Is this a good idea or so i need to know 100% what i want my pattern to be and tape it off before?

And tim you said that i can mark my lines with a pencil once i am done do i need to remove that pencil before painting over it?

Thanks,
Scott
User avatar
Tim
Shipwright Extraordinaire
Posts: 5708
Joined: Tue Apr 01, 2003 6:39 pm
Boat Name: Glissando
Boat Type: Pearson Triton
Location: Whitefield, ME
Contact:

Post by Tim »

Columbia34 wrote:When painting with the showtime 90 are you spraying with the air control full on or somthing less to control over spray?
I used the full amount of air. If overspray is a problem, such as spraying close to another surface that you don't have completely covered, then turn it down.
Colimbia34 wrote: I am wondering if I can just over paint the area right at the bow and determine where the non-skid will go later in that part of the bow.
Yes, you can do this. You'll need to sand the hard, shiny Awlgrip very well, of course, before applying the nonskid over the top.

Of course, if you do the remainder of your nonskid and hope to do only this section later on, you may end up with a lap mark on your deck.
Columbia34 wrote:And tim you said that i can mark my lines with a pencil once i am done do i need to remove that pencil before painting over it?
Yes: you need to remove the pencil lines, or they'll show through. Make the lines as light as possible, too.
---------------------------------------------------
Forum Founder--No Longer Participating
Columbia34
Almost a Finish Carpenter
Posts: 92
Joined: Wed Aug 23, 2006 11:11 am
Location: Battle Creek, Mi
Contact:

Post by Columbia34 »

No I will just hold off on all the non-skid paint tell I decide what I am going to do up in the bow area.

Wow I just got back from the Autobody supply store nothing like spending $75 on tape, 3 Rolls 2" 3M 233+, 12 Rolls 1" 3M 233+, 3 rolls 3M 3/4" Fineline.
Columbia34
Almost a Finish Carpenter
Posts: 92
Joined: Wed Aug 23, 2006 11:11 am
Location: Battle Creek, Mi
Contact:

Tack Cloths

Post by Columbia34 »

What should I use for a tack cloths? I know the steps are to vac off the surface and then clean the surface with awl-prep using the 2 cloth method, then tack the surface off then paint. Can i use just regular tack cloths that i can buy at lowes or the local hardware store. thanks.

Scott
Figment
Damned Because It's All Connected
Posts: 2847
Joined: Tue Apr 08, 2003 9:32 am
Boat Name: Triton
Boat Type: Grand Banks 42
Location: L.I. Sound

Post by Figment »

Awlgrip sells their own brand of tack cloths. There may be something special about them, or there may not, but they're such a tiny drop in the moneybucket of a paint job that it's senseless to debate. After all the work of fairing and priming, I wasn't about to jeopardize the adhesion of the finish coats by introducing a potential for incompatible residue.

Jamestown part number AWL-73009.
User avatar
Tim
Shipwright Extraordinaire
Posts: 5708
Joined: Tue Apr 01, 2003 6:39 pm
Boat Name: Glissando
Boat Type: Pearson Triton
Location: Whitefield, ME
Contact:

Post by Tim »

The Awlgrip tack cloths are low-tack; that is, they don't have a huge amount of the resin or whatever the sticky stuff is. You can also find low-tack tack cloths at other stores, but using the Awlgrip ones is a good bet.

The regular tack cloths, with high-tack properties, run the risk of transferring some of that resin material to the hull or deck, possibly contaminating the surface. This is why Awlgrip recommends and sells its own tack cloths.

Whatever tack cloth you use, always use a very light touch with it--don't press hard against the surface. Unfold the cloth completely and then lightly bundle it together like a "poof", and use this with a light touch, turning and re-poofing frequently.

All this being said, I have used low-tack cloths that I purchase in bulk elsewhere. Just don't use the regular high-tack ones, and you might as well buy the Awlgrip ones.
---------------------------------------------------
Forum Founder--No Longer Participating
dasein668
Boateg
Posts: 1637
Joined: Thu Apr 03, 2003 9:09 am
Boat Name: Dasein
Boat Type: Pearson Triton 668
Location: Portland, Maine
Contact:

Post by dasein668 »

Tim wrote:bundle it together like a "poof"
Is that a technical term? ;-P
Columbia34
Almost a Finish Carpenter
Posts: 92
Joined: Wed Aug 23, 2006 11:11 am
Location: Battle Creek, Mi
Contact:

Sprayed The Primer

Post by Columbia34 »

Well we painted the primer over this weekend and it went really well overall only had one run on the port side that will need to be sanded out. First coat on the decks was light gray, 2nd White, then on the topsides first coat light gray, 2nd coat gray. Took about 45min to get all the way around the boat so the timing will be perfect for the topcoats. Here are some pictures.

Prep Work
Image

Deck Gray
Image

Deck White
Image

Top Side Light Gray
Image

Topside Dark Gray
Image

Image

Ready For Topcoat
Image

One question I had a few pin holes show up on the deck from the epoxy and was wondering are there any fillers/bondo out there that can be used after the primer and then directly topcoated over?

Scott
User avatar
Tim
Shipwright Extraordinaire
Posts: 5708
Joined: Tue Apr 01, 2003 6:39 pm
Boat Name: Glissando
Boat Type: Pearson Triton
Location: Whitefield, ME
Contact:

Post by Tim »

Columbia34 wrote:One question I had a few pin holes show up on the deck from the epoxy and was wondering are there any fillers/bondo out there that can be used after the primer and then directly topcoated over?
The topcoat will not work well directly over any filler. You really need an even, uniform coat of primer to ensure that the topcoats look uniform and even.

This is a good argument for using a high build primer first. Not only does the heavier primer help fill pin holes, but it gives you the opportunity to fill them with a fine, smooth compound like Awl-Fair, and then recoat with 2-3 coats of finish primer.

Unfortunately, these pinholes don't usually show up until the priming has begun. If they're in the nonskid area, you might get away without addressing them, depending on how large and how frequent they are, since the nonskid paint is a lot more forgiving. On the smooth areas, the glossy, thin topcoat will highlight these pinholes.

In the end, it's all about what you can live with. Absolute perfection is an elusive and unreachable target.
---------------------------------------------------
Forum Founder--No Longer Participating
Columbia34
Almost a Finish Carpenter
Posts: 92
Joined: Wed Aug 23, 2006 11:11 am
Location: Battle Creek, Mi
Contact:

Post by Columbia34 »

I talked to the guy from Awlgrip and he has advised me now that I can see the imperfections to go and fill the with Evercoat Polyester Glazing Putty, and just go back and spot prime. So that will be a projst for the day after christmas, were going to be painting the topsides Aristo Blue next Wed.

Scott
Columbia34
Almost a Finish Carpenter
Posts: 92
Joined: Wed Aug 23, 2006 11:11 am
Location: Battle Creek, Mi
Contact:

Post by Columbia34 »

Tim as mentioned in my above post, I am going to take and use the evercoat glazing putty on my oin holes and then go back and spot prime. How long does that primer have to sit before I can get back up on the deck and sand with 320 for my topcoat and mark out non-skid areas. I just couldn't leave the pin holes I know perfect is not a reachable goal, but if i can fix it with $30 worth of material and a days works I will do so. My second question is how long after I paint the top coat can I mark and tape off the stripes with the 3m fine line tape, i was planning on doing it the next day if possible. Thanks

Scott
User avatar
Tim
Shipwright Extraordinaire
Posts: 5708
Joined: Tue Apr 01, 2003 6:39 pm
Boat Name: Glissando
Boat Type: Pearson Triton
Location: Whitefield, ME
Contact:

Post by Tim »

Columbia34 wrote:Tim as mentioned in my above post, I am going to take and use the evercoat glazing putty on my oin holes and then go back and spot prime. How long does that primer have to sit before I can get back up on the deck and sand with 320 for my topcoat and mark out non-skid areas. I just couldn't leave the pin holes I know perfect is not a reachable goal, but if i can fix it with $30 worth of material and a days works I will do so. My second question is how long after I paint the top coat can I mark and tape off the stripes with the 3m fine line tape, i was planning on doing it the next day if possible. Thanks

Scott
The primer should cure overnight before sanding, or at least 8 hours (depending on temperature).

You can usually tape over the topcoats after an overnight cure. Always do a test somewhere first, though. If you can wait a full day, though, that's even better.
---------------------------------------------------
Forum Founder--No Longer Participating
Columbia34
Almost a Finish Carpenter
Posts: 92
Joined: Wed Aug 23, 2006 11:11 am
Location: Battle Creek, Mi
Contact:

Post by Columbia34 »

I can wait a whole day, I will do the topsides on wed, white deck areas thur, and stripe fri or sat.

Scott
Columbia34
Almost a Finish Carpenter
Posts: 92
Joined: Wed Aug 23, 2006 11:11 am
Location: Battle Creek, Mi
Contact:

Post by Columbia34 »

Here are some pictures of the 3 coats of Aristo Blue.

Image

Image

Image

Image

I did not get as far as I wanted to to a family members surgery but thats ok.
Figment
Damned Because It's All Connected
Posts: 2847
Joined: Tue Apr 08, 2003 9:32 am
Boat Name: Triton
Boat Type: Grand Banks 42
Location: L.I. Sound

Post by Figment »

I can only imagine what the note taped to the skirt says.

She's shiny!
Columbia34
Almost a Finish Carpenter
Posts: 92
Joined: Wed Aug 23, 2006 11:11 am
Location: Battle Creek, Mi
Contact:

Spraying Video

Post by Columbia34 »

here is a video we will see if this works or not.

Image
User avatar
Tim
Shipwright Extraordinaire
Posts: 5708
Joined: Tue Apr 01, 2003 6:39 pm
Boat Name: Glissando
Boat Type: Pearson Triton
Location: Whitefield, ME
Contact:

Post by Tim »

Nice work! Are you happy with the results?

Thanks for the update. I can't wait to see how things all come together as you continue!
---------------------------------------------------
Forum Founder--No Longer Participating
Columbia34
Almost a Finish Carpenter
Posts: 92
Joined: Wed Aug 23, 2006 11:11 am
Location: Battle Creek, Mi
Contact:

Post by Columbia34 »

yeah I am very happy with the results, it really looks great. I only had one small run about 2" long on the port side at the waterline and lucky enough it will be right where a stripe is so i can sand it out. I only used a little over a half gallon of color (before mixing), did not seem like much but the coverage was great and looks outstanding. next weekend we are going to layout the stripes and paint those, then the deck the weekend after that. here are a few pics of my non-skid layout. You have to look close to see my pencil marks. I am going for the white around the hardware look.

Image

Image
dasein668
Boateg
Posts: 1637
Joined: Thu Apr 03, 2003 9:09 am
Boat Name: Dasein
Boat Type: Pearson Triton 668
Location: Portland, Maine
Contact:

Post by dasein668 »

Looks good! I'm excited to see the striping as well as the decks. (Also a big fan of the white margins around hardware myself.)

I notice that you were using a cartridge respirator rather than forced air? Do you have some sort of forced air ventilation running in your shop? I ask because I found that the atomized paint haze seemed to overwhelm my 3M cartridge respirator, and I was using it just for "in and out" of the shop.
Columbia34
Almost a Finish Carpenter
Posts: 92
Joined: Wed Aug 23, 2006 11:11 am
Location: Battle Creek, Mi
Contact:

Post by Columbia34 »

Yeah I just used a cartrige respirator, if i were like Tim and doing more than one boat I would have invested in a forced air respirator. We have cross venilation between 2 windows and a fans. I am well aware that its not a good idea to go with out a forced air mask, but I am also not using the product everyday.

we plan to do the stripes this weekend and we are also going to spray the stripes snow white as well. If anyone is looking for some aristo blue for striping I have a half gallon left.
User avatar
Peter
Boat Obsession Medal Finalist
Posts: 580
Joined: Mon Nov 15, 2004 11:23 pm
Boat Name: Pagan
Boat Type: Albin Ballad 30
Location: Pedder Bay (Victoria), BC, Canada
Contact:

Post by Peter »

Interesting video ... thanks!
One thing I noticed is the relatively narrow 'fan' of paint on each stroke. I'm used to about an 8" fan with a conventional HVLP gun.

I found the first coat of red over white primer was easy to monitor, but spraying the second and third "red-over-red" coats it was a real challenge to see where one had left off!
Peter
==================
Victoria BC Canada
Albin Ballad 30

http://www.mostlyaboutboats.ca
User avatar
Tim
Shipwright Extraordinaire
Posts: 5708
Joined: Tue Apr 01, 2003 6:39 pm
Boat Name: Glissando
Boat Type: Pearson Triton
Location: Whitefield, ME
Contact:

Post by Tim »

Peter wrote:I found the first coat of red over white primer was easy to monitor, but spraying the second and third "red-over-red" coats it was a real challenge to see where one had left off!
That's by far the hardest part. It's so hard that it almost makes an argument for sanding between coats even when spraying. I guess maybe it gets easier with lots of experience, but it is very challenging.
Peter wrote:One thing I noticed is the relatively narrow 'fan' of paint on each stroke.
I noticed that too. There are a number of settings on the gun that can affect the fan size, from material flow to air flow to fan size control. But as long as it worked, it doesn't matter!
---------------------------------------------------
Forum Founder--No Longer Participating
Columbia34
Almost a Finish Carpenter
Posts: 92
Joined: Wed Aug 23, 2006 11:11 am
Location: Battle Creek, Mi
Contact:

Post by Columbia34 »

yeah we tested on a mirror with the fan size and I slowly made the fan larger, at the end I was using a 6-8" fan. as far as knowing where you have been if you look on the skirt covering the bottom paint i marked out 1.5' sections then alternated tape colors (so 3' between colors) so first coat go from green to green and then second coat go from tan to tan, thrid coat from green to green. this helps keep track of where you have been.
dasein668
Boateg
Posts: 1637
Joined: Thu Apr 03, 2003 9:09 am
Boat Name: Dasein
Boat Type: Pearson Triton 668
Location: Portland, Maine
Contact:

Post by dasein668 »

Columbia34 wrote:i marked out 1.5' sections then alternated tape colors (so 3' between colors) so first coat go from green to green and then second coat go from tan to tan, thrid coat from green to green. this helps keep track of where you have been.
That's good thinking!
Columbia34
Almost a Finish Carpenter
Posts: 92
Joined: Wed Aug 23, 2006 11:11 am
Location: Battle Creek, Mi
Contact:

Here are the stripes...

Post by Columbia34 »

We painted the stripes over the weekend and here are some pictures how did we do?

Image

Image

Image

Image

Image

Image

Image
Mark.Wilme
Candidate for Boat-Obsession Medal
Posts: 340
Joined: Tue Jun 20, 2006 8:35 pm
Location: MA and RI

Post by Mark.Wilme »

NICE STRIPES - very, very nice.
Mark.
S/V Calypso. 2001 Beneteau Oceanis 381
Image
Not quite a plastic classic yet
User avatar
Tim
Shipwright Extraordinaire
Posts: 5708
Joined: Tue Apr 01, 2003 6:39 pm
Boat Name: Glissando
Boat Type: Pearson Triton
Location: Whitefield, ME
Contact:

Post by Tim »

Looks good, Scott! What an improvement.
---------------------------------------------------
Forum Founder--No Longer Participating
Columbia34
Almost a Finish Carpenter
Posts: 92
Joined: Wed Aug 23, 2006 11:11 am
Location: Battle Creek, Mi
Contact:

Post by Columbia34 »

yeah its looking great, the stripes really set the boat off what a change. It was a long 16hr day, but its was all worth it when we pulled all the masking off the boat. The deck paint it next.
Post Reply