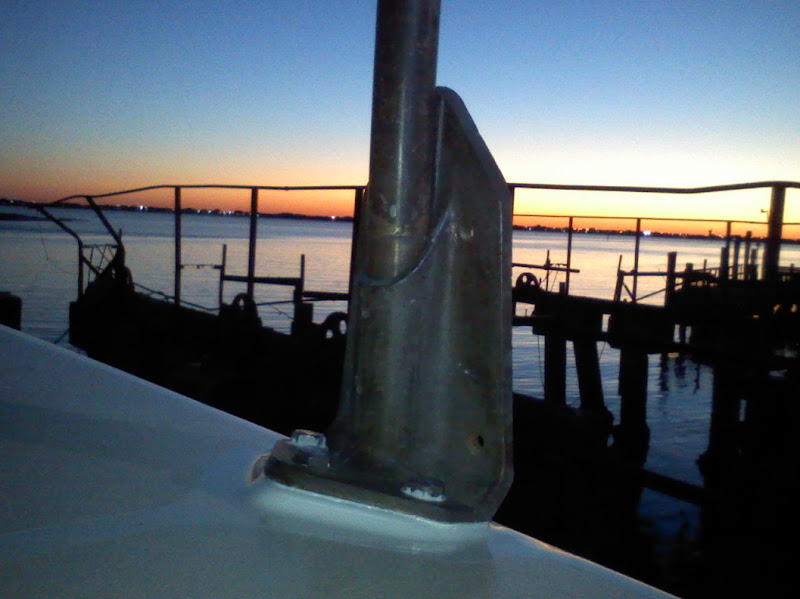
I would like to make molds for the 16 covering boards that are mounted between the stantion bases and the deck. Originally they were made of teak, but time has taken a toll and the need replacement.
My idea is to make molds for each covering board, then fill the mold with epoxy, attach to the deck then glass over top, making them a part of the deck. I've thought of plaster but am concerned with the water content. Beyond, that I'm at a loss.
Can anyone suggest suitable materials for easily and quickly creating molds.
Best regards,
Warren Fraser
Suitable materials to make a mold for epoxy
-
wfraser
- Bottom Paint Application Technician
- Posts: 14
- Joined: Wed Oct 15, 2008 9:52 am
- Location: Tokyo, Japan
Suitable materials to make a mold for epoxy
Warren Fraser
s/v Voyager of Yokohama
s/v Voyager of Yokohama
-
barrybrown
- Master Varnisher
- Posts: 105
- Joined: Tue Aug 12, 2008 6:39 pm
If it were me I would create a sandwich of fiberglass cloth and a good marine plywood soaked/covered in epoxy. While not just simple, it gives you the option to paint or stain/varnish.
edit. Although I'm not entirely sure of your application, but I dont think you need to worry about the cloth, just coat with epoxy and then varnish or paint.
edit. Although I'm not entirely sure of your application, but I dont think you need to worry about the cloth, just coat with epoxy and then varnish or paint.
I've used plaster for making molds quite a few times, made things ranging from motorcycle gas tanks to seat pans.
I use the finest plaster I can find, then do several coats of paint or varnish to ensure smoothness, then use a release agent. never had any trouble with it.
Used to use plaster or wood to make mock ups, then cover them with silicone mold material, works great but gets expensive for either large or multiple one-off projects.
Wood is an advantage over other methods, as to make a cast you need to make a plug, and if you use wood to make the plug, well, you already have a serviceable part.
Ken.
-
David
-
Idon84
- Skilled Systems Installer
- Posts: 245
- Joined: Tue Mar 04, 2008 8:06 pm
- Boat Name: Cosmic Dancer
- Boat Type: Hess Cutter
- Location: Olympia, WA
- Contact:
Warren,
Got the same issue although my cover boards are not rotten from what I can see. I plan on simply removing all of the stanchion bases, removing all the varnish & sealer between the planks, the filling and fairing the boards with thickened epoxy followed by a light layer of cloth over the top. Then I'll come back and install the stanchion bases with thickened epoxy instead of the mahogany pieces which are currently falling apart.
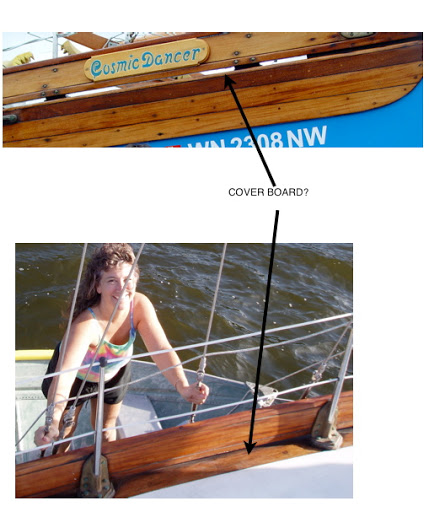
Solid epoxy would be WAY to heavy! David's plan is ideal but that is a lot of work too. Are you sure you have to remove the boards or can you just epoxy and fill over them? Cmartin has a good idea too if you end up removing them. Simply cut the ply wood to the shape needed with a jig saw from a piece slightly smaller than what you currently have and then bond the hole thing to the deck and put a cover material over it, then fill and fair with epoxy. I plan to have mine look like these... http://lh5.ggpht.com/_pGE7b6nT69M/SUrEp ... 081726.jpg
Currently they look like this... http://lh5.ggpht.com/_pGE7b6nT69M/SUrHF ... rboard.jpg
The picture at the top of the 2nd link shows the planks below the cover board that I also intend on removing because of age and weight. The cover board will be epoxied and then I'll add a new board right underneath for my chainplate stand offs... That way it will look like many other BCC's. 2 reasons why I want to do it this way. 1. I have a nice leak forward and can't get to the joint under the coverboards. 2 I don't like spending 4 days every 6 months to varnish everything.
Cheers,
Got the same issue although my cover boards are not rotten from what I can see. I plan on simply removing all of the stanchion bases, removing all the varnish & sealer between the planks, the filling and fairing the boards with thickened epoxy followed by a light layer of cloth over the top. Then I'll come back and install the stanchion bases with thickened epoxy instead of the mahogany pieces which are currently falling apart.
Solid epoxy would be WAY to heavy! David's plan is ideal but that is a lot of work too. Are you sure you have to remove the boards or can you just epoxy and fill over them? Cmartin has a good idea too if you end up removing them. Simply cut the ply wood to the shape needed with a jig saw from a piece slightly smaller than what you currently have and then bond the hole thing to the deck and put a cover material over it, then fill and fair with epoxy. I plan to have mine look like these... http://lh5.ggpht.com/_pGE7b6nT69M/SUrEp ... 081726.jpg
Currently they look like this... http://lh5.ggpht.com/_pGE7b6nT69M/SUrHF ... rboard.jpg
The picture at the top of the 2nd link shows the planks below the cover board that I also intend on removing because of age and weight. The cover board will be epoxied and then I'll add a new board right underneath for my chainplate stand offs... That way it will look like many other BCC's. 2 reasons why I want to do it this way. 1. I have a nice leak forward and can't get to the joint under the coverboards. 2 I don't like spending 4 days every 6 months to varnish everything.
Cheers,
-
wfraser
- Bottom Paint Application Technician
- Posts: 14
- Joined: Wed Oct 15, 2008 9:52 am
- Location: Tokyo, Japan
One of the main limitations I experience in owning and repairing a sailboat is that I'm living in a small apartment in central Tokyo, so power tools for the time being must remain in my fantasy workshop. Molds, however, are doable.
One drawback of my plan is that by integrating the epoxy covering boards into the deck I remove the flex of wood, meaning a serious blow to the lifelines may end up cracking the deck/glass, as opposed to crushing the wood. The outcome would be worse than if wood had been used. This would be enough for me consider Davids's suggestion of simply replacing with teak.
One drawback of my plan is that by integrating the epoxy covering boards into the deck I remove the flex of wood, meaning a serious blow to the lifelines may end up cracking the deck/glass, as opposed to crushing the wood. The outcome would be worse than if wood had been used. This would be enough for me consider Davids's suggestion of simply replacing with teak.
Warren Fraser
s/v Voyager of Yokohama
s/v Voyager of Yokohama
-
wfraser
- Bottom Paint Application Technician
- Posts: 14
- Joined: Wed Oct 15, 2008 9:52 am
- Location: Tokyo, Japan
Byron,
I've already removed half of the stantions so am fully committed to replacing the boards.
That first picture from the BCC site was what inspired me to go with epoxy in the first place. For me the problem with the fabrication plans is that I have no idea how long it would take to assemble 16 boards, all of varying thicknesses, and I'm set for a deck repaint in early January. Quick and simple is what I am looking for.
I may have to go with simply replacing them with teak, something i can do after the painting.
BTW: The second link leads to a Not Found page.
Warren Fraser
s/v Voyager of Yokohama
s/v Voyager of Yokohama
-
wfraser
- Bottom Paint Application Technician
- Posts: 14
- Joined: Wed Oct 15, 2008 9:52 am
- Location: Tokyo, Japan
Byron,
Now that makes sense. That is a covering board...
I always thought the term as applied to the spacers between the deck and stantion base was a bit broad.
My boards have been glassed over, although the salt in me prefers the look of yours. I'm thinking of stripping my bulwarks and going with oil for protection...
Warren Fraser
s/v Voyager of Yokohama
s/v Voyager of Yokohama
-
Quetzalsailor
- Master of the Arcane
- Posts: 1100
- Joined: Fri Aug 26, 2005 9:53 am
- Boat Name: Quetzal
- Boat Type: LeComte North East 38
- Location: Philadelphia, PA
I don't think you need to make moulds for these boards. 1) 'Way too much trouble since you essentially have to make the perfect negative and then make the desired part. If you were making a fiberglass part for several boats then the equation changes. 2) These bulwarks look like flat boards sprung (or perhaps steamed) to the curve; an easy reproduction in kind. 3) If you're really serious about ending up with 'glass rather than wood then choose a core: wood, foam planks, solid fiberglass (heavy!). Shape to fit (no doubt curved in plane) and scarpf to length. Wrap it in several thicknesses of 'glass, coat out in microballoons or similar lightweight fillers in resins. Finish. Paint or gelcoat.
I have some concerns about a wood finish system consisting of epoxy coat plus varnishes. I've done it on smaller parts. I am doing it on my Flying Dutchman. Gougeon promotes it. I found that outside corners at the butt end of my wood tiller failed early. They were radiused. The rest of the tiller lived most of the time inside a Sunbrella tiller cosie. Repair consisted of sanding through the varnish and the failed epoxy, re-epoxying, and revarnishing; kind of a pain since it's hard to achieve perfection in smoothness, while maintaining the thickness of the adjacent epoxy, and while achieving the desired thickness in new epoxy.
The FD will live under cover most of the time so I hope the effort and the risk are justified.
-
David
<<I found that outside corners at the butt end of my wood tiller failed early. They were radiused. The rest of the tiller lived most of the time inside a Sunbrella tiller cosie. >>
Keep in mind you need at least two and I always add three or more coats of epoxy to the wood first; then a number of coats of UV protection (I use System Three Clear Gloss LPU). It sounds like the cover for your tiller left that area exposed, the varnish went and the epoxy might have been thin there and consequently failed. Given enough time and exposure without protection from UV, epoxy will fail.
Keep in mind you need at least two and I always add three or more coats of epoxy to the wood first; then a number of coats of UV protection (I use System Three Clear Gloss LPU). It sounds like the cover for your tiller left that area exposed, the varnish went and the epoxy might have been thin there and consequently failed. Given enough time and exposure without protection from UV, epoxy will fail.
-
Quetzalsailor
- Master of the Arcane
- Posts: 1100
- Joined: Fri Aug 26, 2005 9:53 am
- Boat Name: Quetzal
- Boat Type: LeComte North East 38
- Location: Philadelphia, PA
I probably had 3 coats of West 105 and their hardener for clear finish + 3-4 coats of UV resistant varnish. However, sanding between layers plus the usual tendency for finishes to sag away from corners would tend to make the thicknesses less. More radius would help, too. Certainly, the cosie did not reliably keep sun off the finish.
Neat epoxy will fail in pretty short order, perhaps a summer and a smidge of the next.
Neat epoxy will fail in pretty short order, perhaps a summer and a smidge of the next.
-
Zach
- Boat Obsession Medal Finalist
- Posts: 684
- Joined: Wed Jan 25, 2006 6:28 pm
- Location: Beaufort, North Carolina
- Contact:
I've had some success making molds using polyester resin and chopped strand mat. Done on top of a few coats of carnauba wax over a painted surface... pulls up some paint, but leaves a mostly slick part. (Next time I'm going to load my cup gun full of PVA and see if that helps the release!)
Instead of wetting out with a squeedgee, I tear off pieces and dunk it in the resin so it forms around corners without wrinkling up, and takes a lot less rolling to get it to conform. Takes a few changes of gloves...
For small stuff I've used bondo for the plug. If you grab an extra tube of catalyst you can work it with a body file almost as fast as you can mix it. You can also mix in a little polyester resin to make more of a soup than a putty if you want to mix it hot and still be able to smooth out large areas without it setting up as you spread it. (More dark pink than light when I'm making a part that is sacrificial... Faster! Faster! grin!)
Note: I keep waiting to mix up polyester resin hot enough to reach spontaneous combustion... but so far I've only had one project get hot. (Grin)
1961 Pearson Triton
http://pylasteki.blogspot.com/
1942 Coast Guard Cutter - Rebuild
http://83footernoel.blogspot.com/
http://pylasteki.blogspot.com/
1942 Coast Guard Cutter - Rebuild
http://83footernoel.blogspot.com/
-
David
Maybe you should cover the butt end of your tiller better.Quetzalsailor wrote:I probably had 3 coats of West 105 and their hardener for clear finish + 3-4 coats of UV resistant varnish. However, sanding between layers plus the usual tendency for finishes to sag away from corners would tend to make the thicknesses less. More radius would help, too. Certainly, the cosie did not reliably keep sun off the finish.
Neat epoxy will fail in pretty short order, perhaps a summer and a smidge of the next.
-
Quetzalsailor
- Master of the Arcane
- Posts: 1100
- Joined: Fri Aug 26, 2005 9:53 am
- Boat Name: Quetzal
- Boat Type: LeComte North East 38
- Location: Philadelphia, PA
<<<<Maybe you should cover the butt end of your tiller better.>>>>
Of course. (But, we sold the boat.)
Many, if not most, of us have brightwork. An earlier post on this string spoke to epoxy and varnish finishes as an improvement to straight varnish. Having read Gougeon, I bought into the idea, have used it, and am using it. I felt it appropriate to pass on the experience I'd had with it, and the notion of increased difficulty of subsequent repair.
-
David
Without UV protection, neat epoxy, without the club soda and a twist, will fail sooner than a summer. The issue of your tiller, or any brightwork encapsulated in epoxy is to not let the varnish fail. If it does the epoxy is hard enough and hopefully thick enough that sanding the area of failed varnish lets you simply rough up the epoxy a bit without breaking thru. The advantage of encapsulating the brightwork in epoxy is that it seals and stabilizes the wood, allowing the varnish a better foundation. But, in the end it is all about the varnish, or synthetic UV protection, and the whole system, whether encapsulated or not, hinges on that.
-
Trecksail
- Bottom Paint Application Technician
- Posts: 13
- Joined: Wed Mar 12, 2008 12:43 pm
- Location: Lake Michigan - Racine, WI
- Contact:
Hold the phone!
Cheap source for teak? Hot damn. Can you divulge any info?
"All men die, but very few men ever really live!
Have a great day!
Joe
Have a great day!
Joe
-
Hirilondë
- Master of the Arcane
- Posts: 1317
- Joined: Thu Dec 28, 2006 8:50 am
- Boat Name: Hirilondë
- Boat Type: 1967 Pearson Renegade
- Location: Charlestown, RI
Re: Hold the phone!
Trecksail wrote:Cheap source for teak? Hot damn. Can you divulge any info?
Shipping might erase some of the savings ;>)wfraser wrote:.....in Thailand.......
Dave Finnegan
builder of Spindrift 9N #521 'Wingë'
--------------------------------------------------------------------------------------------------------------------------------------------------------------------
Gresham’s Law of information: Bad information drives out good. No matter how long ago a correction for a particular error may have appeared in print or online, it never seems to catch up with the ever-widening distribution of the error.
-
Idon84
- Skilled Systems Installer
- Posts: 245
- Joined: Tue Mar 04, 2008 8:06 pm
- Boat Name: Cosmic Dancer
- Boat Type: Hess Cutter
- Location: Olympia, WA
- Contact:
Well so much for opening my mouth:
Quoted from earlier in this thread,
Now that I get to do this job, I will most probably be using a marine grade plywood and then fairing and shaping with thickened epoxy. Unless of course there are other options I come across. Teak would be great but the cost would kill me around here.
Quoted from earlier in this thread,
WRONG!!!! I though I would check them out and low and behold... Rotten Spongy parts. JOY!Got the same issue although my cover boards are not rotten from what I can see.
Now that I get to do this job, I will most probably be using a marine grade plywood and then fairing and shaping with thickened epoxy. Unless of course there are other options I come across. Teak would be great but the cost would kill me around here.