Page 1 of 1
Wing? Nert? my new nesting dinghy
Posted: Tue Mar 13, 2007 7:05 pm
by Hirilondë
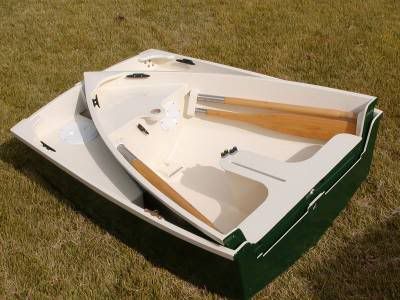
I have just substantially completed my new tender for Hirilond?. It is a 9 foot nesting/sailing/rowing dinghy. I am still waiting on my sail and rigging hardware, but hope to have her afloat soon. I will update with nested, sailing and on deck pictures as the events occur.


Posted: Tue Mar 13, 2007 7:58 pm
by jpmathieu
Dave, The new tender looks great. It will go well with the Renegade.
Posted: Tue Mar 13, 2007 9:43 pm
by s/v Groovy
WOW! does she fit on the fore deck? I remember the pic of you sawing her in half, eyes closed, it?s obvious you know exactly what you?re doing.
I can?t wait for the pics of her sailing, and nested on deck.
Want to give away what the name means?
Posted: Tue Mar 13, 2007 10:12 pm
by fusto
Wow!
You are quite the craftsman.
Wish I was half as good. (*sigh* not so good with the wood...)
A tip of the hat!
The cutting in half picture is one of my favorites.
Posted: Tue Mar 13, 2007 11:24 pm
by Peter
Beautiful job, Dave ... and the colors are great.
Is the centerboard slot off-center?
Posted: Wed Mar 14, 2007 12:12 am
by Hirilondë
Peter wrote:
Is the centerboard slot off-center?
Thanks for the compliments. Yes, just to the side of the keel. This way the keel stays intact the entire length of the boat protecting it while dragging it up on the beach etc.. I have installed a piece of bronze half-oval on the edge of the keel to act as a chafe guard for it.
Posted: Wed Mar 14, 2007 7:11 am
by Tim
She looks great, Dave!
Posted: Wed Mar 14, 2007 8:54 am
by Figment
I like the distinction between the bright finished seat and the painted floatation tanks. A nice cue to newcomers that they should keep their weight centered.
Posted: Wed Mar 14, 2007 9:51 am
by MikeD
Very nice! Is it your own design? Looking forward to many more pictures!
BTW, what does "Wing? Nert?" mean in Elvish? :)
Posted: Wed Mar 14, 2007 10:28 am
by Ceasar Choppy
I love the liberal use of the umlaut:
?It?s like a pair of eyes. You?re looking at the umlaut, and the umlaut is looking at you.? -- David St. Hubbins
:)
Nice job Dave!
Posted: Wed Mar 14, 2007 6:00 pm
by A30_John
Nice job on the dinghy. A couple of questions... I see that you used bolts with wing nuts to fasten the top of each hull half. What did you use on the bottom? Do you have fasteners below the waterline, and if so, what did you use for a gasket? Next question, how much does each half weigh?
Again, wonderful job!
Posted: Wed Mar 14, 2007 7:38 pm
by Hirilondë
MikeD wrote: Is it your own design? BTW, what does "Wing? Nert?" mean in Elvish? :)
It is designed by Graham Byrnes and the plans are sold by his company
http://www.bandbyachtdesigns.com/ This model is a Spindrift 9 (nesting version).
Cool! You noticed that it is an Elvish name. The language is actually properly called Quenya. Wing? is the word for the foam that is blown off the top of waves; spindrift in English. Nert? is the word for the number nine.
A30_John wrote:I see that you used bolts with wing nuts to fasten the top of each hull half. What did you use on the bottom? Do you have fasteners below the waterline, and if so, what did you use for a gasket? Next question, how much does each half weigh?
The plans call for 5 bolts, three of which would be at or below the waterline and require rubber washers on each side. A fellow Spindrift builder invented his own lower hardware which makes assembly of the two halves in the water much easier and eliminates the leaking all together during assembly and in use. I used his plans to fabricate my own set of hardware from 1/8" stainless steel.


As he tells me one simply launches both halves of the dinghy. Then you climb into the aft half. You pull the forward half to you and lift it up and together then down engaging the lower hardware. Then insert the 2 upper bolts and tighten the wing nuts. The bright seats are then installed (they just slip into place, no fasteners). I hope to try this tomorrow, but the weather is supposed to turn for the worse.
The entire dinghy weighs about 75 lbs, so approximately 40 lbs for aft section and 35 lbs for the fore section.
Posted: Wed Mar 14, 2007 8:36 pm
by A30_John
Those brackets are the most clever way I've seen yet to resolve that problem with nesting dinghies. Did you have to grind out some wood or glass on the "transom" of the forward half in order to make room for the bracket to fit? I'll be interested to hear your report on how easy it is to nest the two pieces. I may well build one of these.
Last question.. (I promise) did you cover the dinghy with glass inside and out? Or is that weight representative of the dinghy saturated in epoxy without glass? It appears from your photo that the hull has not been glassed.
Posted: Thu Mar 15, 2007 6:50 pm
by Hirilondë
The rain set in towards the end of a very warm day, drat, never got to go rowing. I will have to report on the actual putting together of the halves another time.
A30_John wrote:Did you have to grind out some wood or glass on the "transom" of the forward half in order to make room for the bracket to fit?
I routed out some material from the transom of the forward section and the bottom of the aft section. As the hull is just 6 mm Okume plywood I had to first glue in "patches" of 1/2" plywood to create enough meat to do this. Visit
http://www.pbase.com/sailrosita/connector_design and you will find the drawings for the connectors and details for routing out to receive them. This site belongs to the man who designed them. He made and used jigs for the routing, I just did them free hand. Other than that I made and installed them exactly as he specified. I saw no reason to try to improve them.
If you end up building one of these you may want to start participating in this forum
http://www.messing-about.com/forum/inde ... f4940ad6e9 as well. One of the sections is devoted to the building of B and B designs exclusively.
A30_John wrote:did you cover the dinghy with glass inside and out? Or is that weight representative of the dinghy saturated in epoxy without glass?
The only glass used is one layer of 3" - 9 oz glass tape on both the inside and outside of all joints. The only exception being additional layers on the nesting bulkheads/transoms (they are bulkheads until you cut the dinghy in half, then they become transoms), which have significant stress on them. The entire hull is then coated with 2 coats of epoxy, 6 coats of Awlgrip 545 2-part epoxy primer and then 5 oats of Awlgrip outside and 2 of EasyPoxy inside with Interdeck on the bottom.
Posted: Thu Mar 15, 2007 10:36 pm
by A30_John
Thank you for the comprehensive information.
I'm very interested to hear how the trials go when you launch, and I'm very very interested to hear how it tows behind your sailboat. :-)
I'll check out the site you recommended.
Posted: Sat Mar 24, 2007 8:54 pm
by Hirilondë
Well I finally got to go rowing today. Probably a good thing I went, supposed to start snowing soon.
The assembly in the water went better than I had hoped for. It is remarkably easy and took a minute from stepping into the aft section through installing the removable seats and setting my self down to row. The nesting hardware design proved to be more than clever.
She rows quite well. Here are a few pics..........


Posted: Sat Mar 24, 2007 9:36 pm
by A30_John
Dave, she's a beauty! I'm going to see if I get get one built this summer. Thanks for all the info.
Posted: Sat Mar 24, 2007 9:43 pm
by Figment
What'd you use for the gunwale guard?
Posted: Sun Mar 25, 2007 12:56 am
by Peter
Dave, she's a work of art!
I think I see a new dinghy in my future :-)
Posted: Sun Mar 25, 2007 8:33 am
by Duncan
Dave, that really is inspirational, especially with all the good links and photos!
Hirilond? wrote: I will update with nested, sailing and on deck pictures as the events occur.
I am looking forward to these. Am I correct in thinking, because of how this one looks, she wouldn't stow upside-down? I am also guessing she needs some sort of cradle/shaped chocks?
Posted: Sun Mar 25, 2007 9:58 am
by Hirilondë
Figment wrote:What'd you use for the gunwale guard?
I bought the material through the store at work. It is a dacron cloth over foam material. I will get the brand/model info monday for you.
Duncan wrote:Am I correct in thinking, because of how this one looks, she wouldn't stow upside-down? I am also guessing she needs some sort of cradle/shaped chocks?
I am planning on stowing it upside down on the foredeck/over the leading end of the coach house. My Renegade is still under a frame and cover so this detail has yet to be worked out. I am considering chocks to receive the gunwales in a couple spots, or just using foam blocks that fit onto the gunwales. I would tie down with either option. Right side up could work, but the profile would be higher and it would need a cover. I want to avoid both of those.
Posted: Sun Mar 25, 2007 4:11 pm
by A30_John
Am I correct in thinking, because of how this one looks, she wouldn't stow upside-down?
Every boat is different. I stow my current nesting dinghy upside down on the foredeck, covering the hatch. The centerboard trunk on the dinghy pictured above would impede stowage in this location. Here's what my current configuration looks like:

For use as a tender on my boat, I would not build a nesting dinghy as a sailing dinghy to ensure a similar fit.
The foredeck stowage you see here works very well on the A30. The mooring cleats are still accessible, as is everything forward. The lashings provide additional handholds when working forward, and, for added security, I sit on the dinghy when reefing in heavy weather.
I think the 9' Spindrift is the best solution I've seen yet for boats our size if you require deck stowage. (If I didn't have a requirement to stow my dinghy on deck, then the Fatty Knees would be my first choice.)
Posted: Sun Mar 25, 2007 4:19 pm
by A30_John
Right side up could work, but the profile would be higher and it would need a cover. I want to avoid both of those.
Good thinking Dave. I wouldn't feel comfortable storing it right side up on a boat y/our size. If the dinghy ever filled up with water in heavy weather you could have a serious problem on your hands. I would not trust a cover to prevent that from happening.
Posted: Mon Mar 26, 2007 8:20 pm
by Hirilondë
Figment,
Part # TEM-1518-QR-150
http://store.hamiltonmarine.com/search. ... wale+guard
Expensive stuff, costs the same as 2 of the 3 sheets of plywood it took to build the boat. But it comes out well and should last a long time.
Here it is nested on the trailer. It will nest the same on the boat only upside down and in the same orientation as John's pram, or so is the plan.

Posted: Tue Mar 27, 2007 9:53 am
by Figment
Yeah, I was afraid you'd say that. Applying that to my dinghy would cost 3x what I spent building the WHOLE dinghy. nuts.
However, I guess it's not about the dinghy, it's about the paintjob on the real boat.
Posted: Tue Mar 27, 2007 10:07 am
by bcooke
Mike, it is expensive but totally worth it.
It looks nice (minus an installation faux pas that I would not do again) and does an excellent job of protecting whatever my dinghy comes in contact with. I covered my nutshell for about $140.
I have noticed that since I left my dinghy outside on low blocks over the winter that the rubrail material is looking a bit grungy. That might be the excuse to pull it off and replace it. Yes, it is that good.
-Britton
Posted: Tue Mar 27, 2007 12:46 pm
by Tim
I have the same rubrail material on my Fatty Knees.
If you like a rubrail that works, it's totally worth using, regardless of price. It's the only rubrail that's any good at all--strong, long-lasting, and easy on the topsides.
You're right: it's not about the dinghy; it's about protecting the parent boat. How much is that worth?


