The Plastic Classic Forum, your free and in-depth resource for information on re/building classic sailboats. ... Be sure to visit / join our sister site at sailFar.net! ... And don't forget to check out Atom's Virtual Home Port! ...
First, I just want to say how much I have enjoyed reading this forum. The quality of the advice given on such a myriad of topics is outstanding.
I have owned my boat for two seasons now and I have ignored my exterior teak for far too long. I have been very intimidated by the thought of removing it and doing a proper job of varnishing. This is the year that I will over come that fear.
I have removed almost all exterior teak and have started the process of preparing it for varnish. My question for this esteemed body is this:
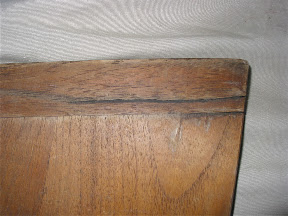
The middle hatchboard has a rather significant crack. I am not much of a woodworker and really have no idea as to how to approach this task. Any words of advice would be very appreciated.
Mark
Huntington, NY
'82 Catalina 25 FK/SR #3202
"Good News"
Welcome to the forum! (Or at least to the "official" side of the forum, as a registered poster!)
Is the crack tight, or can you pull it apart at all? Does the crack make the surrounding wood flop around at all, or is the edge of the hatchboard still secure?
If you can spread the crack at all, it's easy to glue it up with epoxy, resorcinol, or other appropriate glue of your choice. It's not really a critical joint, so if the gluing wasn't perfect, it wouldn't be the end of the world. You're looking to secure the edge of the hatch and prevent further damage.
---------------------------------------------------
Forum Founder--No Longer Participating
What you say is true, there are some very knowledgeable people here who are very generous with their time.
Regarding your crack, or should I say your cracked hatch board I would say from the picture that it would be an easy fix, especially if you can get a chisel or a wedge gently into the crack to spread it a bit. If you can, clean out as much accumulated grunge from the crack and work some epoxy into the crack, idealy with a syringe but a bit of dilligence with a sliver of hardwood or the like will work. Open and shut the crack a number of times (gently) like a baby gumming strained peas to work the epoxy into the crack then clamp, not too tightly (you dont want to squeeze all the glue back out). Use a good epoxy, like West system or Industrial formulators, not the cheap 5 miniute bargain store variety. You could also get some 'resorcinol' powder and mix up a little since it is still a good glue above the waterline especially under a finish. When everything has cured (overnight) you can sand or better yet scrape the excess glue away and smooth out the wood for finishing, good as new.
Don't be afraid to tackle stuff like this, even if you haven't done much of this sort of work, the person that built it in the first place was no smarter than you, and he had to learn how just like everyone else. With all woodwork, just life, plan your operation in your mind, try everything dry, without glue first so that you have all your tools and clamps ready at hand then take you time and all will work out well. You will always see the areas that you think you might have done better at but noone else will. I am convinced that Stradavarius could easily point out the places where he could have done better. The point is to learn and move forward, not to be perfect the first time.
Good luck, and post some pics of your finished work, stuff like that is a delight to us all.
Like feetup said, spreading the crack a bit, hopefully not increasing its length gets you inside a bit to clean it out. Clamping the board together at the end of the crack can help keep it from continuing. Because teak is oily, the final cleaning should be with alcohol or acetone. Acetone works a little better. Both however dissolve the natural oils in teak and many foreign contaminants you may have and will improve the bond of your glue. Resorcinol is probably the strongest glue for teak, but epoxy joints usually look better when varnished and are quite strong as well.
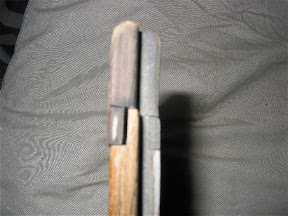
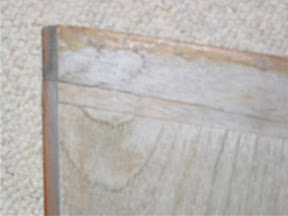
In your second picture it looks like you have a half-lap joint that is coming apart. If this is so you can use a similar technique but depending on how else the hatch board is loosening up you may want to take it apart. Its hard to tell from your pictures so I can't really advise further.
Dave Finnegan
builder of Spindrift 9N #521 'Wingë'
-------------------------------------------------------------------------------------------------------------------------------------------------------------------- Gresham’s Law of information: Bad information drives out good. No matter how long ago a correction for a particular error may have appeared in print or online, it never seems to catch up with the ever-widening distribution of the error.