How to replace electrical wires in boat...
How to replace electrical wires in boat...
FIZZ, the family daysailer, needs new wires badly. Only one light out of 5 works and that sole working light is in the cabin! FIZZ is a 1978 C.E. Ryder Sea Sprite 23 so she has for both better and worse, a full liner in the interior. Most of the wires goes thru behind the cabin liner so... Could anyone be willing to give me some pointers in replacing the wires? I am a total novice in this area so would appreciate some pointers. Thanks. - Casey
-
Figment
- Damned Because It's All Connected
- Posts: 2847
- Joined: Tue Apr 08, 2003 9:32 am
- Boat Name: Triton
- Boat Type: Grand Banks 42
- Location: L.I. Sound
The liner does make things difficult. Much depends upon how well secured the wires are in their runs. Ideally, you'd solder a new wire to the end of the old, and pull from the other end so that the new wire runs the same path as the old. It's been my experience, however, that this only works about half of the time. Sometimes the existing wiring is too well anchored. Sometimes it's just been gooped-in-place inadvertently in the process of some other repair.
Are you rewiring the whole boat, or just replacing what's broken?
If rewiring the whole boat, it may be easier to simply abandon all old wiring in place (remove what you can, but don't go nuts) and create new wiring chases. I think this makes for a better end-product because you'll be less frustrated in the process and you'll be able to properly secure the new elements.
If you're just replacing what's broken, think ahead to the day when the rest of the wiring will need to follow suit.
Figment:
I did replace the light bulbs and when that didn't work, tried new light fixtures... still no worko. So it's the wires. Since reading Don Casey's electrical book, I have determined that the wires for the port/starboard lights are of the solid wire variety... An extremely lousy choice for boat wiring, according to Don Casey.
I don't think I want to abandon the old wiring and try to get new wires somewhere else. I do not want to see wires lurking in the spartan interior of the Sea Sprite 23. I want it hidden.
Would twisting and duct taping firmly the old wires together with the new wires then try pulling the new wire in, using the old wire work? - Casey
Er... Only 1 out of 5 lights work. You know that means.Are you rewiring the whole boat, or just replacing what's broken?
I did replace the light bulbs and when that didn't work, tried new light fixtures... still no worko. So it's the wires. Since reading Don Casey's electrical book, I have determined that the wires for the port/starboard lights are of the solid wire variety... An extremely lousy choice for boat wiring, according to Don Casey.
I don't think I want to abandon the old wiring and try to get new wires somewhere else. I do not want to see wires lurking in the spartan interior of the Sea Sprite 23. I want it hidden.
Would twisting and duct taping firmly the old wires together with the new wires then try pulling the new wire in, using the old wire work? - Casey
twist and pull
may work, dependin on how well the wires are secured, I get to watch a lot of electricians at work, mostly because they always want to work in the smae area I am, sometimes just because it's better than working, and I've been amazed at some of the tension they put on wires when they pull them.
A lot of the electricians pull a fishwire through, then pull a nylon cord through, then tie onto the wire and pull the wire with the cord, they claim the cord holds the wire better.
The cord is the same as you get at the lumber yard for securing loads, may want to try that.
ken
A lot of the electricians pull a fishwire through, then pull a nylon cord through, then tie onto the wire and pull the wire with the cord, they claim the cord holds the wire better.
The cord is the same as you get at the lumber yard for securing loads, may want to try that.
ken
-
Tim

- Shipwright Extraordinaire
- Posts: 5708
- Joined: Tue Apr 01, 2003 6:39 pm
- Boat Name: Glissando
- Boat Type: Pearson Triton
- Location: Whitefield, ME
- Contact:
Those wires behind the liner were installed before the boat was assembled, most likely, and therefore are probably well stuck in place with the resin used to secure the liner to the underside of the cabin trunk.
Each situation varies, but I think it might be tough to pull anything through using the old wires. I wouldn't get too excited over the prospect! Basically, any time you manage to pull wires through a liner like this is time for celebration, and not to be expected.
Attempting to pull any new wiring through the liner is likely to be an exercise in frustration, since the liner is not generally spaced--and certainly not evenly--away from the underside of the cabin. Inside that liner, were you to have X-ray vision, you'd see globs of resinous mess that probably oozed out in all directions when the two pieces were "smooshed" together during assembly--with the wires already in place. In some areas, you might be lucky enough to find a space through which you can snake wires.
My point isn't to be discouraging, but to hopefully prepare you for the possible frustrations you will face during this process. You may well be better off figuring out another way to hide the wires. When I rewired, I couldn't even manage to pull out the old wires from molded wire chases; they were somehow stuck in there.
There are lots of ways to hide wiring that aren't difficult. At the juncture of hull and deck is often a good location; you can easily cover this witih trim if necessary. Just don't run anything through the bilge, as tempting as it may seem (except the bilge pump, etc). Of course you don't want wires all over the place, but I think you'll find that it's easier and better to work on creative ways to run and hide the wires than it is to fight with the stubborn old wiring. That said, it's worth giving each wiring run a test first, to see if you'll be able to pull it through or not.
Good luck! Wiring is fun stuff. (really)
---------------------------------------------------
Forum Founder--No Longer Participating
Forum Founder--No Longer Participating
-
Tim
- Shipwright Extraordinaire
- Posts: 5708
- Joined: Tue Apr 01, 2003 6:39 pm
- Boat Name: Glissando
- Boat Type: Pearson Triton
- Location: Whitefield, ME
- Contact:
By the way, if you don't have one yet, go out and get a good wire snake from the hardware store. You'll need it if you want to run anything through the liner.
Taping wires together can work, but it takes surprisingly little force to often rip that tape apart, usually halfway through the chase, causing additional frustration. Just be prepared for the potential difficulties and you'll be fine!
Taping wires together can work, but it takes surprisingly little force to often rip that tape apart, usually halfway through the chase, causing additional frustration. Just be prepared for the potential difficulties and you'll be fine!
---------------------------------------------------
Forum Founder--No Longer Participating
Forum Founder--No Longer Participating
-
dasein668
- Boateg
- Posts: 1637
- Joined: Thu Apr 03, 2003 9:09 am
- Boat Name: Dasein
- Boat Type: Pearson Triton 668
- Location: Portland, Maine
- Contact:
This was my experience with Dasein. I would seriously consider other options. Wiring neatly bundled and run up underneath the side decks on a boat is pretty inconspicous, and has the added benefit of being easy to get to if any problems arise down the road, or you want to add new circuits.Tim wrote:Those wires behind the liner were installed before the boat was assembled, most likely, and therefore are probably well stuck in place with the resin used to secure the liner to the underside of the cabin trunk.


Nathan
dasein668.com
dasein668.com
-
Invitation
- Deck Grunge Scrubber
- Posts: 35
- Joined: Wed May 25, 2005 3:46 pm
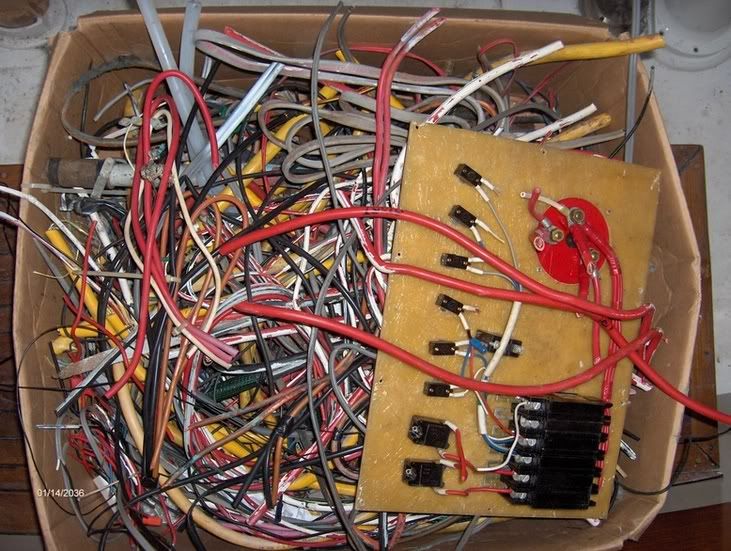
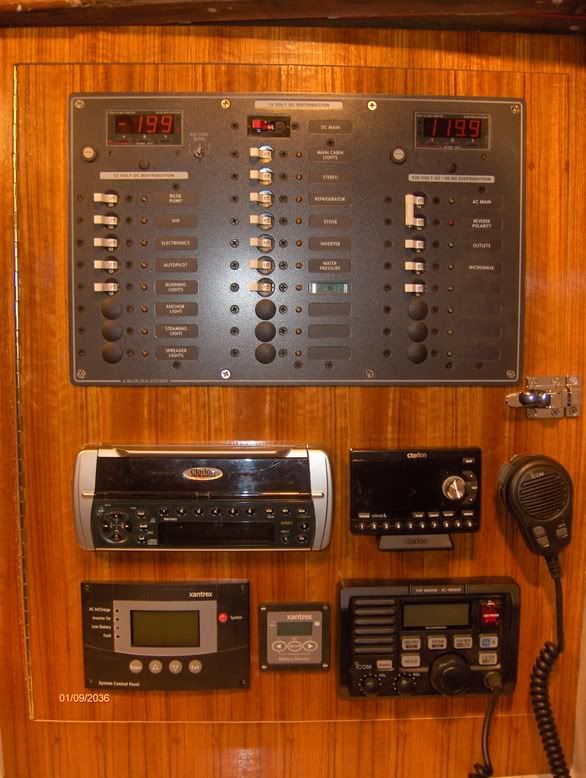
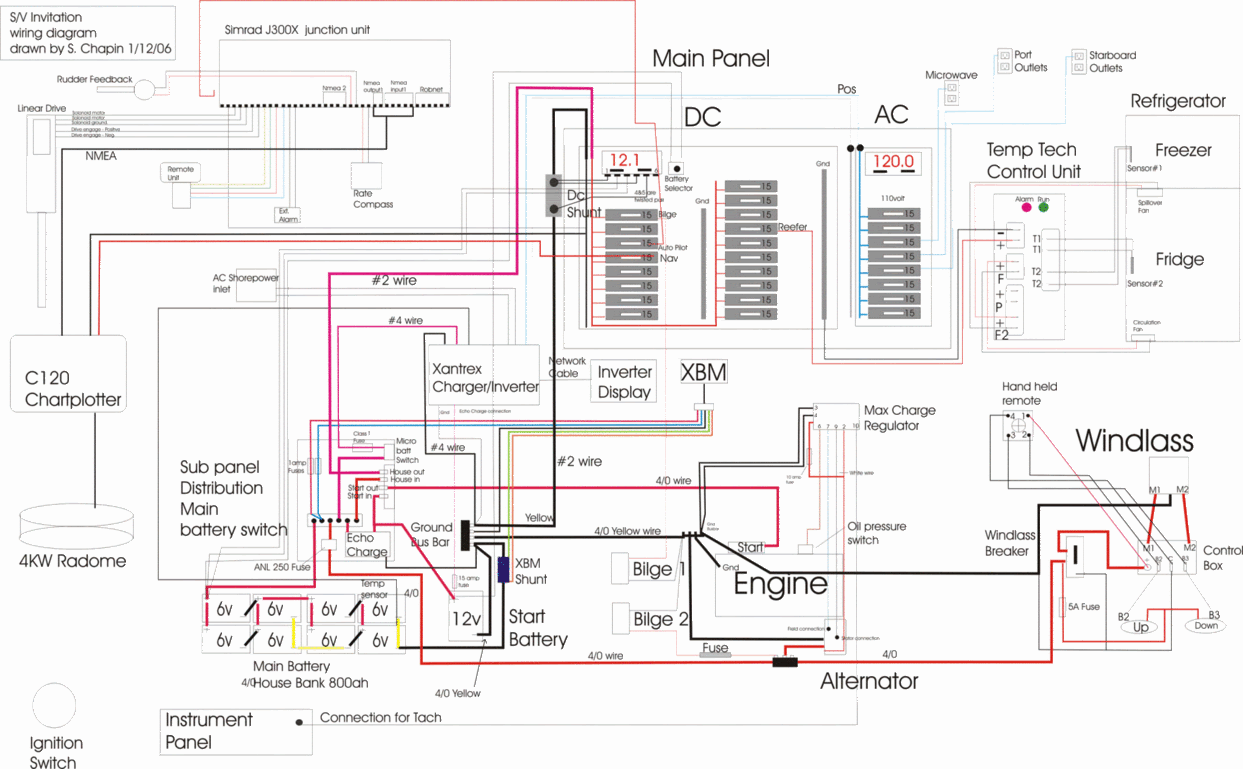
I had a similar problem with my Cheoy Lee. Below is what I did this weekend, removed everything! Working with Jack rabbit to design an entire new system then start wiring next weekend. If you decide to remove everything to solve your problems, do yourself a big favor and draw up an entire wiring diagram and check and double check it before you start laying any new wires.
Here's the old system in a box
Here's the new panel ready to start wiring.
Here's the old system in a box
Here's the new panel ready to start wiring.
-
Invitation
- Deck Grunge Scrubber
- Posts: 35
- Joined: Wed May 25, 2005 3:46 pm
-
dasein668
- Boateg
- Posts: 1637
- Joined: Thu Apr 03, 2003 9:09 am
- Boat Name: Dasein
- Boat Type: Pearson Triton 668
- Location: Portland, Maine
- Contact:
How 'bout a shot of the INSIDE of that nice cabinet of yours?Invitation wrote:Sorry - but sometime's you just gotta show it.


Nathan
dasein668.com
dasein668.com
-
Invitation
- Deck Grunge Scrubber
- Posts: 35
- Joined: Wed May 25, 2005 3:46 pm
-
JonnyBoats
- Candidate for Boat-Obsession Medal
- Posts: 372
- Joined: Fri Feb 04, 2005 4:54 pm
- Location: Wiscasset, ME
- Contact:
Color of wires
I know there are "new" standards for the color of wires. I believe black is now reserved for AC (110V) wiring and the the DC ground should be yellow.
Does someone have a list of the "standard" (recommended) colors that they could post?
Thanks.
Does someone have a list of the "standard" (recommended) colors that they could post?
Thanks.
-
Tim
- Shipwright Extraordinaire
- Posts: 5708
- Joined: Tue Apr 01, 2003 6:39 pm
- Boat Name: Glissando
- Boat Type: Pearson Triton
- Location: Whitefield, ME
- Contact:
There's no requirement to use yellow for DC negative wires, but it's highly recommended, particularly in a boat that also contains AC wiring. The idea is that the use of black for DC negative wires could cause confusion with an AC hot lead, which is also black by convention.
I now always use yellow wire for DC negative leads, but black is still conventional.
Here's a list of other supposedly standard wiring colors. In practice, most of these are never used, but if one really wanted to follow everything to the letter, here they are. The reference is ABYC E-11.

I now always use yellow wire for DC negative leads, but black is still conventional.
Here's a list of other supposedly standard wiring colors. In practice, most of these are never used, but if one really wanted to follow everything to the letter, here they are. The reference is ABYC E-11.
---------------------------------------------------
Forum Founder--No Longer Participating
Forum Founder--No Longer Participating
-
dasein668
- Boateg
- Posts: 1637
- Joined: Thu Apr 03, 2003 9:09 am
- Boat Name: Dasein
- Boat Type: Pearson Triton 668
- Location: Portland, Maine
- Contact:
I used both. I used the buss bar to collect all of the negative returns to a common point. I used the terminal blocks to route power out, as the circuits are all separate. In cases where I wanted 2 or more leads to run off of one hot wire from the panel, I used terminal jumpers. I could have wired everything directly to the panel hots, but it is alot neater and easier to add/subtract/modify with the terminal blocks.
Nathan
dasein668.com
dasein668.com
-
Tim
- Shipwright Extraordinaire
- Posts: 5708
- Joined: Tue Apr 01, 2003 6:39 pm
- Boat Name: Glissando
- Boat Type: Pearson Triton
- Location: Whitefield, ME
- Contact:
It's kind of up to the installer which accessories are used. Terminal blocks and distribution busses really just help organize and neaten up the wiring, and make for a much nicer installation overall. Neatness counts in wiring, because it greatly simplifies troubleshooting or adding new equipment later.hawkeye wrote:I see a lot of you using terminal blocks and alot of you using buss bars. Is it just up to the installer, or is there a good reason for using one over the other?
You should put no more than four wires on any single terminal screw, anywhere. Using terminal blocks or busses allows you to avoid overloading any terminals, as you need only send one wire up to the circuit breaker in the panel.
Plus, all this extra stuff looks cool!
---------------------------------------------------
Forum Founder--No Longer Participating
Forum Founder--No Longer Participating
-
Tim
- Shipwright Extraordinaire
- Posts: 5708
- Joined: Tue Apr 01, 2003 6:39 pm
- Boat Name: Glissando
- Boat Type: Pearson Triton
- Location: Whitefield, ME
- Contact:
That's a nice wiring diagram! Can I hire you? My diagrams, if they exist at all, tend to be...um...a bit more...rustic, shall we say?Invitation wrote:Now you have me in a tight spot, there's nothing on the inside-yet. Give me a few weeks, the primary wire all shows up tomorrow and I have just a few things to install and connect. I have not finished the wiring diagram yet, it's taken me a little time to do what I have.
---------------------------------------------------
Forum Founder--No Longer Participating
Forum Founder--No Longer Participating
-
Ceasar Choppy

- Boat Obsession Medal Finalist
- Posts: 622
- Joined: Thu Mar 09, 2006 11:05 am
- Location: Port Starboard, MD
Am just reading this for the first time...
Here is what I used for terminals throughout the boat (P-39).
http://www.bluesea.com/product.asp?Prod ... 1=7463&l2=
(Can't seem to use the pic on the Blue sea web site)
Vastly simplified circuits for certain things like lights since I only had to run wire from the panel to these strategically placed throughout the boat. When I want to add a light or a fan or something, I can just run wire to these instead of wiring all the way to the panel.
Conduit
I have been a lurker on this board for some time, the wealth of information is staggering sometimes. I don't really have much to contribute but I do recall reading about a guy that used CPVC water pipe as conduit. It's pretty flexible and would blend in with most boat ineriors and I think its paintable. I con't recall how it was attached but don't think that would pose serious problems. So, it might provide a way to run wires outside the liner yet easily conceal them and then if necessary run new ones or replace something.