Gasoline smell/general A-4 questions/fresh-water cooling.

Ask a question...get an answer (or two).
bcooke
Master of the Arcane
Posts: 2272
Joined: Sat Oct 04, 2003 10:55 pm
Boat Name: Jenny
Boat Type: 1966 Pearson Triton
Location: Rowley, MA
Contact:

Post by bcooke »

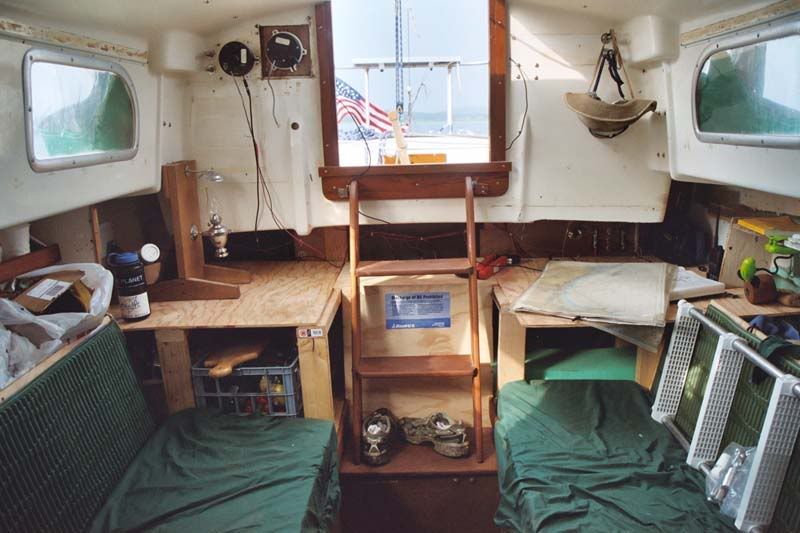
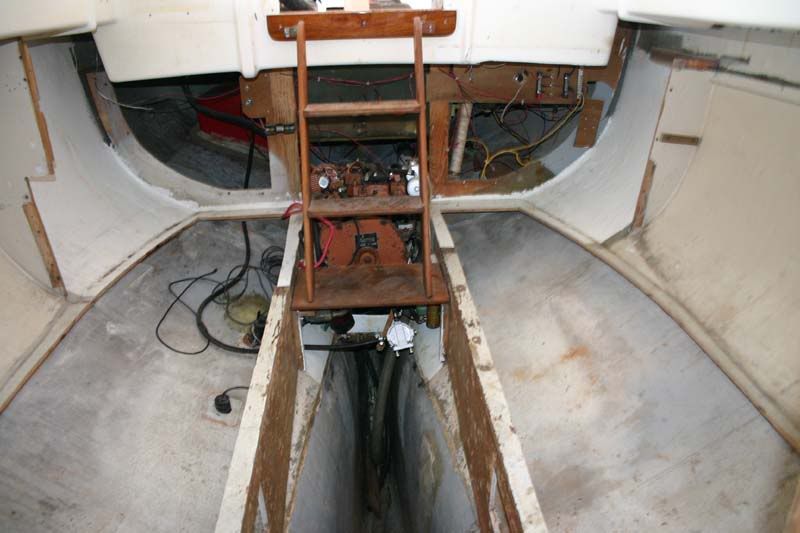
How have you people not been complaining daily and bitterly about these deep bilges and tight engine spaces?
Swing for the fences...

Image

Or fashion better access

Image

The whole carburetor is held on by a spring clamp. Disconnect the fuel hose, keeping a jar handy to catch the remaining fuel in the line, and then pull out the carburetor. You won't be smelling any gas after that. You could drain the carburetor but if the carb is leaking then you need to clean it and change the needle valve and seals (read overhaul kit). No way around it you need to overhaul the carb. Pretty simple, get one of the mechanics at the yard to guide you if you are nervous about it. I can't remember on the A4 but most carbs have a plug on the bottom for draining the fuel which is a good idea when winterizing so the fuel in the carb doesn't turn to sludge on you.
I'll hold off on my "engine ripping out" scenario
Good. Call me if you start considering it seriously again. Or just swing your hammer against your shin. That should distract you for awhile.

-Britton
-Britton
Work is overrated.

Most everything you read on the Internet is wrong.

The Website
The Blog
windrose
Candidate for Boat-Obsession Medal
Posts: 302
Joined: Mon Nov 24, 2003 8:50 am
Location: Shady Side, MD

Post by windrose »

Rachel, I hate to see you so frustrated and I certainly can relate to the feeling of thinking I might be in over my head. It is a normal part of the growing process. For several months while working on Windrose I would open up the engine compartment (with all those attachements, wires, etc) and think "oh, my!" and simply move on to something else..... but it really is a pretty simple engine as you get familiar with it and you will know what all the wires, etc. go to and why.

I agree with Britton, get the carb off and out of the boat and a clean cartridge into the external fuel filter. I think that is going to make a huge difference! Think about actually flooding the bilge with some water/cleaner, even degreaser since you're on the hard... I mean now is really your chance to REALLY clean it. GET THE MOYERS MANUAL!! It simplifies everything!!!! It walks you thru things step by step!

Most importantly, get warm!; eat well (take a good multi-vitamin) and take extra good care of yourself. You are stressing out. I know everthing seems big now, but it really isn't. You've already made it over the "high hurdles", it's all down hill from here. You also have a lot of folks pulling for you! Keep on keeping on!

Ang
s/v Wind-rose
Pearson Triton #215
West River, Chesapeake Bay
User avatar
Tim
Shipwright Extraordinaire
Posts: 5708
Joined: Tue Apr 01, 2003 6:39 pm
Boat Name: Glissando
Boat Type: Pearson Triton
Location: Whitefield, ME
Contact:

Post by Tim »

The lack of engine access on auxiliary sailboats is nearly criminal, in my opinion. I would never put up with it myself. One can say all they want about it being a sailboat and all that, but if you have an engine on board, it needs to be maintained and reliable, and this requires access. No wonder most engines and related items are neglected by their owners--the access is so poor that it's not worth the bother.

That said, one does tend to learn the tricks for getting to those seemingly impossible areas on the engine to do what needs to be done. You will too. It will still take longer than it should, and will be frustrating and knuckle-bruising, but you'll find the way. When you've had enough, then walk away and return later. Sometimes even a short break can truly make all the difference in the world to your perspective and to the success of that annoying little task, whatever it may be.

Rebuilding an engine room to increase access, even by a mere inch or two on a side, would always be a priority for me if the original space was too tight. I just don't see any reason to fight with the crammed-in spaces that come standard on most boats. Like it or not, the prudent boatowner spends plenty of time in that engine room (hopefully doing only preventative and routine maintenance), and to fight the space constantly over a long-term boat ownership is simply ridiculous.

I literally rebuilt my interior around the engine, beginning with the space I thought I needed there. It's still not huge, but I added enough extra width to make a truly practical difference. I also pulled the engine forward a bit, which drastically improves access. The A30 engine room is similar enough to that on the Triton that I think similar changes would help.

Rebuilding interiors is a big job too and shouldn't be undertaken without some serious thought first. You don't want your boat to end up a hollow shell while you're trying to live aboard. But it's worth it if fighting things is the only other option. Still, you need not worry about that right now. You must need to get launched and get some heat. Everything else can come later. Focus only on what you need to do to accomplish those two tasks, and the world will be a better place.

BTW, I have had very good luck with Simple Green as a general "boat nastiness reducer". It may be too cold there now to fill your bilge with a strong solution of Simple Green, but if you can, you may be surprised at the results.
---------------------------------------------------
Forum Founder--No Longer Participating
User avatar
Rachel
Master of the Arcane
Posts: 3044
Joined: Tue Dec 07, 2004 7:59 pm

Post by Rachel »

Okay, it's a new day, the sun's out, and it's warm in the coffee shop :-) And with the "special" solvent/fuel aroma on my jacket, I've got the comfortable couch here to myself. Thanks so much for the encouragement (obviously I'm exuding overwhelmedness with every post) and information.

Britton: There aren't really any fences left in Northern Massachusetts, are there... Please let me know if you are headed south at any time with a sledge hammer; I'm not sure right now if I'd be barring the door or throwing out the welcome mat (for the sledge hammer, that is), but give me some advance warning, okay?

Alright, today the fuel tank and the carb are coming out. I closed the boat yesterday before I went for supper and then paid close attention when I opened it back up. The fuel tank locker was definitely a source of gasoline odor. I can't for the life of me tell where it is coming from, so out she comes. Really, that tank takes up most of the locker anyway, and all for only 12 gallons, so (uh-oh, it's starting) might as well replace it. As long as I can get a tow or a nudge to a slip, I don't mind if the engine is out of commision for awhile while I get things sorted out.

The main part of the boat (the fuel tank locker is somewhat separated from the engine compartment, although there are holes for hoses and such) has a sort of .... how to describe it.... solvent/fuel smell. It's not the "hot metal grease" smell of a machine shop, and it's not pure gasonline either - although there is that component - so I'm not sure what it's from, but it's definitely engine-related. There is no liquid on the white towel I stuck under the carb/fuel pump, but when I swipe the carb I still smell gasoline so I do want to remove it.

I do plan to get the Moyer Manual, but for today I'd like to make sure I've got it right:

1) I see that there is a throttle cable and a choke cable, and it looks like those can be unscrewed from their levers on the carb.

2) There is an inverted "U" shaped loop of what I imagine is fuel line (~1/4" metal tubing) that goes from the fuel pump to the carb. It looks like it has those fittings wherein the nut is trapped on the tube (flare?). Can I just unscrew the end on the carb and then flex it a bit to get it off? Or do I need to take both ends off so I don't break it. Do I need to get something special to plug the end of it in order to keep fuel/fumes from coming out while the carb is off? Will all the fuel from the external canister filter continue to ooze/fume it's way out?

3) At the top of the carb is a diamond-shaped casting coming off what I assume is the intake manifold. Looks like I just undo the two bolts from above. Do I plug the leftover opening with something specific, or?

4) Try as I might, I can't actually see the bottom of the carb, which is supposed to have some kind of large hose clamp-type thing holding it on. I think I'll look for a small mirror at the hardware store and see if that will help. Then I need a gecko to reach in there.... Okay, the icebox just lost all of the charm I said it had when I first saw it. I can't swing for the fences presently though -- as much as I love the concept (both houses I owned were gutted back to the studs...) I need to live aboard now and plus if I do that then I might as well have bought that Tripp-Lentsch project :-) Oh, and do I stuff a rag in where the carb was, or?

**************

I'm starting to figure out what a few things are. The red-painted metal "box" I determined is the transmission. I can see the exhaust system (wrapped loop leading to a stainless box and then on back into darkness). The alternator is obvious. But one thing has me stumped: There is a black hose (~1") coming off the intake manifold that leads off basically horizontally into the area beneath the icebox, then re-emerges into the port cockpit locker, where it goes into a vented loop and then I *think* (will look with mirror later) it terminates in some kind of stainless cap inside the boat. That last bit is all mounted on the inside "wall" of the cockpit locker, in the forward end.

Okay, I'm off to read the rest of the threads and then I'll go tackle these things. By the way, I have been using Simple Green. It was the only serious looking cleaner that didn't say you HAD to rinse it off, so I grabbed it. I hate the smell because I used to have to clean the bathroom with it at a previous marina, and so I always associate it with that task, but just yesterday I saw they have Lemon Simple Green at the hardware store. I think I'll pick some up today so I can have "lemon fresh" bilges :-)

--- Rachel
CharlieJ
Wood Whisperer
Posts: 649
Joined: Fri Aug 19, 2005 7:42 pm
Location: South coast of Texas, Matagorda Bay

Post by CharlieJ »

hey Rachel- try sticking your camera back in those hard to see spots and snapping a picture- set the camera on close up if you can- Then you can just look at the pic to see what things look like.

No - don't thank me- that's what I'm here for *grin*

You do sound a bit cheerier today than you did yesterday- keep after it- it'll all come out fine gal.
Figment
Damned Because It's All Connected
Posts: 2847
Joined: Tue Apr 08, 2003 9:32 am
Boat Name: Triton
Boat Type: Grand Banks 42
Location: L.I. Sound

Post by Figment »

Rachel wrote: 1) I see that there is a throttle cable and a choke cable, and it looks like those can be unscrewed from their levers on the carb.

2) There is an inverted "U" shaped loop of what I imagine is fuel line (~1/4" metal tubing) that goes from the fuel pump to the carb. It looks like it has those fittings wherein the nut is trapped on the tube (flare?). Can I just unscrew the end on the carb and then flex it a bit to get it off? Or do I need to take both ends off so I don't break it. Do I need to get something special to plug the end of it in order to keep fuel/fumes from coming out while the carb is off? Will all the fuel from the external canister filter continue to ooze/fume it's way out?

3) At the top of the carb is a diamond-shaped casting coming off what I assume is the intake manifold. Looks like I just undo the two bolts from above. Do I plug the leftover opening with something specific, or?

4) Try as I might, I can't actually see the bottom of the carb, which is supposed to have some kind of large hose clamp-type thing holding it on.

**************

I'm starting to figure out what a few things are. The red-painted metal "box" I determined is the transmission. I can see the exhaust system (wrapped loop leading to a stainless box and then on back into darkness). The alternator is obvious. But one thing has me stumped: There is a black hose (~1") coming off the intake manifold that leads off basically horizontally into the area beneath the icebox, then re-emerges into the port cockpit locker, where it goes into a vented loop and then I *think* (will look with mirror later) it terminates in some kind of stainless cap inside the boat. That last bit is all mounted on the inside "wall" of the cockpit locker, in the forward end.
--- Rachel
1) Yes. These screws are frustrating with poor side-access, but it is as simple as it looks. Lay a clean-ish rag down alongside the engine below the work area to catch microscopic dropped screws and nuts before they bounce off three surfaces and disappear down into the chasm.

2) Yes, flared copper compression fittings. You don't need to completely disconnect both ends. Just crack the nut loose on the fuelpump end so that the tube can wiggle freely.

3) Yes, just undo those two bolts and the carb is free from the engine. I don't see any need to plug the intake with anything, but if it makes you feel better to stuff a rag up in there, I don't see any harm.

4) I have no friggin idea of what you're talking about. :)
The bolts mentioned in #3 secure the carb to the engine. After this step you'll have the carb out in your hands where you can easily become intimately familiar with everything about it. I'd recommend not separating the top and bottom halves of the carburetor until you have the rebuild kit on hand.

There may be ONE other thing to disconnect, depending on the early model or late model status of the engine. There may be a small (1/8") copper scavenge tube leading from the bottom of the carb to the side of the manifold. It's either there or it's not, and it will be perfectly obvious if it's there.

The black hose coming from the manifold (remember, it does double-duty, it's also the EXHAUST manifold) is where the coolant exits the engine. I assume that after it disappears behind the icebox it mates up with the exhaust system in some sort of an injection-elbow arrangement.

Charlie's right about the camera trick. A small digicam with an lcd display can be a VERY handy quasi-periscope.
User avatar
Rachel
Master of the Arcane
Posts: 3044
Joined: Tue Dec 07, 2004 7:59 pm

Post by Rachel »

I am happy to report that progress has been made! Sound the horns!

My two goals for today were to get the carburetor off and out, and to remove the fuel tank. I had previously tried the camera trick in order to see the carb, but it was so close to the side of the icebox, that I couldn't get a very good shot. Also, I wanted to see what I was doing as I was doing it. So, I got a 4" x 6" mirror for $1 at the Dollar Store (logically), that had a normal mirror on one side and a magnifying mirror on the other. I duct-taped it in place alongside the carburetor and "Voila!" I could see! And the space looked so LARGE (always use a magnifying mirror for this ;-) I found that reaching in wasn't nearly as cramped as it seemed when I couldn't see what I was doing. The mirror gave me such a great view! Also, I don't know where I got the idea that there was a spring clamp holding the carb on, but indeed there wasn't (although I didn't get a chance to see your comments, Figment, until just now).

Image

Here you can see the general set-up again, from before I took off the flame arrestor. I taped the mirror to that white shelf fiddle and to the red hose in the background. Worked great!

One nice thing about today is that Larry/Radicalcy - who has that sleek little Columbia Saber slipped nearby (okay, it's three feet longer than my boat, but sooo slender that it seems smaller) - came by to say "Hi" and to lend a hand. We had actually started on the fuel tank when I realized that I really did need something to plug the fill line with (the hardware store had been closed, so no plugs). He had the good idea to get some of those softwood bungs from West Marine, and while he drove off to get them I tackled the carb. I got both the throttle and choke cables off without actually taking off those little screws - I just had to loosen them a bit, then take the cables out.

Larry came back to find me just loosening the U-shaped fuel line, about to drain the "little bit" of fuel in there. I wasn't expecting a cup or so, and nearly over-filled the container I had there (crumpled-to-fit foil cake pan). Boy, was it nice to have someone to hand me down tools, oilsorbs, and extra paper towels while I tried to balance the thing without spilling. The moral support didn't hurt either, and next thing you know I had a carb in a bucket, outside the boat. Yay! While I could find no evidence of any fresh leakage, it did give a gasoline smell to any rag that was swiped against it.

A couple of questions about the fuel line and fuel pump: One is whether or not I now should remove the fuel pump. The other end of that U-shaped fuel line goes into it for one thing, and also there is a fuel cup on it - I'm guessing there is still fuel in it, but I'm not sure. If I don't remove it, I wonder how to cap off that U-shaped line. There must be gasoline still at the other end of it, but since it's a flare fitting, I'm not sure how to stop it up.

Image

The red tank was taken out in Detroit, before the boat move; it's the blue tank that was slated for removal today. The hose connections are all out of the photo to the left (forward).

Next it was back to the fuel tank project. First, I took off the copper strap holding it on, then cut the ground wire. Next step was to cut the supply line (it did NOT want to come off the barb of the shut-off, and I didn't want to disturb the rest of the fitting in case there was fuel in it). Happily, it was dry. I stuck a piece of dowel in it, clamped it off, and moved it out of the way, then did the same thing with the vent line (if there had been a third person there, we would have photos....). Then the only thing holding it in was the fill hose. Like the other lines it was genuine fuel hose, but in this case it was short and wire-reinforced. It *really* did not want to come off the filler neck and we didn't want to take it off the tank since there was stil quite a bit of fuel in the tank, and having a bit of hose on there seemed like a good way to avoid spilling. After a good bit of wrestling, and a small blood donation by Larry, we got the hose off the filler neck and bunged and clamped it. So now the tank was completely free, although it was sporting twin "trunks" of vent and filler hose.

Then the real trial began, as we tried to figure out HOW the heck to get it out of there! Hmm, this is going to require more than a bit of tipping... Larry had cleverly brought along a fuel bulb/line of the outboard motor type, along with a gas tank, so we decided to remove some of the fuel (12-gallon tank about 3/4 full). We got the tank pretty close to empty, and then were able to wrestle it out of there. I suppose it would have been possible for one person to do it by themselves, but it was sure nice to have two!

Aha! The paint on the forward end of the tank shelf was all bubbled up and even slightly wet from fuel. The tank clearly had a leak on the bottom, at the forward/outboard end. It wasn't pinholes, but looked more like it might have chafed (?). The tank was steel, with an "aluminized" coating inside -- and although it was up on wooden stringers, there was a rust spot in the leaky corner. I would never have gotten the gasoline smell out of there without removing the tank! It's amazing the fuel didn't all just run right out.

The shelf was obviously going to have to come out too - I'm sure the wood was soaked with gasoline and permanently smelly. THAT turned out to be a real pain, as the square-drive screws had their slots full of paint. Square drives are nice, but it's not as easy to get the paint out as it is with a slot. Of course they were also hard to reach, and Larry and I took turns trying to wield the screwdriver in there: You could either see what you were doing, or actually do it, but not both. The shelf looked original (the screws holding it in looked like very ordinary screws - not bronze or stainless, ahem) and had two glassed in knees supporting it, in addition to resting on - and being screwed into - the wide hull-reinforcement stringer.

I could see maybe making another shelf to the same pattern, as it would be handy for stowage; but I can't imagine reinstalling a gas tank on it. There was oodles of space underneath the shelf that you couldn't really access because of it, but that looks like it would be a good spot for a wedge-shaped tank that would sit lower down.

The bad news is that by then it was dark, so photos of the wreckage will have to wait. The good news is that the "fresh" gasoline smell in the starboard locker is gone, and the boat is much improved as well. The saloon still has a kind of "old solvent/gas" smell but I hope that some more scrubbing and another round of bilge cleaning will take care of it. I sure hope so anyway. Even now I think it would be safe to run a heater. I can't wait to go back after things have been closed up and see how it is.

Whew! What a relief! I couldn't have done it without you all :-) Thanks.

--- Rachel
User avatar
Rachel
Master of the Arcane
Posts: 3044
Joined: Tue Dec 07, 2004 7:59 pm

Post by Rachel »

One more note: I checked out the crankcase ventilation upgrade on the Indigo site. It looked like it was meant only for the other style of flame arrestor (the horizontal type), so I wrote to Indigo to inquire (I mentioned that the flame arrestor element and hose had smelled strongly of gasoline), and here's what they wrote back:

"Thanks for the inquiry. Our CVS kit does work with the early style A4s. I just have to provide you with a couple of extra pieces.

If what you are smelling is truly from gasoline, then your mechanical fuel pump is probably leaking gasoline into the crankcase. They are designed so that when the rubber diaphragm in the pump starts to leak, the gasoline goes into the crankcase with the oil instead of in the bilge. You need to check that out."

So maybe it is time to remove the fuel pump too (might as well........)

--- R.
radicalcy
Skilled Systems Installer
Posts: 176
Joined: Tue Apr 05, 2005 1:45 pm
Boat Name: AllAboutMe
Boat Type: Columbia 8.7
Location: Richmond,Va
Contact:

Post by radicalcy »

Rachel,
If you do decide to remove the fuel pump, I'm guessing that the oil will need to be drained from the engine. A question for the Atomic 4 owners...Does the fuel pump lever run ride on the crankshaft? And is the crankshaft usually submerged in the oil sump?
If gas HAS been leaking into the crankcase, the oil level may be higher than the opening for the pump lever. Because of the cold weather, the oil will be excessively thick, and really difficult to pump out. Might be prudent to wait for warm weather. JMHO.
Larry Wilson
Columbia 8.7
Columbia Sabre
CharlieJ
Wood Whisperer
Posts: 649
Joined: Fri Aug 19, 2005 7:42 pm
Location: South coast of Texas, Matagorda Bay

Post by CharlieJ »

A big YAYY from Laura, and a "That's great news", from me Grin

Now maybe you can relax, and get warm in there.
User avatar
Tim
Shipwright Extraordinaire
Posts: 5708
Joined: Tue Apr 01, 2003 6:39 pm
Boat Name: Glissando
Boat Type: Pearson Triton
Location: Whitefield, ME
Contact:

Post by Tim »

Rachel wrote:...it was dark, so photos of the wreckage will have to wait...
Excuses, excuses. Isn't that why they put flashes on cameras?

I'm happy to read of your success, though! Enjoy the clean air. A day or so will take care of any residual smell.
---------------------------------------------------
Forum Founder--No Longer Participating
Figment
Damned Because It's All Connected
Posts: 2847
Joined: Tue Apr 08, 2003 9:32 am
Boat Name: Triton
Boat Type: Grand Banks 42
Location: L.I. Sound

Post by Figment »

Removing and rebuilding (or outright replacing) the fuel pump is not a bad idea. With the replacement of the tank and lines and the carburetor work, you're most of the way into a wholesale fuel system overhaul at this point, so it makes little sense to leave a doubtful element in the middle of it all. Again, not on the critical path to your launch and happy habitation, but certainly "on The List".

The A4 (mechanical) fuel pump is driven by the camshaft via a short pushrod. It's well above oil level. Gas-diluted oil would flow out of the oil fill (that weird little flapper thing behind the alternator belt) before it ever reached the height of the fuel pump.

Yes, the fuel pump's sediment bowl will be full of nasty old fuel. Loosen the thumbwheel at the bottom of the bail to swing the bail out of the way and drop the bowl away from the housing. This is another of those operations that, while simple as can be, requires more hands than can fit in the space, so your aluminum catch-pan will come in handy once again.

If you do decide to remove the pump, I recall that the rear bolt is not so easy to access. Make life easier for yourself by pre-soaking those bolt heads in PB Blaster for a few days before you actually wrench it. (hey, the boat already vaguely smells of solvents, right?)

The indigo CCV kit bypasses the flame arrestor entirely.

Congrats on the progress (more than I got done this weekend!), and good on Larry as well for stopping by to pitch in!
windrose
Candidate for Boat-Obsession Medal
Posts: 302
Joined: Mon Nov 24, 2003 8:50 am
Location: Shady Side, MD

Post by windrose »

KUDOS!!! Now turn the heat on and make you something warm to drink/eat. Good on Larry. It is always nice to have another contortionist to assist you.
s/v Wind-rose
Pearson Triton #215
West River, Chesapeake Bay
radicalcy
Skilled Systems Installer
Posts: 176
Joined: Tue Apr 05, 2005 1:45 pm
Boat Name: AllAboutMe
Boat Type: Columbia 8.7
Location: Richmond,Va
Contact:

Post by radicalcy »

I know that in the Sailboat racing world, you aren't officially "crew" until you've spilled blood,(your own) on some working part of the particular boat you're crewing on.
Well, if Rachel's boat were a racer, I would officially be crew. I left large donations all around the lazerette and gas tank area.
It was great to meet Rachel, and get the 25 cent tour of her new home. The boat is pristine. As soon as the gasoline smell, (which was minimal by my smoker's standards) is cleared up, Rachel will have a great home.
I gave Rachel a quick tour of Wild Swan, my C-Sabre. Quick, because I didn't want her to have time to assess the truly amatuerish refit.
Rachel, it was a pleasure to meet you and the new boat. You know how to reach me next time you need a transfusion.
Larry
Larry Wilson
Columbia 8.7
Columbia Sabre
bcooke
Master of the Arcane
Posts: 2272
Joined: Sat Oct 04, 2003 10:55 pm
Boat Name: Jenny
Boat Type: 1966 Pearson Triton
Location: Rowley, MA
Contact:

Post by bcooke »

Also, I don't know where I got the idea that there was a spring clamp holding the carb on, but indeed there wasn't
Ummm...

I might have got confused with all the thousands of carbs I have seen... Oops, my bad.

As for the fuel pump, in my case I put this on the "Might as Well" list. The mechanical fuel pump works okay but the electric is better IMHO (and Universal's as they switched to electric towards the end of the production run I believe).

The electric is somewhat more reliable but what I really like is that it can be positioned remotely wherever it is easiest to maintain. I have mine out in front of the engine where my raw water and fuel filters are. One less thing to have to reach back in there for.

You might not need to replace it but it does improve the convenience factor for when you do.

Glad to hear the things are looking up. It was undoubtedly the blood sacrifice that did it. The Boat Gods like that sort of stuff.

-Britton
-Britton
Work is overrated.

Most everything you read on the Internet is wrong.

The Website
The Blog
Post Reply