How to repair wooden "rubrail" damage

This is the place to post your ideas, thoughts, questions and comments as relates to general boatbuilding and reconstruction techniques and procedures (i.e. recoring, epoxy, fiberglass, wood, etc.)
Post Reply
FloatingMoneyPit
Topside Painter
Posts: 135
Joined: Wed May 04, 2005 12:27 pm

How to repair wooden "rubrail" damage

Post by FloatingMoneyPit »

So I--er, the captain--was motoring through a very circuitous channel in an unexpectedly swift current when a green can had the nerve to jump out of the water and whack my boat while I--er, the captain--was busy tidying some lines. Fortunately the topsides were left untouched (only to be scratched up later, but that's another story), probably because the rubrail took such a beating.
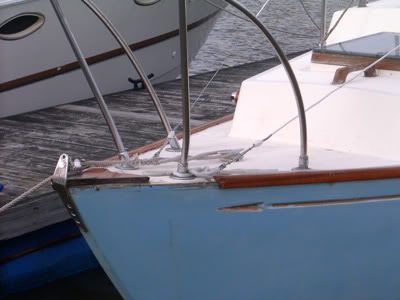
By the way, please feel free to correct my nomenclature. I'm not sure that the part I'm referring to is really a "rubrail", but it's just below what I believe is the "caprail" and I don't think gunwale would be the correct term. And it's not a toerail, since toes would never be near it thanks to the built-in bulwark created by the boat's outward flanged hull-deck joint.

How would you folks go about repairing this? I'm looking for a relatively small fix for now since it's primarily aesthetic and not structural. I guess the proper thing to do is eventually replace the entire piece of stock, but that isn't in the cards right now.
My intuitive initial approach is to make straight cuts (via dremel) around the damage and epoxy a piece of new teak in place to fit the void; it would probably have a nearly triangular shape. That way the existing length of lumber that's attached to the boat would retain its curvature and not pop off the boat. Surely someone has a better idea...

The existing structure is: outward-turning hull-deck joint, 1/2" teak caprail on top of joint, and 1/2" teak "rubrail" screwed right into the caprail. Please forgive the poor photos and the poor condition of the teak (Cetol= yuck; fading Cetol=very yuck).


Image

Image

Image
Tartan 27
Brooklyn, NY
jollyboat
Candidate for Boat-Obsession Medal
Posts: 338
Joined: Wed Mar 29, 2006 11:51 am
Boat Name: Jollyboat
Boat Type: Pearson Triton
Location: Fairfield County, CT
Contact:

Post by jollyboat »

Hey Money, there are many ways to handle this repair - it will come down to time and . . . well, money. By your post it sounds to me like you already know what it is going to take to repair this so with that said - for the other suggestions here is one. Rip thin pieces of teak in strips and fill in the area with the strips using epoxy and clamps. Once you have the area slightly over filled with new strips of teak , bust out the mini grinder and feather in the shape. Finish as needed. Obviously tape off and protect areas that could be damaged by the grinder. Quick and very dirty.
Brian
Jollyboat, Triton #466
Sepi,Triton #346 (1st, Triton)

No Quarter
Mark.Wilme
Candidate for Boat-Obsession Medal
Posts: 340
Joined: Tue Jun 20, 2006 8:35 pm
Location: MA and RI

Post by Mark.Wilme »

What was the helmsman doing while the captain was tidying the lines ?
Mark.
S/V Calypso. 2001 Beneteau Oceanis 381
Image
Not quite a plastic classic yet
User avatar
Tim
Shipwright Extraordinaire
Posts: 5708
Joined: Tue Apr 01, 2003 6:39 pm
Boat Name: Glissando
Boat Type: Pearson Triton
Location: Whitefield, ME
Contact:

Post by Tim »

Mark.Wilme wrote:What was the helmsman doing while the captain was tidying the lines ?
Obviously paying too much attention to what the captain was doing! ;<)
FloatingMoneyPit wrote:...the rubrail took such a beating...
You can do as little as you want to that rubrail, as long as you are satisfied with the aesthetics in the end. Remember that however "temporary" this repair might originally be anticipated to be, it will probably end up being relatively permanent, given how these things go. So take a little extra time and do a nice job on the repair.

Scarfing in a new piece of wood is quite straightforward. Use whatever tools you have and are comfortable with. If you like the Dremel tool, then use it. I think something like a Japanese pull saw would be better, more accurate, and easier, though. You have good access to the area in question. If you don't have one of these saws, get one. I'd recommend this "Shark Saw" as a great all-around tool that isn't so precious that you're afraid to use it, or even to keep it on board. It works great for all things.

Make your cuts nice and straight; I'd recommend angling them at 45? so that the resulting joints look like semi-intentional scarfs rather than an obviously bodged-in repair. If this is a piece of wood which has its edge grain visible at the top (which it appears to be), you could angle cut the damaged part out so that the miters are on the short dimension of the wood (the top), and slide the new piece in from the top or bottom. You could get a nice tight fit this way; the tighter the fit, the better the repair will look, and the less critical it might be to replace the whole rubrail.

If you have tight joints, use some resorcinol glue to secure the piece. Epoxy will work too, but a tight joint can squeeze so much out that it may be less effective.

Good luck!
---------------------------------------------------
Forum Founder--No Longer Participating
Summersdawn
Skilled Systems Installer
Posts: 279
Joined: Fri Nov 04, 2005 6:34 pm

Post by Summersdawn »

I would agree with Tim. Those pull saws are great for this type of work. Because the teeth have minimal rake, they don't chew up the surrounding wood. The pull saw will give you straighter cuts than the dremel. If you can match the angles on the rubrail with the angles on your scarfed in piece, and the angles are beveled into towards the top, you should be able to get a nice, tight fit.

A nice tight scarf will look good. I wouldn't worry about trying to get it to be invisible. Get the joints tight. The "old school" way of fixing damage to bright work was to put in a scarf that was shaped like a bow tie, oval, fish, etc. They made the scarf look like a feature, as opposed to trying to make it look invisible. Every time I have to scarf in a piece, I try to keep this in mind.
Rick
Summer's Dawn
24 San Juan #380
User avatar
Tim
Shipwright Extraordinaire
Posts: 5708
Joined: Tue Apr 01, 2003 6:39 pm
Boat Name: Glissando
Boat Type: Pearson Triton
Location: Whitefield, ME
Contact:

Post by Tim »

Summersdawn wrote:The "old school" way of fixing damage to bright work was to put in a scarf that was shaped like a bow tie, oval, fish, etc. They made the scarf look like a feature, as opposed to trying to make it look invisible. Every time I have to scarf in a piece, I try to keep this in mind.
One of the sayings that I adopted long ago was:

"If you can't hide it, then highlight it."
---------------------------------------------------
Forum Founder--No Longer Participating
Hirilondë
Master of the Arcane
Posts: 1317
Joined: Thu Dec 28, 2006 8:50 am
Boat Name: Hirilondë
Boat Type: 1967 Pearson Renegade
Location: Charlestown, RI

Post by Hirilondë »

Its hard to tell from the photos, but if you have a bulwark (where the topsides come up higher than the deck) then the trim on top is called a caprail. This is so even if it is made out of a couple pieces of wood and is shaped over the bulwark. A rubrail is located much lower on the topsides, often 1/4 or 1/3 of the way down to the waterline. It can be wood, but then usually also has a half oval chafe strip applied. It extends further outboard than anything else and protects the topsides and all other trim from pilings and such, though it does little to protect from cans that jump. :-0
Caprails sometimes have chafe strips as well, but that doesn't really change the nomenclature.

Just another thought that may be more than a quick fix, but might just be an alternative better than replacing everything. If you follow your caprail the entire length of the boat you may find that it is already a couple pieces scarfed together. If this is so then you can cut out and replace the damaged section using the same joint and be well withing character of the whole piece. If the cap portion and that exterior strip are multiple pieces joined over the length in different locations then you can replace portions of each in the same manner and it will look original, at least in joinery if not color. I have used both of these methods.
Dave Finnegan
builder of Spindrift 9N #521 'Wingë'
--------------------------------------------------------------------------------------------------------------------------------------------------------------------
Gresham’s Law of information: Bad information drives out good. No matter how long ago a correction for a particular error may have appeared in print or online, it never seems to catch up with the ever-widening distribution of the error.
Duncan
Candidate for Boat-Obsession Medal
Posts: 388
Joined: Fri Mar 03, 2006 7:28 am
Boat Name: Coquine
Boat Type: Cape Dory 27
Location: Montréal
Contact:

Post by Duncan »

Tim wrote:"If you can't hide it, then highlight it."
I saw this last week on a friend's refit site, which makes me think it must be true that great minds think alike:

Image

I get it about the green turtle to starboard, but I guess the loggerhead turtle was just the right shape for the port side ;)
Image
Cape Dory 10 & 27
User avatar
Rachel
Master of the Arcane
Posts: 3044
Joined: Tue Dec 07, 2004 7:59 pm

Post by Rachel »

Those turtles are really neat. How on earth do you get the turtle and the opening to match like that? (I say that not ever having even made a "football" so I'm just unaware of even the basic method.)
Figment
Damned Because It's All Connected
Posts: 2847
Joined: Tue Apr 08, 2003 9:32 am
Boat Name: Triton
Boat Type: Grand Banks 42
Location: L.I. Sound

Post by Figment »

Absent a CNC process, you get down and dirty with some very sharp chisels.

Then you order up some new eyeballs and fingers to replace the ones that fell off in the process.

(Great work, though)
Summersdawn
Skilled Systems Installer
Posts: 279
Joined: Fri Nov 04, 2005 6:34 pm

Post by Summersdawn »

It takes a master craftsman. I'm happy if a square/rectangle fits tight.
The turtle will also be bevelled in, so the harder you push it in, the tighter the fit.
Rick
Summer's Dawn
24 San Juan #380
User avatar
Ceasar Choppy
Boat Obsession Medal Finalist
Posts: 622
Joined: Thu Mar 09, 2006 11:05 am
Location: Port Starboard, MD

Post by Ceasar Choppy »

Hirilond? wrote: Just another thought that may be more than a quick fix, but might just be an alternative better than replacing everything. If you follow your caprail the entire length of the boat you may find that it is already a couple pieces scarfed together. If this is so then you can cut out and replace the damaged section using the same joint and be well withing character of the whole piece. If the cap portion and that exterior strip are multiple pieces joined over the length in different locations then you can replace portions of each in the same manner and it will look original, at least in joinery if not color. I have used both of these methods.
This is how I've seen caprails repaired before. You'll no doubt need to make a jig for the scarf ...
Duncan
Candidate for Boat-Obsession Medal
Posts: 388
Joined: Fri Mar 03, 2006 7:28 am
Boat Name: Coquine
Boat Type: Cape Dory 27
Location: Montréal
Contact:

Post by Duncan »

Rachel wrote:Those turtles are really neat.
They're perfect, aren't they? Just the fact that they aren't perfect makes them perfect.
John's site is at svazura.net

I am actually paying close attention to the original topic here, because of a similar repair to be done.

Image
Image
Cape Dory 10 & 27
User avatar
Tim
Shipwright Extraordinaire
Posts: 5708
Joined: Tue Apr 01, 2003 6:39 pm
Boat Name: Glissando
Boat Type: Pearson Triton
Location: Whitefield, ME
Contact:

Post by Tim »

Rachel wrote:Those turtles are really neat. How on earth do you get the turtle and the opening to match like that? (I say that not ever having even made a "football" so I'm just unaware of even the basic method.)
Of course this can be done by hand, and certainly always used to be. These turtles were probably hand done. This is far more admirable than the method I am about to describe, but there's no stigma (as far as I'm concerned) to using modern methods and materials when they're available.

These days, there is a really cool bit available for routers that has a guide collar with a removable bearing on the inside. Basically, you use the router with collar alone to rout out the area on the parent piece of wood, using a template that you made with a jigsaw or scrollsaw.

Then, with the area routed out, you install the bearing on the collar, and, using the same template, you rout the outline of the new filler piece, saw off the thin slab on a table saw, and insert the dutchman. It's a perfect fit every time.

The extra bearing reduces the size of the second cut just enough that it fits perfectly inside the routed area. Or maybe it's the other way around; I haven't used mine in a long time, so I forget. It'd be easy to remember if I just looked at the bit.

In any event, this simple two-step process, using a single bit and jig, makes the job easy. One is limited only by imagination and by their ability to cut decent-looking templates with a saw.

I'll try and find a link to this router bit later.
---------------------------------------------------
Forum Founder--No Longer Participating
User avatar
Rachel
Master of the Arcane
Posts: 3044
Joined: Tue Dec 07, 2004 7:59 pm

Post by Rachel »

Thanks for the (modern method) explanation, Tim. I was given a router years ago, but I've never used it. I'm just about to the tipping point though, as I've seen so many neat things you can do with one. Actually, if I had a shop I'm sure I would have tried it out already.
User avatar
Tim
Shipwright Extraordinaire
Posts: 5708
Joined: Tue Apr 01, 2003 6:39 pm
Boat Name: Glissando
Boat Type: Pearson Triton
Location: Whitefield, ME
Contact:

Post by Tim »

Rachel wrote:I was given a router years ago, but I've never used it.
I couldn't live without my routers.
---------------------------------------------------
Forum Founder--No Longer Participating
Triton 185
Skilled Systems Installer
Posts: 178
Joined: Sat Mar 31, 2007 4:38 am
Boat Type: O'day Mariner, Pearson Triton
Location: Canada

Post by Triton 185 »

FloatingMoneyPit,

Good luck with your repair. Remember to prep all teak surfaces that are to be glued with acetone prior to gluing. This procedure applies to both new and old teak.
Post Reply