I am happy to report that progress has been made! Sound the horns!
My two goals for today were to get the carburetor off and out, and to remove the fuel tank. I had previously tried the camera trick in order to see the carb, but it was so close to the side of the icebox, that I couldn't get a very good shot. Also, I wanted to see what I was doing as I was doing it. So, I got a 4" x 6" mirror for $1 at the Dollar Store (logically), that had a normal mirror on one side and a magnifying mirror on the other. I duct-taped it in place alongside the carburetor and "Voila!" I could see! And the space looked so LARGE (always use a magnifying mirror for this ;-) I found that reaching in wasn't nearly as cramped as it seemed when I couldn't see what I was doing. The mirror gave me such a great view! Also, I don't know where I got the idea that there was a spring clamp holding the carb on, but indeed there wasn't (although I didn't get a chance to see your comments, Figment, until just now).

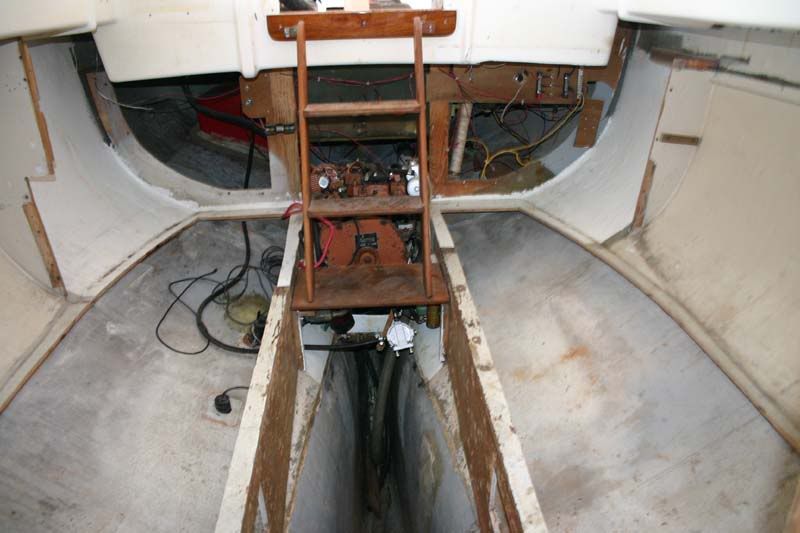
Here you can see the general set-up again, from before I took off the flame arrestor. I taped the mirror to that white shelf fiddle and to the red hose in the background. Worked great!
One nice thing about today is that Larry/Radicalcy - who has that sleek little Columbia Saber slipped nearby (okay, it's three feet longer than my boat, but sooo slender that it seems smaller) - came by to say "Hi" and to lend a hand. We had actually started on the fuel tank when I realized that I really did need something to plug the fill line with (the hardware store had been closed, so no plugs). He had the good idea to get some of those softwood bungs from West Marine, and while he drove off to get them I tackled the carb. I got both the throttle and choke cables off without actually taking off those little screws - I just had to loosen them a bit, then take the cables out.
Larry came back to find me just loosening the U-shaped fuel line, about to drain the "little bit" of fuel in there. I wasn't expecting a cup or so, and nearly over-filled the container I had there (crumpled-to-fit foil cake pan). Boy, was it nice to have someone to hand me down tools, oilsorbs, and extra paper towels while I tried to balance the thing without spilling. The moral support didn't hurt either, and next thing you know I had a carb in a bucket, outside the boat. Yay! While I could find no evidence of any fresh leakage, it did give a gasoline smell to any rag that was swiped against it.
A couple of questions about the fuel line and fuel pump: One is whether or not I now should remove the fuel pump. The other end of that U-shaped fuel line goes into it for one thing, and also there is a fuel cup on it - I'm guessing there is still fuel in it, but I'm not sure. If I don't remove it, I wonder how to cap off that U-shaped line. There must be gasoline still at the other end of it, but since it's a flare fitting, I'm not sure how to stop it up.

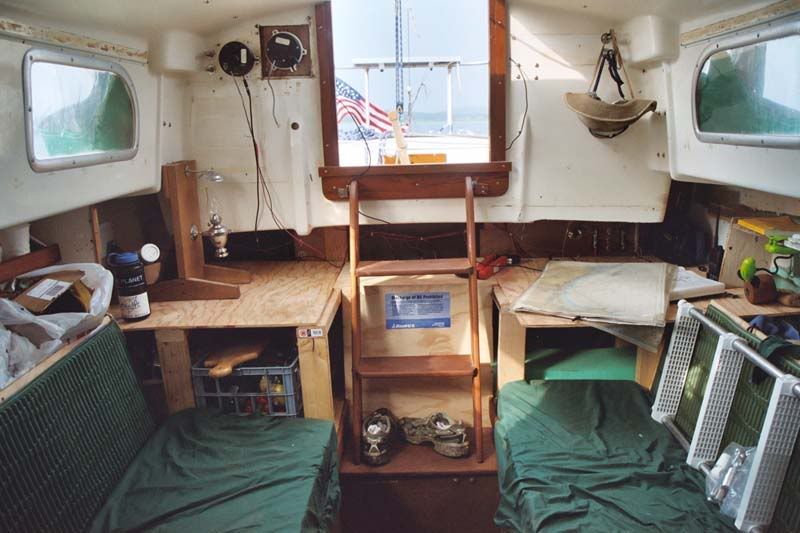
The red tank was taken out in Detroit, before the boat move; it's the blue tank that was slated for removal today. The hose connections are all out of the photo to the left (forward).
Next it was back to the fuel tank project. First, I took off the copper strap holding it on, then cut the ground wire. Next step was to cut the supply line (it did NOT want to come off the barb of the shut-off, and I didn't want to disturb the rest of the fitting in case there was fuel in it). Happily, it was dry. I stuck a piece of dowel in it, clamped it off, and moved it out of the way, then did the same thing with the vent line (if there had been a third person there, we would have photos....). Then the only thing holding it in was the fill hose. Like the other lines it was genuine fuel hose, but in this case it was short and wire-reinforced. It *really* did not want to come off the filler neck and we didn't want to take it off the tank since there was stil quite a bit of fuel in the tank, and having a bit of hose on there seemed like a good way to avoid spilling. After a good bit of wrestling, and a small blood donation by Larry, we got the hose off the filler neck and bunged and clamped it. So now the tank was completely free, although it was sporting twin "trunks" of vent and filler hose.
Then the real trial began, as we tried to figure out HOW the heck to get it out of there! Hmm, this is going to require more than a bit of tipping... Larry had cleverly brought along a fuel bulb/line of the outboard motor type, along with a gas tank, so we decided to remove some of the fuel (12-gallon tank about 3/4 full). We got the tank pretty close to empty, and then were able to wrestle it out of there. I suppose it would have been possible for one person to do it by themselves, but it was sure nice to have two!
Aha! The paint on the forward end of the tank shelf was all bubbled up and even slightly wet from fuel. The tank clearly had a leak on the bottom, at the forward/outboard end. It wasn't pinholes, but looked more like it might have chafed (?). The tank was steel, with an "aluminized" coating inside -- and although it was up on wooden stringers, there was a rust spot in the leaky corner. I would
never have gotten the gasoline smell out of there without removing the tank! It's amazing the fuel didn't all just run right out.
The shelf was obviously going to have to come out too - I'm sure the wood was soaked with gasoline and permanently smelly. THAT turned out to be a real pain, as the square-drive screws had their slots full of paint. Square drives are nice, but it's not as easy to get the paint out as it is with a slot. Of course they were also hard to reach, and Larry and I took turns trying to wield the screwdriver in there: You could either see what you were doing, or actually do it, but not both. The shelf looked original (the screws holding it in looked like very ordinary screws - not bronze or stainless, ahem) and had two glassed in knees supporting it, in addition to resting on - and being screwed into - the wide hull-reinforcement stringer.
I could see maybe making another shelf to the same pattern, as it would be handy for stowage; but I can't imagine reinstalling a gas tank on it. There was oodles of space underneath the shelf that you couldn't really access because of it, but that looks like it would be a good spot for a wedge-shaped tank that would sit lower down.
The bad news is that by then it was dark, so photos of the wreckage will have to wait. The good news is that the "fresh" gasoline smell in the starboard locker is gone, and the boat is much improved as well. The saloon still has a kind of "old solvent/gas" smell but I hope that some more scrubbing and another round of bilge cleaning will take care of it. I sure hope so anyway. Even now I think it would be safe to run a heater. I can't wait to go back after things have been closed up and see how it is.
Whew! What a relief! I couldn't have done it without you all :-) Thanks.
--- Rachel