GREYHAWK's re-fit

Post photos and descriptions of your ongoing projects here. No project is too big or too small.
Post Reply
User avatar
catamount
Candidate for Boat-Obsession Medal
Posts: 378
Joined: Sun Jun 19, 2005 7:30 am
Boat Name: GREYHAWK
Boat Type: Peterson 34
Location: Boothbay Harbor, ME
Contact:

GREYHAWK's re-fit

Post by catamount »

GREYAHWK's October 2006 Project Update

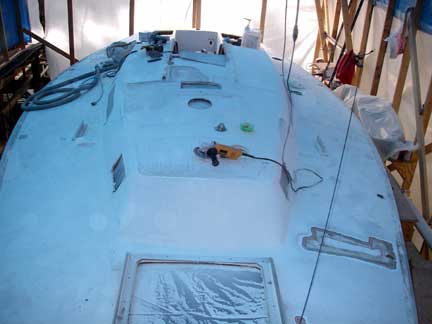
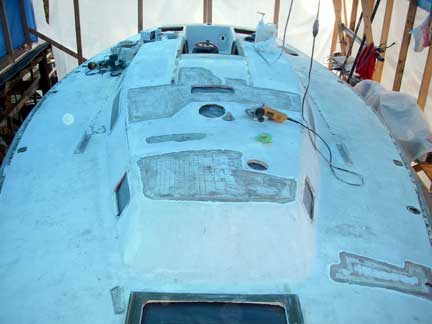
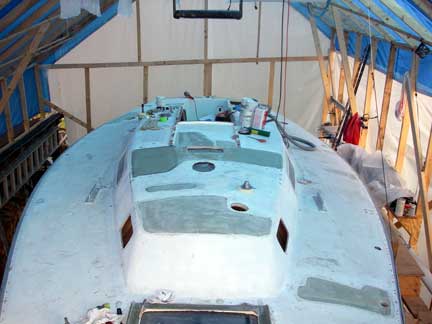
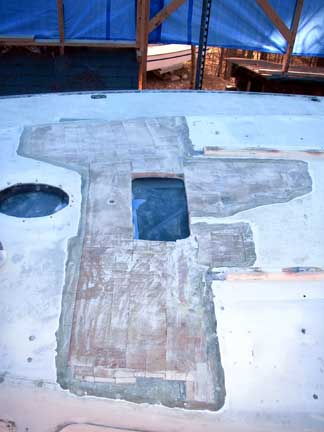
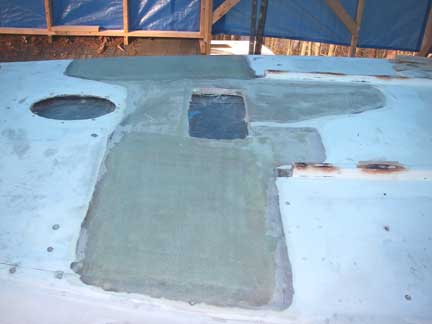
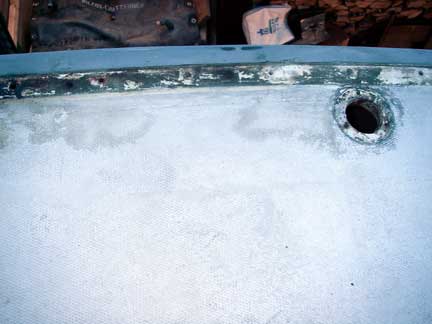
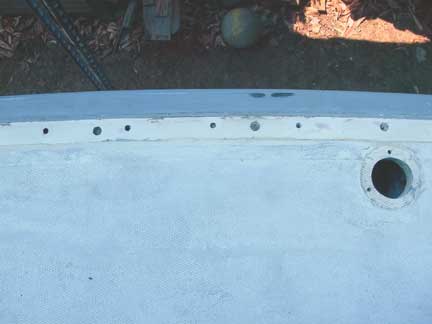
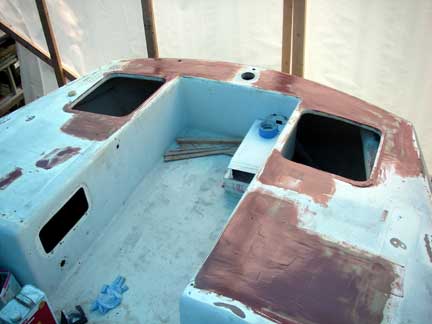
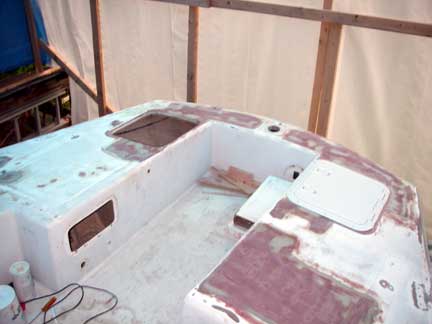
I have finally stripped all the hardware off Greyhawk's decks (except toe rails, chainplates, hydraulic panel and autopilot control head). Note that these photos have a blue overcast color due to the blue tarp covering of the boat tent; the decks are really a dirty white to grey color.

Image
Before

Image
After

Image
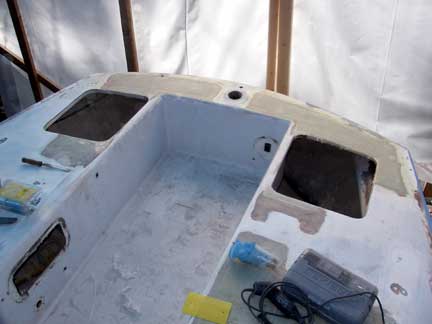
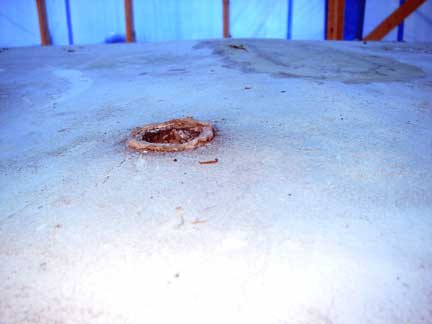
Looking aft from amidship. The large holes in the back are for Lazarette hatches (see below). The round holes to the sides are for the deck-mounted compasses.

Image
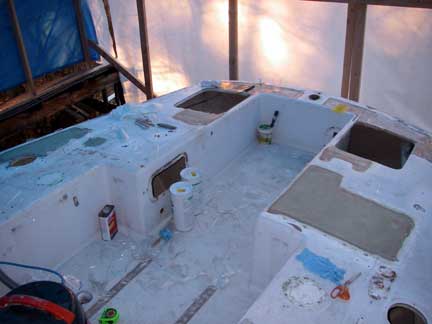
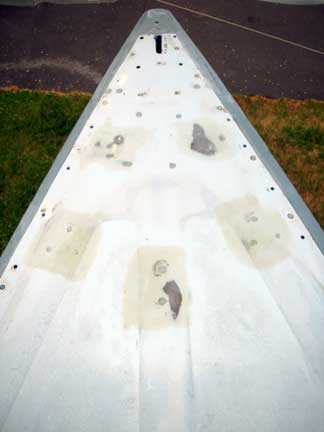
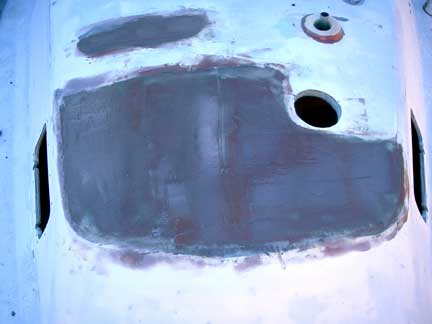
Looking foreward from amidship. The green spots are the previous owner's attempts at repairing bad coring. The hole in the foreground is the mast partners; there's also the hole I cut last spring for a solar ventilator over the head compartment.

Taking all the hardware off required pulling down the overhead to gain access to the underside of the deck. In the main cabin this was not an issue, as the vinyl was falling apart anyway; but under the side decks it was still in good condition so pulling that down was a little heart wrenching. The backside of the fabric was just a bit moldy though, and I did need access to the underside of the decks, so it had to be done. I'm not sure yet how I will replace the overhead, but it will probably involve easily removable panels instead of what was there before.

Image

All the hardware is now on a shelf on the side of the boat tent:

Image

Over the winter I'll overhaul all the winches and clean up all the hardware bits before re-installing things next spring after re-coring and re-finishing the decks. Now I've got to get to work mapping out the areas of bad core!

The toe rails will come off when I'm ready for paint, but in the meantime I'll leave them on to keep my tools (and me) from rolling off the decks. I haven't decided yet whether to pull the chainplates out (again) or just work around them (I just installed and bedded new chainplates last March). BTW, the headstay and backstay chainplates have been pulled for inspection, replacement if necessary (or just polishing), and re-bedding.

Lazarette Hatches

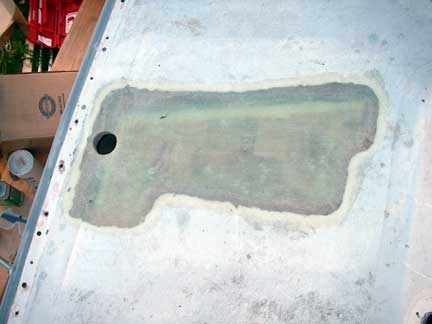
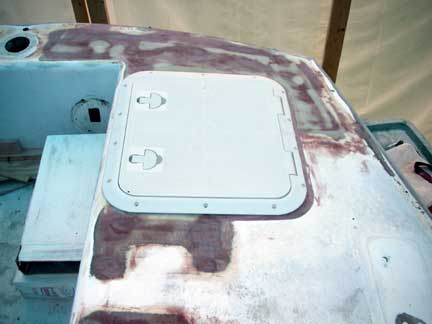
The big holes in the aft deck are where I plan to install hatches to access the Lazarette space. Originally there were "wells" here for storing man-overboard horseshoe buoys. I cut out the wells, and then layed out and then cut out for hatches:

Image

Image

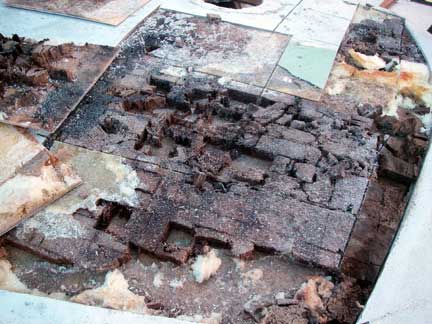
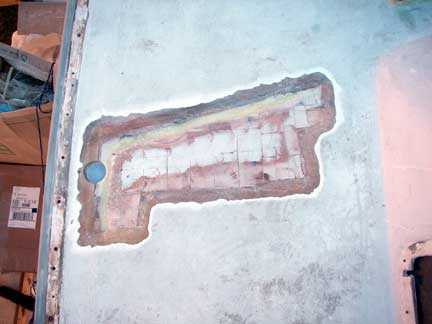
Much of the deck in this area had rotten core anyway:

Image

It will be really useful having access to this previously un-used space, although it will still be really important to keep the weight out. But for fenders and dock lines, it will be great.

Image Image

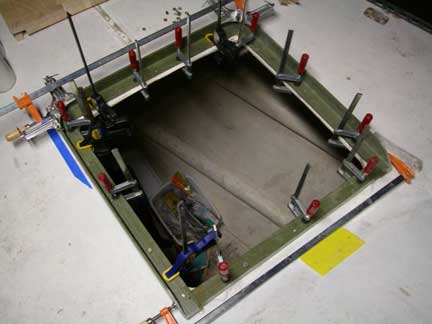
I'll have to fill portions of the cutout for the wells, which were longer than the hatches I bought, but I can use some of the good deck sections from the hatch cutouts to do that. For now, the hatches are just layed in the openings so you can see what it will look like.

Image Image

Bow

One of my projects will be to design a new bow fitting with anchor roller(s) and dock line chocks. This will be challenging because of the very narrow pointy nature of Greyhawk's bow:

Image

The slot is where the headstay chainplate comes through the deck.

Propellor Shaft Projects

Image

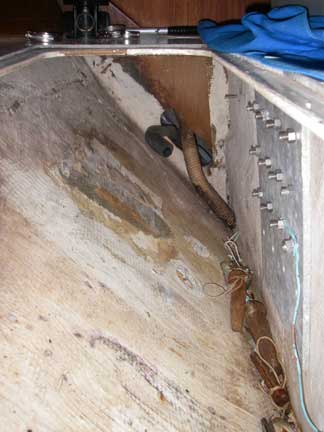
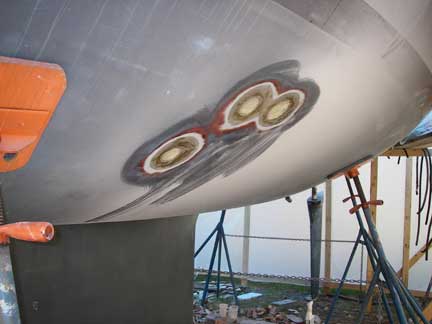
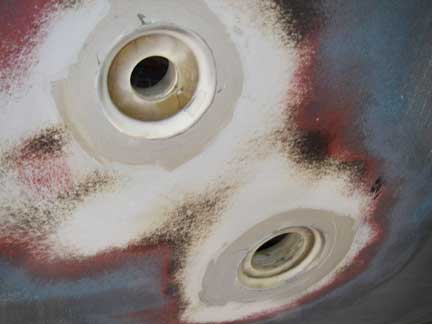
Another of the issues to be dealt with is "re-bedding" the propellor shaft support strut. When the shaft is spinning, water seeps in around the strut and through the support structure inside the boat, which looks like this (BTW, the gate valves for the cockpit drains will be replaced, and the thru-hulls need to be re-bedded too):

Image Image

The green stuff is presumably copper that has been leached from the bronze of the strut. I'm not sure whether I've got to take this all apart and re-build it, or whether just re-doing the bedding and fairing outside where the strut joins the hull will be sufficient:

Image Image

I've been struggling with the shaft coupler. The set screws that tighten it onto the shaft are rusted in place. If I can't free them, I will cut them off, and then drill them out. Then hopefully I'll be able to get the coupler off the shaft, so I can slide the shaft out in order to replace the hose connecting the stuffing-box to the shaft log. (Alternatively, I suppose I could pull the engine and transmission out, something under contemplation for other reasons anyways...)

Image

Note that the propellor came off the shaft without any fuss at all and the cutlass bearing slid out of the strut with just finger pressure after loosening the set screws. I will be sending the propellor back to Martec for re-furbishing.

Image

Rudder

The spade rudder is "wet." I don't really want to take it all apart -- although maybe I should to check the web for crevice corrosion -- but probably should at least attempt to dry it out somehow. In the mean-time, I was curious about the condition of the shaft and bearings. I had to take the tiller head off the rudder shaft anyway, so I dropped the rudder partway:

Image

Image
Close-up of Rudder Shaft where it goes into the rudder.

The shaft is supported in the boat by a solid fiberglass tube from hull to deck. The "bearings" appear to be just plastic shims between the shaft and this tube.

Image Image

Do I really want to try putting in new bearings? ....

As posted at http://sailing.thorpeallen.net/Greyhawk ... DeckStrip/
Last edited by catamount on Thu Apr 30, 2009 7:12 pm, edited 1 time in total.
Tim Allen -- 1980 Peterson 34 GREYHAWK
Harborfields Housekeeping Cottages, West Boothbay Harbor, Maine
Sailors for the Sea, a new voice for ocean conservation
Summersdawn
Skilled Systems Installer
Posts: 279
Joined: Fri Nov 04, 2005 6:34 pm

Post by Summersdawn »

Your boat looks familiar! That's what mine looked like this summer!

I envy your storage shed and staging. It would have been nice to do this in the off season, at my house, with a much more ergonomic work area. It sucks doing the work while your boat is in the water - you are always kneeling and twisting, and crawling on your hands and knees.
The shaft is supported in the boat by a solid fiberglass tube from hull to deck. The "bearings" appear to be just plastic shims between the shaft and this tube.
That is the same setup as on the 24 San Juan. Putting in bearings or bushings can be really difficult.

Does your rudder shaft have play in it? What a lot of the San Juan owners are doing is wrapping the shaft with mylar drafting film before re-inserting. It really takes the play out, it's slippery, and is softer than the fiberglass tube, allowing it to be "sacrificial".
Rick
Summer's Dawn
24 San Juan #380
User avatar
Tim
Shipwright Extraordinaire
Posts: 5708
Joined: Tue Apr 01, 2003 6:39 pm
Boat Name: Glissando
Boat Type: Pearson Triton
Location: Whitefield, ME
Contact:

Post by Tim »

Thanks for the update and photos, Tim! Nice to watch your progress.
---------------------------------------------------
Forum Founder--No Longer Participating
User avatar
catamount
Candidate for Boat-Obsession Medal
Posts: 378
Joined: Sun Jun 19, 2005 7:30 am
Boat Name: GREYHAWK
Boat Type: Peterson 34
Location: Boothbay Harbor, ME
Contact:

Re: GREYHAWK's re-fit

Post by catamount »

catamount wrote:The spade rudder is "wet." I don't really want to take it all apart -- although maybe I should to check the web for crevice corrosion -- but probably should at least attempt to dry it out somehow.
I had lunch today with a very experienced offshore sailor who suggested that if I were to go to the trouble of taking my rudder apart to check the web for corrosion, why don't I just build a new rudder instead. We also talked about emergency steering systems, and maybe my initial efforts might better be spent on building a decent transom-mounted "cassette" type emergency rudder, since some kind of emergency steering system is required by all the offshore sailing events I think about participating in someday).

Rick, as to the bearings, I don't yet see any reason to do anything different than what's there now -- the shaft is definitely not loose in the tube (if anything, it's too tight). But, when I was doing due diligence before buying my boat I looked at another Peterson 34 owned by a respected Annapolis boat yard manager. His rudder tube had apparently worn out, and so he had installed Jefa/PYI bearings, which he said was a pain -- the hardest part supposedly was finding a replacement fiberglass tube of appropriate diameter to accomodate the bearings. IIRC, he since has got PYI to standardize the OD of their bearings so that shouldn't be a problem anymore.

Regards,
Tim Allen -- 1980 Peterson 34 GREYHAWK
Harborfields Housekeeping Cottages, West Boothbay Harbor, Maine
Sailors for the Sea, a new voice for ocean conservation
User avatar
Tim
Shipwright Extraordinaire
Posts: 5708
Joined: Tue Apr 01, 2003 6:39 pm
Boat Name: Glissando
Boat Type: Pearson Triton
Location: Whitefield, ME
Contact:

Re: GREYHAWK's re-fit

Post by Tim »

catamount wrote:
catamount wrote:The spade rudder is "wet." I don't really want to take it all apart -- although maybe I should to check the web for crevice corrosion -- but probably should at least attempt to dry it out somehow.
I had lunch today with a very experienced offshore sailor who suggested that if I were to go to the trouble of taking my rudder apart to check the web for corrosion, why don't I just build a new rudder instead. We also talked about emergency steering systems, and maybe my initial efforts might better be spent on building a decent transom-mounted "cassette" type emergency rudder, since some kind of emergency steering system is required by all the offshore sailing events I think about participating in someday).
I would tend to agree with this approach. However, you can better determine your course of action if you drilled some largeish holes in your rudder in order to inspect the interior and web first, regardless of what other moves you might make later on. These inspection holes would be easy to repair if you find acceptable conditions inside; if things have deteriorated to a point where you'd be more comfortable with a new rudder, or with continuing with rebuilding the existing, you haven't wasted a lot of time and effort carefully splitting a rudder.

Note that many rudders read "wet", but the stainless webs often cause false moisture readings. Also, the lightweight foam frequently used during rudder construction will read very wet with only a small amount of moisture.

Almost every spade rudder I have ever seen either shows these signs of internal moisture, and/or contains other external evidence of delamination, freeze damage, or some combination thereof. Almost none of these issues is truly a serious concern for most boats, though potential offshore sailing requires additional prudence in terms of boat gear and equipment.

The construction of these rudders in two halves, with the shaft exiting directly through the seam at the top, often allows some level of moisture infiltration. Badly deteriorating internal webs and shafts usually show some external signs, but not always. The moisture problem is so common that a lot of people simply drill holes in the bottoms of their spade rudders to encourage draining during the off season.
---------------------------------------------------
Forum Founder--No Longer Participating
User avatar
catamount
Candidate for Boat-Obsession Medal
Posts: 378
Joined: Sun Jun 19, 2005 7:30 am
Boat Name: GREYHAWK
Boat Type: Peterson 34
Location: Boothbay Harbor, ME
Contact:

Post by catamount »

I say my rudder is "wet" because water actually seeps from the bottom of it, not from moisture readings. The surveyor actually pointed this out to me when I bought the boat in July 2005, and it had been sitting on the hard since the fall of 2004. He didn't seem too concerned about it: "...appears in serviceable condition in spite of some water oozing out of the bottom of the blade." Sounding did not indicate any delamination, and there are no other obvious signs of a problem. Some inspection and drain holes sound like the way to go for now.
Tim Allen -- 1980 Peterson 34 GREYHAWK
Harborfields Housekeeping Cottages, West Boothbay Harbor, Maine
Sailors for the Sea, a new voice for ocean conservation
User avatar
Chris Campbell
Candidate for Boat-Obsession Medal
Posts: 422
Joined: Tue Jun 06, 2006 9:18 am
Boat Name: Luna
Boat Type: Yankee 30
Location: Chester, NS
Contact:

Post by Chris Campbell »

Any chance that it's working the way it's supposed to? I know on my LeComte Northeast 38 the rudder was designed with a hole in the bottom for water to get in and back out. The builder felt that with the different expansion rates for the metal bits and the glass bits, keeping it sealed was hopeless - better to provide an exit path for the water and have it drain out when the boat is out of the water. He used bronze, though, not stainless, which is a little happier in the seawater environment.
User avatar
catamount
Candidate for Boat-Obsession Medal
Posts: 378
Joined: Sun Jun 19, 2005 7:30 am
Boat Name: GREYHAWK
Boat Type: Peterson 34
Location: Boothbay Harbor, ME
Contact:

GREYHAWK's Mid-Winter 2007 Project Update

Post by catamount »

GREYHAWK's Mid-Winter 2007 Project Update

Note that some of these photos have a blue overcast color due to the blue tarp covering of the boat tent; the decks are really a dirty white to grey color.

Deck Re-Coring

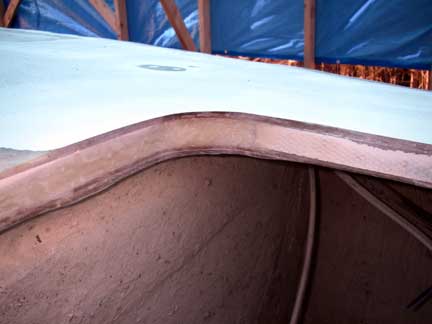
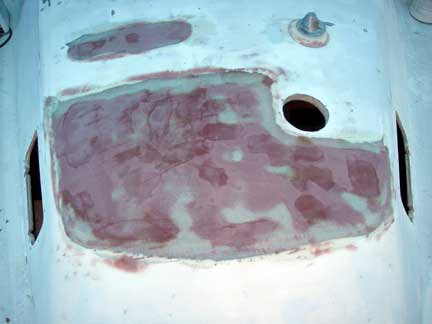
After stripping all the hardware off Greyhawk's decks in October, I began the deck re-coring project, starting with the worst areas, the forward end of the cabin trunk. I cut into the deck with my circular saw, set to cut through just the top skin. Once I had cut around a section, I would lift off the top skin, which sometimes entailed prying, chiselling, or cutting the section into smaller sections... Thus I exposed a lot of very rotten, very soggy balsa wood coring.
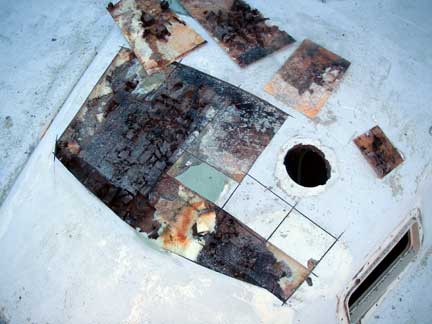
Image Image
Efforts by the previous owner at repairing the coring on the cabin house involved the use of expanding foam (Great Stuff?) to fill in some rather limited areas. This was wholly ineffective!
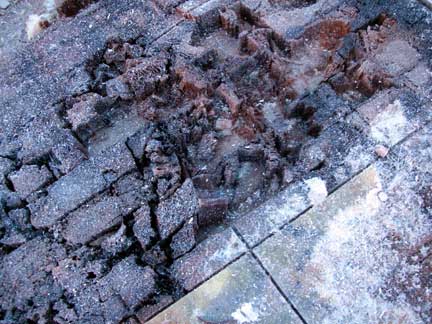
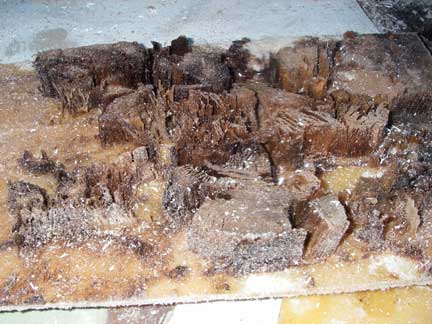
Image Image
Often the balsa was not adhered to either skin, but sometimes it came up with the top skin.

With the area opened up, I proceeded to remove all of the rotten and/or wet coring, using exploratory drilling to identify it's outer limits. I chiselled, scraped, ground, and sanded until it was all gone. Note that the coring was still dry and solid around the hole I cut in Spring 2006< for a solar ventilator over the head compartment.
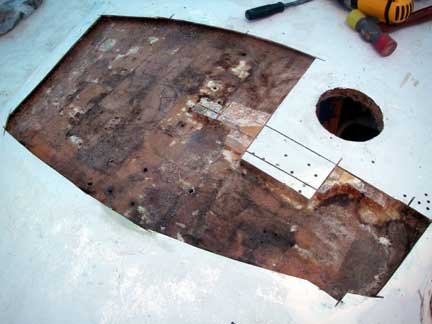
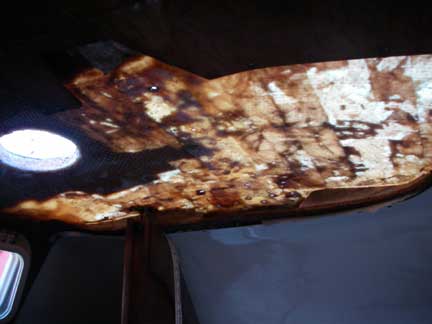
Image ImageFrom below,
the inner skin is rather translucent without any coring, paint or gelcoat!

After sanding everything smooth, and cleaning the area, I layed in some fiberglass cloth over some of the holes and weak spots, filled edges and gaps with thickened epoxy, and then glued sections of new balsa wood coring in place with more thickened epoxy.
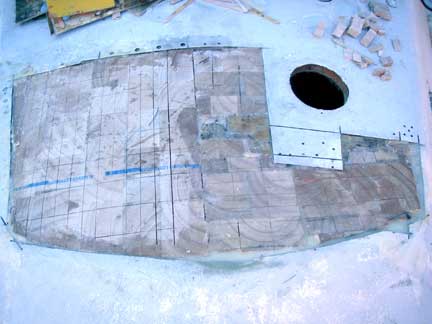
Image

I suspect that this forward part of the cabin got so bad due to a padeye at the forward end that was used for connecting a baby stay. The padeye did not have an adequate backing plate nor any tie rod, so the pull of the babystay lifted the whole area, promoting de-lamination and water intrusion.

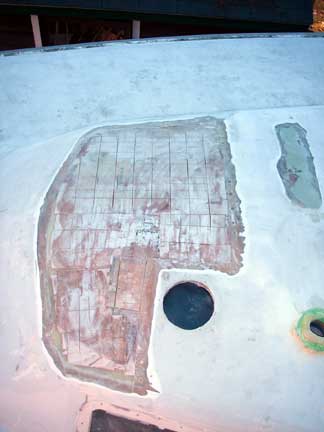
With everything set in place and filled, I turned my attention to the next worst area, the rear deck. Here, the checkstays were run to blocks blocks bolted through the deck, again without adequate backing plates. Again, the pull of the checkstays lifted the decks promoting de-lamination and water intrusion. In addition, there were numerous other fixtures attached here that could allow significant water intrusion. Furhtermore, the man-overboard horseshoe buoy wells were not particularly well-engineered, causing cracking of the deck and allowing more water intrusion.
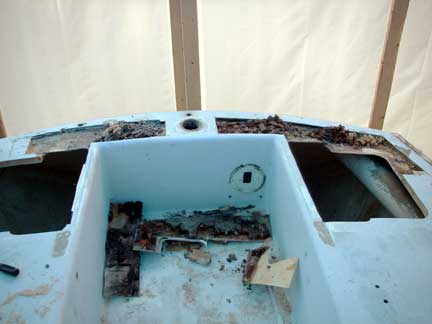
Image

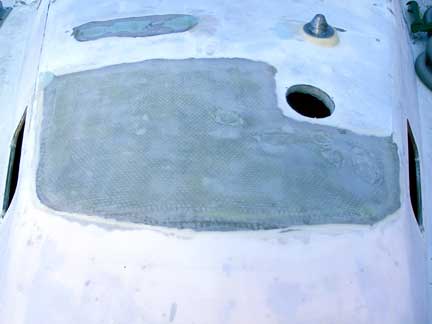
The process here was much the same as at the forward end of the cabin trunk, but first I had to lay in place some bottom skin in the areas where the wells had been. I did this by using offcuts of the old top skin, and taping them in place with multiple layers of fiberglass tape and epoxy top and bottom. Then I sanded and cleaned, filled gaps and edges, and glued down new balsa wood as before.
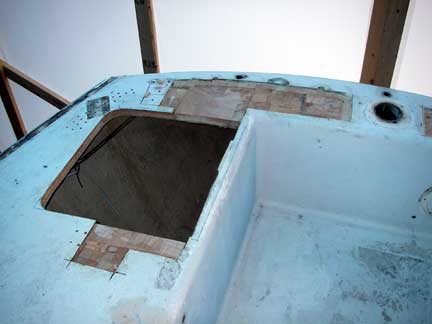
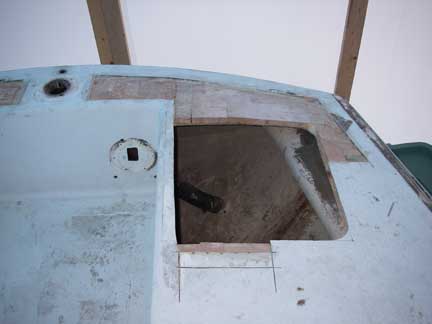
Image Image
Recall that the large holes are for new <Lazarette hatches<.

There are still several other areas of bad coring that need to be addressed, but the weather turned cold and other projects rose to the top of the list. (It's hard to sound out areas of bad and wet core when everything is frozen...). My plan is to excavate each area of bad core, and put in the new balsa,for each area, in turn, but wait until I've done the whole deck before laminating new top skins.


Heater

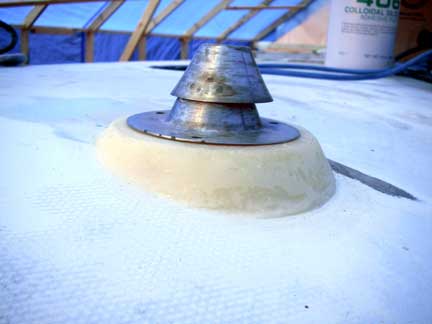
I installed the second-hand Force 10 Cozy Cabin D/K heater that my parents had given me as a "boatwarming" present. (ha ha, pun intended :). For starters, I used aluminum roof flashing as a heat shield against the bulkhead. Ultimatley, I'ld like to replace this with some stainless steel, but I don't think there's any huge hurry. I drilled a 2" hole through the deck where the 1" flue pipe will pass through. This area of the deck will require re-coring as well, so I haven't finished off the installation of the cap for the flue pipe yet. The pressure fuel tank sits neatly on the cabin sole under the heater (I still have to install the strap that holds the tank in place).
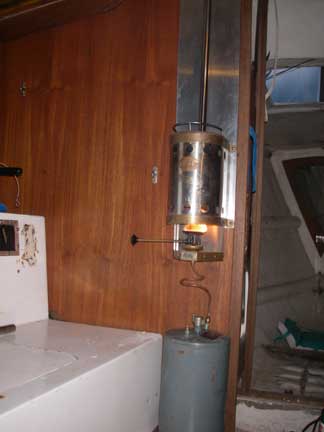
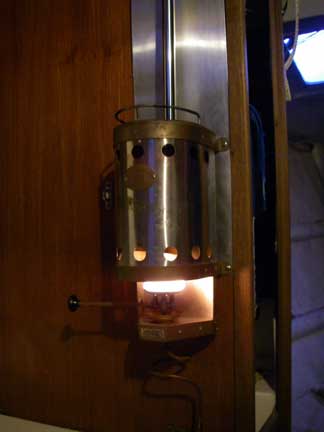
Image Image
It works! All in all, I think this will make the cabin quite cozy....


Propellor

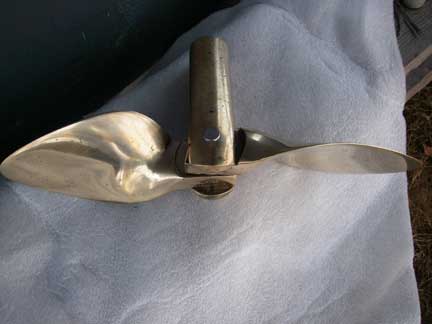
I sent my folding propellor back to its maker, Martec, for their refurbishing service. They drilled out the pivot holes for a new oversized pivot pin, re-welded the blade stops that limit the blade movement, re-balanced the blades, and polished everything up nice and shiny. Here is a before picture to go with the afters:
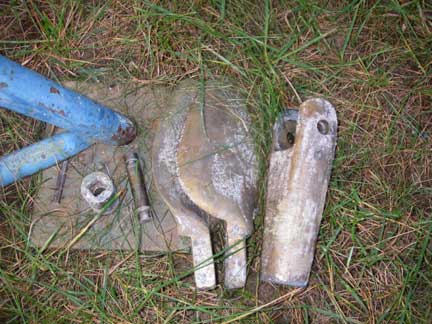
Image
the prop has been dis-assembled as part of the removal process.
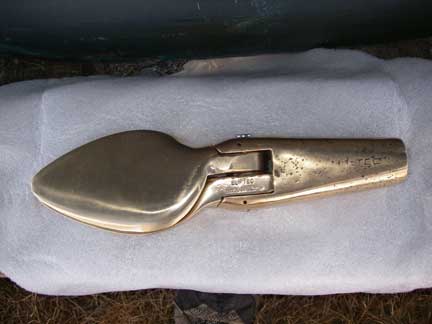
Image Image

I'm still working on removing the shaft (been drilling out the set screws from the coupling), and have to re-set the shaft support strut<, as well as replace the hose on the stuffing box.


Fuel Tank

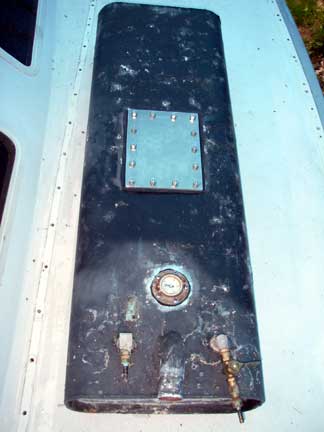
I decided to pull the fuel tank out for a thorough cleaning. In order to give it that, I cut an access hole through the top (after siphoning most of the fuel out). There was a bit of sludge, so it was a worthwhile exercise. I cleaned up the tank inside and out, and have begun work on fabricating a cover plate for the access hole. Eventually, I may replace this old coated aluminum tank (it was Renu'd) with a custom made plastic tank that makes better use of the space (12 gallons could be 16!). I will probably also add a second tank then, too, as I would like eventually to have about 25 to 30 gallons of installed capacity.
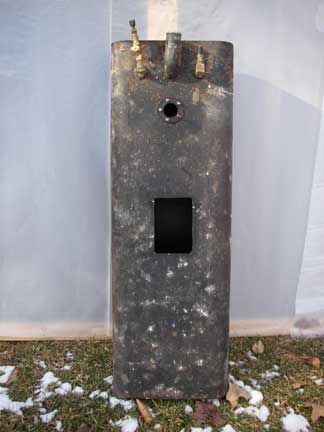
Image


Compasses

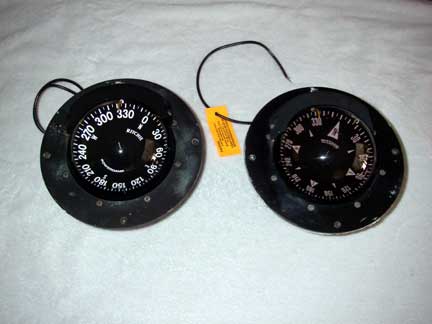
The boat came equipped with two Ritchie Globemaster F-500 flush deck mount compasses, one to port the other to starboard. On one of these the fluid was very hazy and discolored, and difficult if not impossible to read, especially at night, so I sent it off to Andrews Compass Service in Mattapoisett for rebuilding. It came back with a new card and dome as well as fresh fluid and a new light, so now it looks like a new compass. Here it is compared to what was the "good" one of my original two compasses. Now that "good" compass doesn't look so good anymore (just imagine how bad the bad one must have been!), so I've sent it off for rebuilding, too. My only regret is that the new compass card doesn't emphasize the points of the compass the way the old one did; but the numbers are much more readable, and I do steer to an azimuth (022 degrees) rather than points (N by NE).
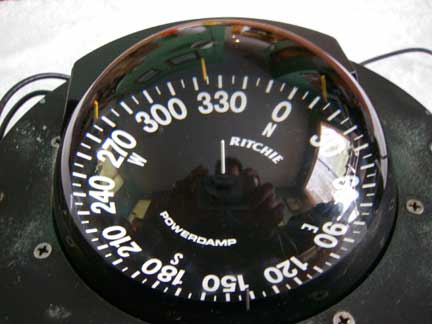
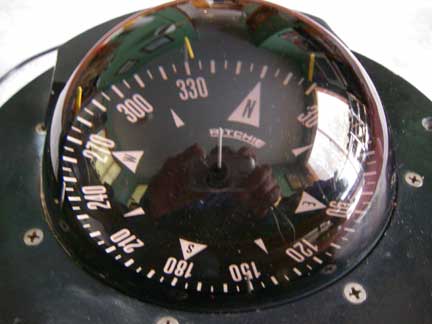
Image Image

Image
Side by Side comparison

I'll need to make some sort of covers for the compasses to protect them from the Sun when the boat is not underway, as I think that lack of such protection may have contributed to the aging of the old fluid and cards.


Pulpits

I took my bow and stern pulpits to a welder in Gilford, NH, with experience in marine stainless steel fabrication work. I had him add intermediate rails to the bow pulpit and tack on a bracket for the stern light to the stern pulpit. I also had him fabricate new bases for the stern pulpit to replace the old cast alumninum bases. Aluminum and stainless steel don't mix too well, so the old bases were falling apart. Here are new and old for comparison:
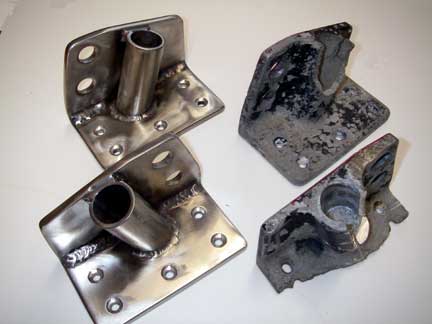
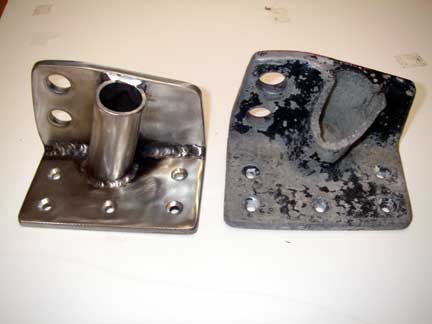
Image Image

Meanwhile, I've ordered new lifelines from Chesapeake Rigging in Annapolis, along with some other components for my rig.


Thru-Hulls

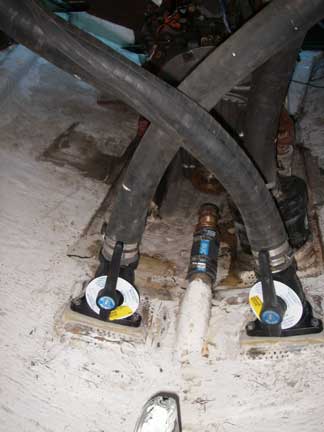
I've removed most of the thru-hulls from the boat, as many of them need new seacocks, and most of them need re-bedding. These included the two cockpit drains, the engine intake, an old instrument transducer, head discharge, sink drain, and toilet intake. The cockpit drains and head discharge were equipped with seized gate valves that will be replaced with Marelon seacocks. I will also be relocated the thru-hulls and seacocks for the head from under the settee and pilot berths, to a "newly discovered" space under the toilet, which should make them much more accessible!
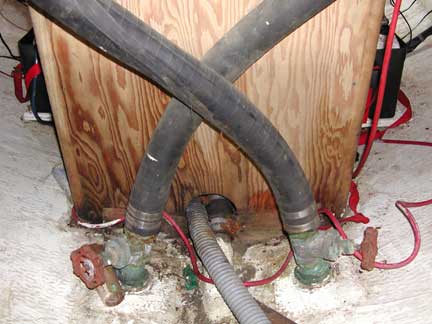
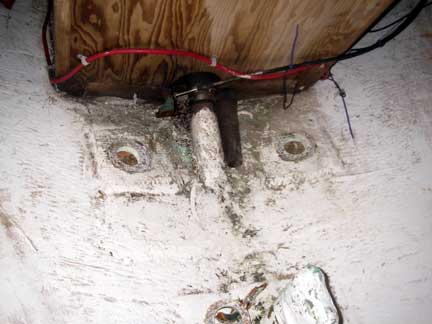
Image Image
Cockpit drains before, and after removal.
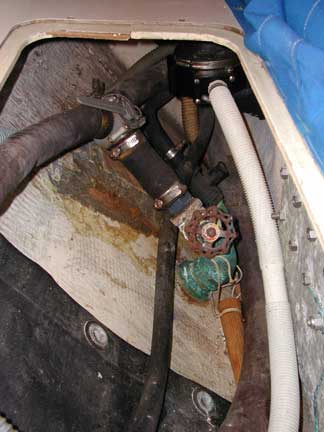
Image Image
Head discharge and toilet intake before, and after removal. Also shown is a manual bilge pump, which I have rebuilt and will be re-installing. Before, the intake and discharge hoses were just left loose; if needed, you would throw the discharge hose out a hatch, put the intake hose down into the water, and start pumping. I hope to install these hoses in a more permanent, ready-to-use state, with the discharge side run to an above the waterline thru-hull probably located near the transom.
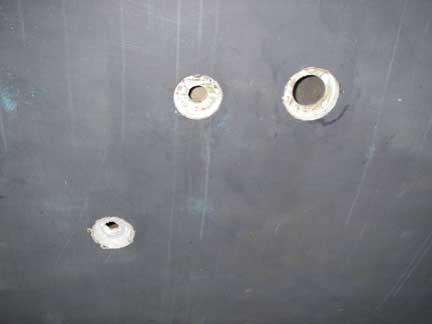
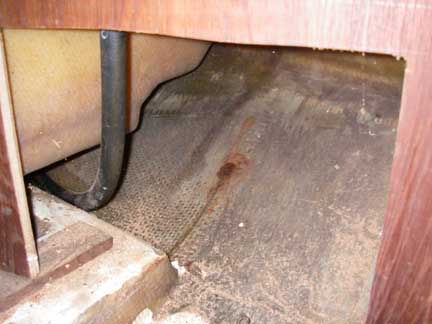
Image Image
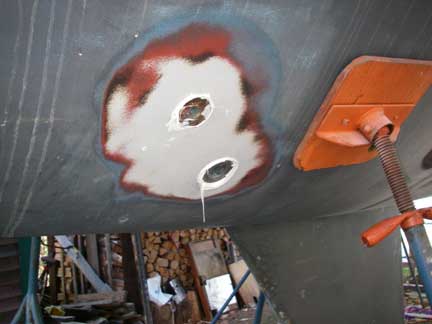
Here are the Head discharge, toilet intake, and sink drain holes from the outside, and the "new discovered" space underneath the toilet. I will re-locate these thru-hulls and seacocks to this space under the toilet, and glass over the old holes.

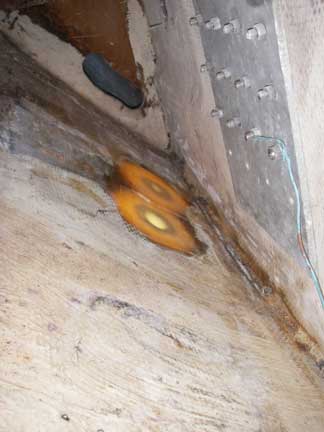
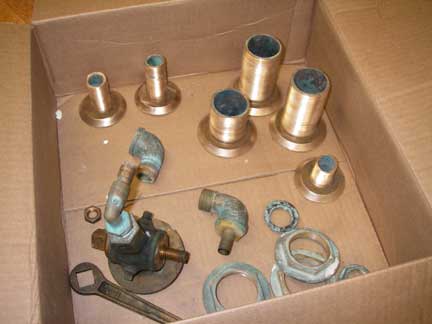
Meanwhile, I cleaned all the old grunge off the old thru-hulls with a wire wheel in my bench grinder. Also shown is the seacock for the engine intake. I'm in the process of fabricating new backing blocks for these thru-hulls out of 1/2" G10 Epoxy-Fiberglass Laminate, to replace the rotten old rings of plywood that were used originally. The G10 backing plates will be shaped and epoxied to the hull, and will make a nice flat surface upon which to mount the new seacocks, impervious to rot or corrosion.
Image


Hatch and Ports

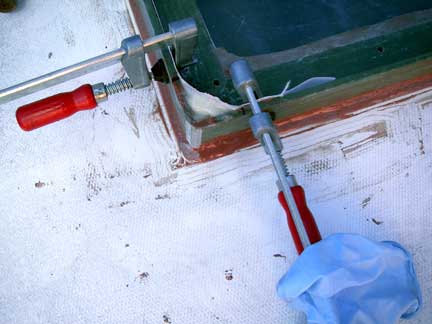
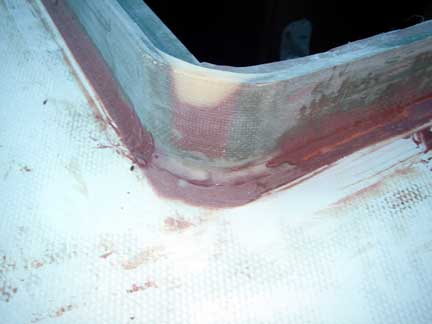
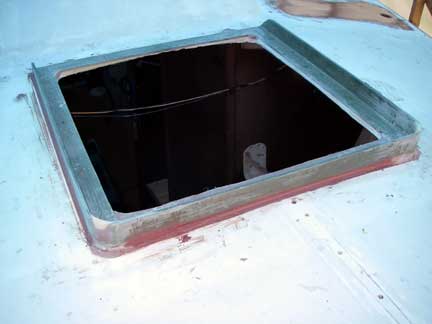
I've built a "wavestop" for the forward hatch using pre-made fiberglass angle (from McMaster-Carr). They'll be epoxied down around the existing hatch opening, and then the hatch will be bedded on top of their horizontal flange. The purpose is to deflect waves crashing across the deck from impacting the gasket of the hatch, which hopefully will keep the boat a little drier. I got the idea from Beth Leonard (Voyager's Handbook) and Evans Starzinger. While at it, I have also replaced the very worn gasket. At some point, I will need to re-do the lexan in the cover, as well.
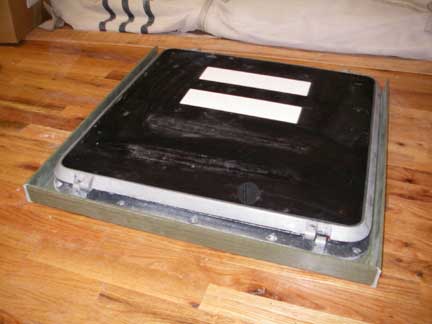
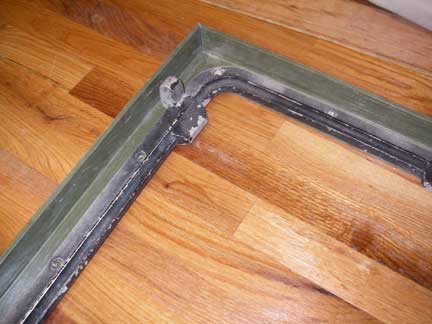
Image Image

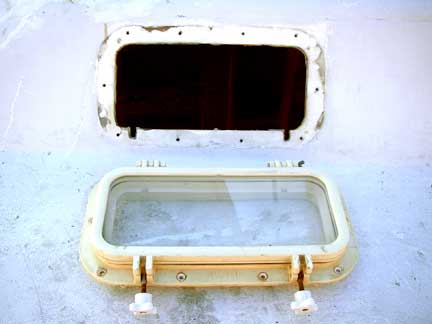
I would also like to replace the opening ports in the cabin. I will probably go with the plastic Beckson Newport RainDrain ports, as the sides of my cabin slope at about a 58 degree angle, and having the spigots drain properly is really important to us.
Image


Rigging

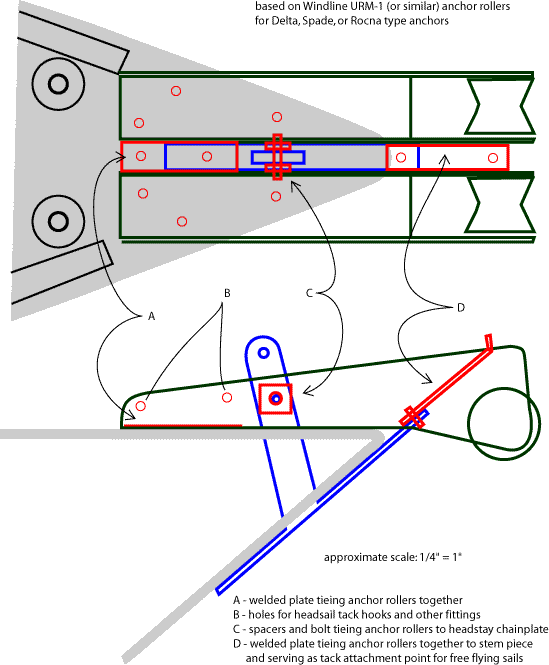
In the fall, I pulled the headstay and backstay chainplates. I think I've previously mentioned the need for a new bow fitting with anchor rollers, etc... Well, I've sent the chainplates down to my friends at Cheseapeake Rigging in Annapolis, and they're now fabricating new chainplates as well as an integrated bow fitting with anchor roller and a channel for a "prod" (a pole for tacking an asymmetric spinnaker or Code Zero ahead of the bow pulpit). The sketch below gives a general outline of what I have in mind:
Image

After all the work done on the rig last year, with these new headstay and backstay chainplates, the entire standing rig, from chainplate bolts to masthead will be "new!" (With one exception: the failsafe turnbuckle between the backstay and the hydraulic adjuster)

Chesapeake Rigging will also be providing me with all the bits and pieces I need to finish installation of a new removable inner forestay supported by running backstays, as well as new deck organizers and rope clutches, lifelines (as mentioned above), and a new Tides Marine Strong Track for the mainsail (I'll have to install the hardware on the sail, of course, but I was planning to put slugs on in any case).

As posted at: http://sailing.thorpeallen.net/Greyhawk/2007-01/

Regards,
Last edited by catamount on Thu Apr 30, 2009 7:15 pm, edited 2 times in total.
Tim Allen -- 1980 Peterson 34 GREYHAWK
Harborfields Housekeeping Cottages, West Boothbay Harbor, Maine
Sailors for the Sea, a new voice for ocean conservation
User avatar
cantstopnow
Master Varnisher
Posts: 106
Joined: Tue Nov 14, 2006 8:05 pm
Boat Name: Ariadne
Boat Type: Morgan M34
Location: Chebeague Island, ME
Contact:

Post by cantstopnow »

Thanks for catching us up on the progress.
I have been unable to devote time to my boat project for most of this winter but at least I can live vicariously through the efforts of others.
Today is a great day to Go Sailing
1966 Morgan M34 K/CB
1965 Pearson Commander
1977 kells 28
1973 Paceship PY23
1971 Compac CP 16
Figment
Damned Because It's All Connected
Posts: 2847
Joined: Tue Apr 08, 2003 9:32 am
Boat Name: Triton
Boat Type: Grand Banks 42
Location: L.I. Sound

Post by Figment »

You mentioned G10 backing plates. Were you able to find a reasonable source for less-than-whole sheets??

That Martec is friggin gorgeous!
User avatar
catamount
Candidate for Boat-Obsession Medal
Posts: 378
Joined: Sun Jun 19, 2005 7:30 am
Boat Name: GREYHAWK
Boat Type: Peterson 34
Location: Boothbay Harbor, ME
Contact:

Post by catamount »

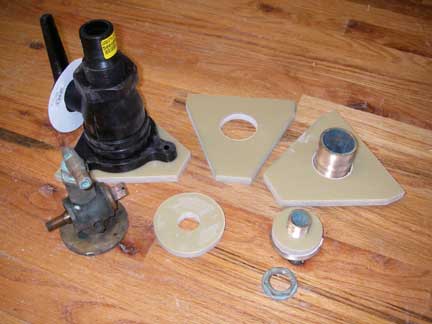
I bought a 12" x 12" piece of 1/2" thick G-10 from McMaster-Carr. It was not inexpensive!

Here's a picture of some of the backing plates. Three of my thru-hulls (cockpit drains, head discharge) are 1-1/2" size, and they'll all be getting new Marelon flange-mount seacocks. The backing plates for these had to be large enough to accommodate the seacock's flange, so to maximize my material use, I've cut them out as polygonal shapes. The rest of my thru-hulls are 3/4" size, and most of those just had Marelon ball-valves mounted to the end of the thru-hull, which is what I plan to do again. I made these backing plates at least as big as the outside flange of the thru-hull. With the extra thickness of the backing plate, and a nice tight fit, I feel there is plenty of lateral support for these smaller thru-hulls, and since they are all located in relatively protected areas of the boat's interior, I'm not too worried about not having flanged seacocks on these.

Image

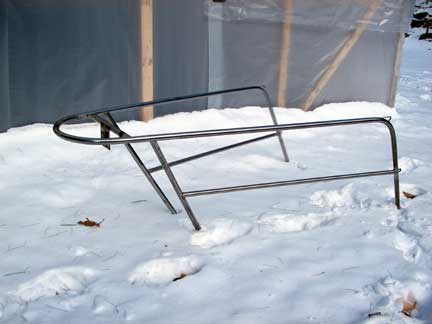
Also, while I'm at it, here's a picture of the Bow Pulpit with the newly added intermediate rails:

Image

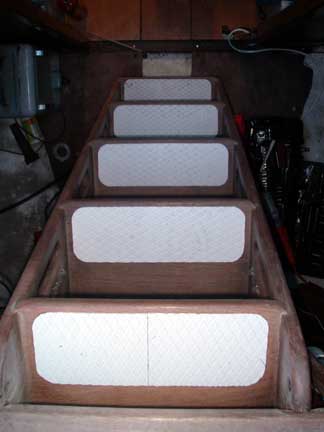
And, another project that I forgot to mention was that of replacing the non-skid treads on my companionway ladder:

Image

These I cut down from 8"x16" step pads I got at Annapolis Performance Sailing. I was able to cut out four 4" x 12" pads from one package of two step pads, and used the off cut ends to piece together another 4"x12" pad for the fifth step of the ladder. Of course, I did that to the top stop, which is the one most visible from the companionway. Perhaps, I should have done it to the bottom step...

Regards,

Tim
Last edited by catamount on Thu Apr 30, 2009 7:15 pm, edited 1 time in total.
Tim Allen -- 1980 Peterson 34 GREYHAWK
Harborfields Housekeeping Cottages, West Boothbay Harbor, Maine
Sailors for the Sea, a new voice for ocean conservation
Jedediah
Deck Grunge Scrubber
Posts: 29
Joined: Thu Nov 24, 2005 1:00 am
Location: Seattle

Post by Jedediah »

Check with your local plastics dealers. In the Seattle area Port Plastics carries a pretty good range of the standard thicknesses (up to 2" thick) and will sell pieces for much better than McMaster usually. If you need more than 2" thick it will most likely be a special production run (at least on the W. Coast--factories in OR) and won't be cheap. It also has reasonable vacuum characteristics in case you needed to know :)
Figment wrote:You mentioned G10 backing plates. Were you able to find a reasonable source for less-than-whole sheets??

That Martec is friggin gorgeous!
A30_John
Candidate for Boat-Obsession Medal
Posts: 318
Joined: Mon Nov 01, 2004 3:46 pm
Location: Maine

Post by A30_John »

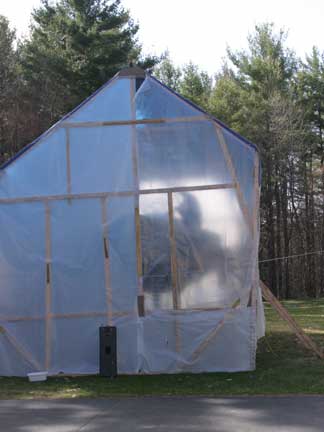
Tim, how has it been working in your boat structure in the winter? How are you maintaining temperature for your epoxy work? How is the structure holding up?
John
User avatar
catamount
Candidate for Boat-Obsession Medal
Posts: 378
Joined: Sun Jun 19, 2005 7:30 am
Boat Name: GREYHAWK
Boat Type: Peterson 34
Location: Boothbay Harbor, ME
Contact:

Post by catamount »

Hi John,

I'm sorry I didn't see your question until just recently.

I really didn't do much epoxy work over the winter, unless the outside temperatures were above 40F (which did happen occaisionally). Then I'ld set up my electric heaters to further warm up the area of the boat where I wanted to work, or rather to keep it "warm" once the sun went down or overnight while the epoxy cured.

As posted in the Tall Tent thread, the structure has held up pretty well, even through some relatively high wind events. Of course over the last several days, the winds haven't been all that strong, but they've been very gusty and swirly which has been whipping the plastic all around.

Here are a couple more pics:

Image
Me, grinding away on deck

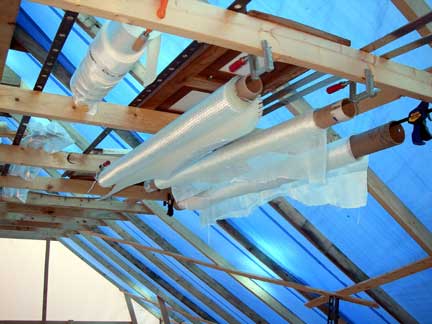
Image
Rolls of fiberglass materials suspended from my overhead storage racks

Regards,

Tim
Last edited by catamount on Thu Apr 30, 2009 7:16 pm, edited 1 time in total.
Tim Allen -- 1980 Peterson 34 GREYHAWK
Harborfields Housekeeping Cottages, West Boothbay Harbor, Maine
Sailors for the Sea, a new voice for ocean conservation
User avatar
catamount
Candidate for Boat-Obsession Medal
Posts: 378
Joined: Sun Jun 19, 2005 7:30 am
Boat Name: GREYHAWK
Boat Type: Peterson 34
Location: Boothbay Harbor, ME
Contact:

April/May Update (Part 1)

Post by catamount »

Late April/Early May Update (Part 1)

corresponding Winter Worklist Update

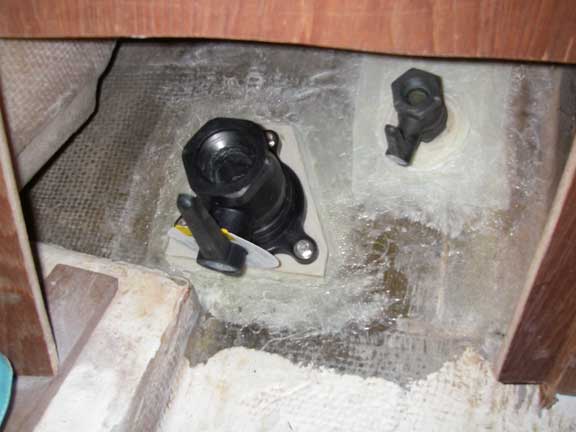
Cockpit drains Then:
Image

Cockpit drains Now:
Image

As discussed here, the backing plates are G-10 epoxied in place which have been tapped for the bolts securing the seacocks in place.

Head discharge under port pilot berth Then:
Image

Under port pilot berth Now:
Image

Space underneath toilet platform in head compartment Then:
Image

And Now:
Image

Relocating the head discharge and toilet intakes out from under the port pilot berth to under the toilet itself will make these valves much more accessible, which is important since I like to keep them closed when not in use.

Toilet and Basin discharges, and toilet intake, Then:
Image

And Now:
Image

So they have been relocated:
Image

And Now:
Image

Since my thruhulls are supposed to be flush to the outside of the hull, I had to carve and mold recesses for their heads. They are still just a little proud, though. Once the LifeCaulk has cured, I'll trim it down, and fair the area with epoxy fairing compound.


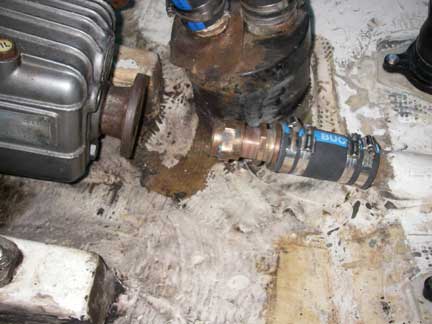
Stuffing box Then:
Image

Stuffing box Now:
Image

See prop shaft saga here.


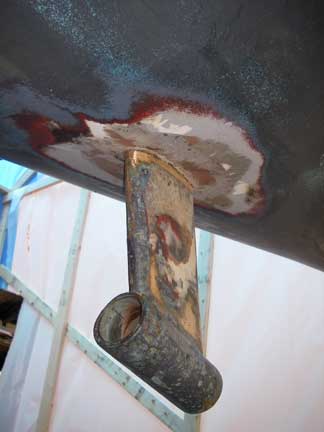
Strut-to-hull attachment Then:
Image

Strut-to-hull attachment Now:
Image

The strut appears to have been fiberglasssed to the hull (inside and out). My plan is to inject some sealant up into the gap around the strut where it goes in to the hull, and then fiberglass over it again -- the sealant being there to stop water ingress when (if?) the fiberglass ever cracks again.

Deck re-coring pics coming soon.
Last edited by catamount on Thu Apr 30, 2009 7:16 pm, edited 5 times in total.
Tim Allen -- 1980 Peterson 34 GREYHAWK
Harborfields Housekeeping Cottages, West Boothbay Harbor, Maine
Sailors for the Sea, a new voice for ocean conservation
A30_John
Candidate for Boat-Obsession Medal
Posts: 318
Joined: Mon Nov 01, 2004 3:46 pm
Location: Maine

Post by A30_John »

Image

Woo, that's a hefty snowfall you got down there.. have you found your boat yet? ;-)

I like your overhead storage racks for the glass.. very clever!
John
dasein668
Boateg
Posts: 1637
Joined: Thu Apr 03, 2003 9:09 am
Boat Name: Dasein
Boat Type: Pearson Triton 668
Location: Portland, Maine
Contact:

Post by dasein668 »

catamount wrote:Image
That's alot of snow! The boat is buried, and only the pulpit is still showing!
Figment
Damned Because It's All Connected
Posts: 2847
Joined: Tue Apr 08, 2003 9:32 am
Boat Name: Triton
Boat Type: Grand Banks 42
Location: L.I. Sound

Post by Figment »

Are the thruhulls bronze or plastic?
There's no shame in shaving a bit off the proud surface of the thru-hull.
(not that a schmear of fairing compound is the end of the world)

That's a good bit of work.
User avatar
catamount
Candidate for Boat-Obsession Medal
Posts: 378
Joined: Sun Jun 19, 2005 7:30 am
Boat Name: GREYHAWK
Boat Type: Peterson 34
Location: Boothbay Harbor, ME
Contact:

Post by catamount »

Figment wrote:Are the thruhulls bronze or plastic?
There's no shame in shaving a bit off the proud surface of the thru-hull.
(not that a schmear of fairing compound is the end of the world)
Bronze, and yeah I'll probably grind a little off of them in the fairing process.

It was a bit tricky because the place where I relocated them has more curvature to the hull than where they came out of. Getting the face of the thru-hull to follow the curve of the hull AND be parallel to the backing plate (so the seacock flange would sit flat) was "fun" (and it's far from perfect).
Tim Allen -- 1980 Peterson 34 GREYHAWK
Harborfields Housekeeping Cottages, West Boothbay Harbor, Maine
Sailors for the Sea, a new voice for ocean conservation
User avatar
catamount
Candidate for Boat-Obsession Medal
Posts: 378
Joined: Sun Jun 19, 2005 7:30 am
Boat Name: GREYHAWK
Boat Type: Peterson 34
Location: Boothbay Harbor, ME
Contact:

Post by catamount »

A30_John wrote:Woo, that's a hefty snowfall you got down there.. have you found your boat yet? ;-)
dasein668 wrote:That's alot of snow! The boat is buried, and only the pulpit is still showing!
Yeah, and if I took that picture now, you guys would be talking about how tall my grass has grown and that I need to get the weed wacker out to get to the boat! ;-)
Tim Allen -- 1980 Peterson 34 GREYHAWK
Harborfields Housekeeping Cottages, West Boothbay Harbor, Maine
Sailors for the Sea, a new voice for ocean conservation
User avatar
catamount
Candidate for Boat-Obsession Medal
Posts: 378
Joined: Sun Jun 19, 2005 7:30 am
Boat Name: GREYHAWK
Boat Type: Peterson 34
Location: Boothbay Harbor, ME
Contact:

Post by catamount »

Late April/Early May Update, part 2

Deck Recoring

Overview

Then:
Image

Covered in Dust:
Image

Recoring Done:
Image

Now (Skin Lamination Done):
Image


Cockpit Area

Then:
Image

Now:
Image

And here's an in-progress pic:
Image


Exposed Core Edges

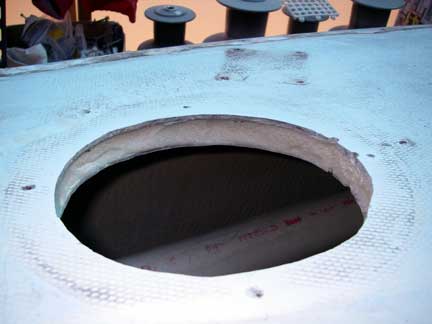
One important task was the filling of all exposed core edges around penetrations through the deck, such as for the lazarette hatches:
Image

and the two deck mounted compasses:
Image

and similarly for the vent opening forward. I used a dado bit in my router to mill out the coring around these openings, and then filled with silica-thickened epoxy, or around the hatches (where it's straight) I glued in strips of the old deck fiberglass skins ripped from areas that are being re-cored (and re-skinned).


Cabintop

Then:
Image

Recoring Done:
Image

Now (Skin Lamination Done):
Image


More Cabintop

Then:
Image

Recoring Done:
Image

Now: (Skin Lamination Done):
Image

See this other thread for discussion of the frost heaves that occurred in the above area...

Side deck around pump-out fitting

Recoring Done:
Image

Now (Skin Lamination Done):
Image

All told, the re-coring used about 15 square feet of 3/4-inch Balsa contour-kore, over 5 yards of woven roving, probably a similar amount of fiberglass cloth, a couple gallons of Epoxy, and lots of gloves and mixing cups, etc....

Despite all these areas of bad deck coring, I've been generally impressed with how well built this boat is (the rotten coring mostly has to do with hardware installation and maintenance, not so much initial build).


Toe Rails Removed

Dirty:
Image

Clean:
Image

It's amazing the sense of security you can get from a one-inch high toe-rail when you are working on the deck, over ten feet off the ground, which you only realize once they are gone!


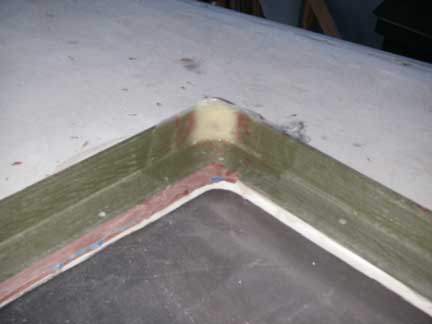
Forward Hatch Wavestopper

Image

Image

Image

I'll be grinding the outside of the corners to match the radius I've molded to the insides, and then will apply fiberglass tape to reinforce.


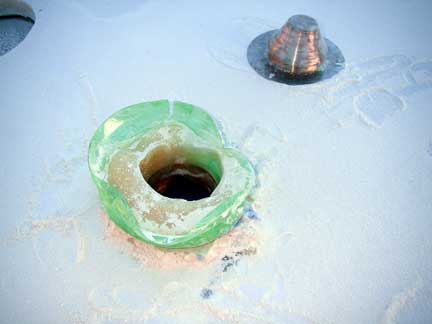
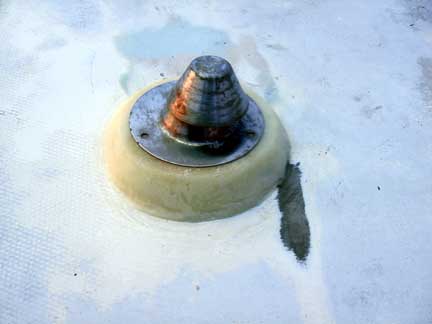
Chimney Cap

Image

I attempted to use part of a soda bottle as a mold, but the resin pour got too hot and melted the bottle. I ground what was left to shape and finished sculpted with more silica-thickened epoxy, which after sanding got me to this:

Image

Image

I think that brings you all up to date now. Gotta get back to work! (final details, sanding, fairing, cleaning, sanding, prep for painting, etc...)

Regards,

Tim
Last edited by catamount on Thu Apr 30, 2009 7:18 pm, edited 1 time in total.
Tim Allen -- 1980 Peterson 34 GREYHAWK
Harborfields Housekeeping Cottages, West Boothbay Harbor, Maine
Sailors for the Sea, a new voice for ocean conservation
User avatar
catamount
Candidate for Boat-Obsession Medal
Posts: 378
Joined: Sun Jun 19, 2005 7:30 am
Boat Name: GREYHAWK
Boat Type: Peterson 34
Location: Boothbay Harbor, ME
Contact:

Post by catamount »

GREYHAWK's Refit
May 2007 Update

A month ago, I had hoped to have the decks all painted and be starting on hardware installation at this time, but those hopes were just TOO optimistic.

There really are a lot of details to be attended to in preparing for paint!

Here's an update on some of those details that have received attention over the past month:

(a) Sealed and reinforced a number of holes on the foredeck, particularly where the bow pulpit attaches:

Image


(b) Finished off the corners of the forward hatch "wavestopper" and have faired in the join to the deck:

Image

Image

It may look a bit ungainly now, but once it's painted and the hatch itself is installed, I don't think it will look so out of place anymore.

(c) Modified the cut-outs in the cabin sides for new opening ports, which are of slightly different dimensions than the old ports:

Image

Image


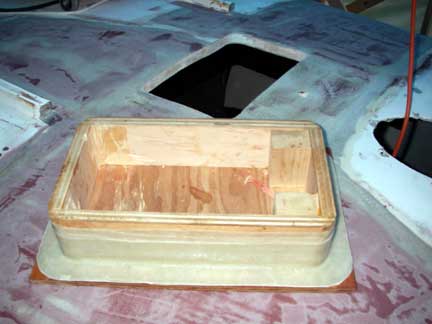
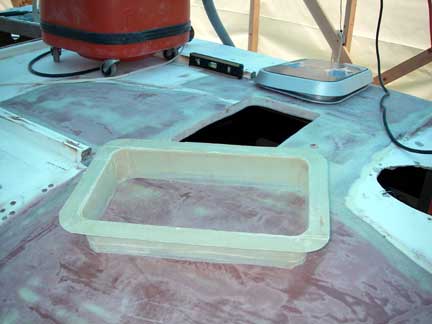
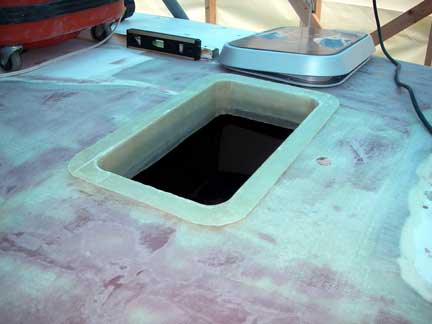
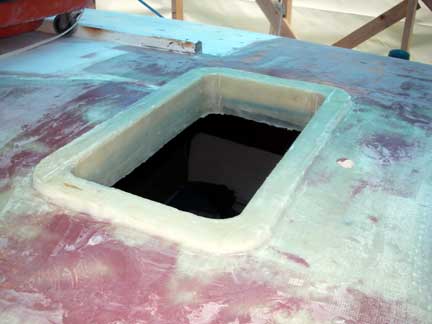
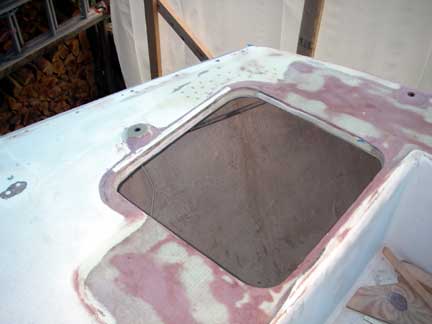
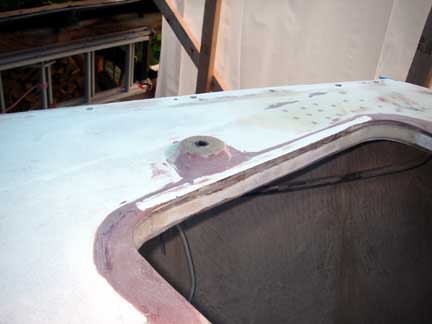
(d) Molded and installed a flange to accommodate the new ventilation hatch in the cabin top. The purposes of this flange are to provide a level base for installing the ventialation hatch, to give a more attractive lining opening through the deck and overhead, and to help seal and protect the exposed coring in the deck around the opening.

I built a mold for the flange out of plywood, covered it in epoxy, and then waxed it before doing the layup of the flange:

Image

Still, I had to de-construct the mold in oder to get the flange free:

Image

Here, it is dry fit into the opening. You can see the Lewmar Ocean series hatch in the background:

Image

And finally, epoxied in place, with all gaps filled:

Image


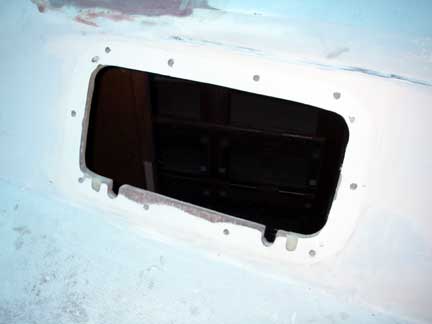
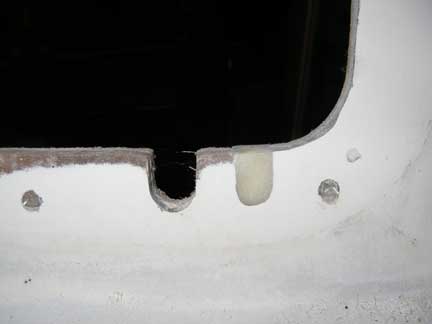
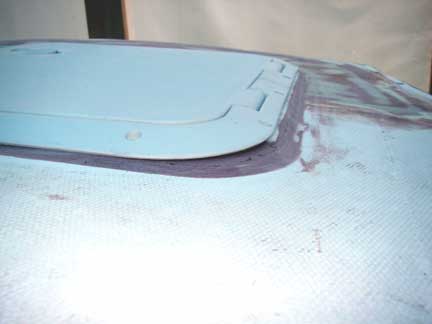
(e) In the process of fairing the aft decks and areas around the new lazarette hatches, I had to build up a rim around part of the hatch openings, to account for the crown in the decks so that the hatches would remain flat:

Image

Image

Image


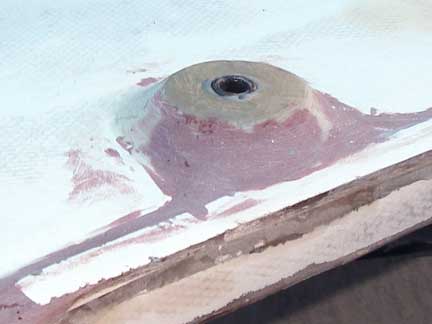
(f) On the starboard side, I had to relocate the socket fitting for my ST4000 Tiller Pilot. This was originally set into the deck just about in the middle of where the hatch opening is now. So, I had to move it outboard 10" (adding 10" of extension rods to the arm of the Tiller Pilot). But I had to raise the socket up off the deck as well, both because the deck is slightly crowned and to accommodate the height of the hatch that would installed there. Here's what I came up with (based on a disc of 1/2" G-10 left over from making my seacock backing plates):

Image

Image


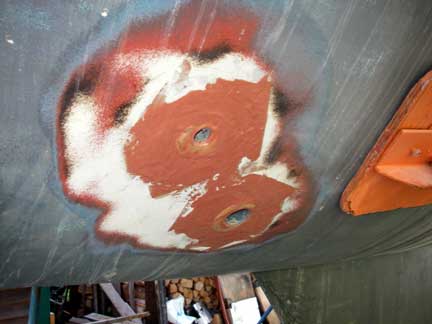
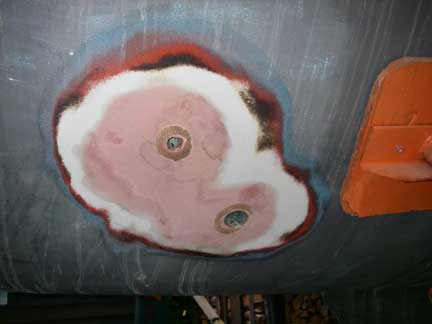
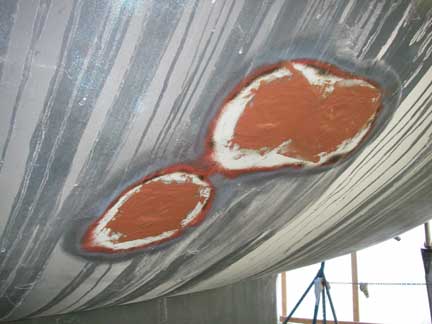
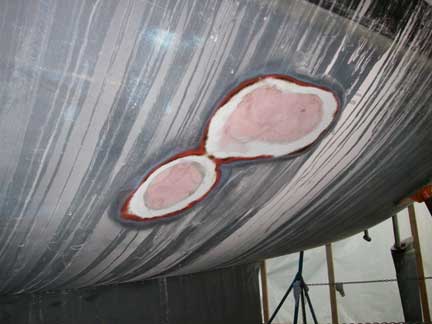
(g) As I showed you before, I had moved the thru-hulls for the head. Now, I've just about finished fairing them in (and fairing in their old holes). I also completed re-installation of the engine intake seacock with a new g-10 backing plate epoxied in place. (I had left it out when re-installing the other seacocks back in April, as I wanted to scrub down the engine compartment, and the wash water could drain out the hole for the intake seacock more easily without the backing plate in place).

Image

Image

Image

Image

This fairing business takes several applications to get all the hollows filled, doesn't it?


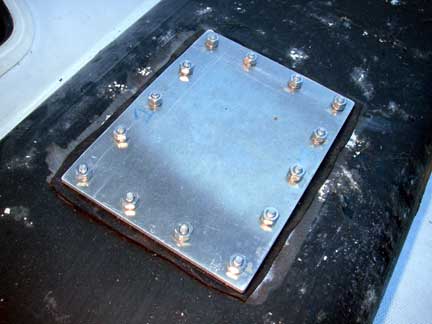
(h) In between various fairing projects, I also finished machining the cover plate for the access hole I had cut in the top of my diesel fuel tank, and got that installed.

Image

Image


(i) The biggest task has been fairing and sanding, fairing and sanding, and fairing and sanding, all the areas on the deck that I had opened up for re-coring. I still have a round or two of fairing and sanding on a couple of the areas before I think I'll be ready to try putting down some primer to see how it all looks.

Image

Image

Image

Image


Not shown, but I spent a good day or three just washing the decks, scrubbing with a stiff wire brush. Quite a lot of dirt came out! And it could use another wash, still! I also scrubbed down the engine compartment, and the locker where the fuel tank goes (it was basically black with grunge, now it's kind of tan -- not quite white, yet).

A whole day was dedicated to removing old bedding, including the silicone around the old plastic ports; I used a lot of BoatLife "Release," a sharp chisel and a lot of elbow grease...

I spent another whole day just drilling out old hardware mounting holes on the cabin top and filling them with thickened epoxy! I also took apart the counter and cabinets in the head compartment so that I will be able to fit the new holding tank in (once I've built it!).

Last month, I had still been holding out hope that we would be ready to launch in early July.... But we're going off on vacation with the Mother-In-Law the last week in June, and then we'll be crewing on another sailboat delivery from Annapolis to Maine the first week in July, and given my desire to make sure I've dotted all my i's and crossed all my t's before putting paint to the decks (etc...), we've pretty much decided to not launch GREYHAWK this year. So we'll be re-commissioning QUASAR, our San Juan 21, for our sailing fix this season instead. Work will continue on GREYHAWK's refit throughout...

Regards,

Tim
Last edited by catamount on Thu Apr 30, 2009 7:19 pm, edited 1 time in total.
Tim Allen -- 1980 Peterson 34 GREYHAWK
Harborfields Housekeeping Cottages, West Boothbay Harbor, Maine
Sailors for the Sea, a new voice for ocean conservation
User avatar
Rachel
Master of the Arcane
Posts: 3044
Joined: Tue Dec 07, 2004 7:59 pm

Post by Rachel »

Nice work and a great update! I've mentally filed away a few ideas on how you used that frp "angle," made the flange, etc. for future reference.

Rachel
Post Reply